Elden Ring Boss Locations + How To Beat Them


You can usually feel Elden Ring’s eerie charm through its vast open world and challenging gameplay. Bosses add to the experience, asking players to master their movement and combat techniques. Knowing Elden Ring boss locations can make your playthrough much smoother. As you prepare to face these formidable foes, remember the importance of Sacred Tears for strong healing.
After all, the Lands Between’s powerful bosses create a mystical aura that begs you to brave a rewarding and punishing world. There are 15 main bosses you need to defeat to progress the story, each with unique movesets and lore behind them. In this article, we highlight their location and the rewards obtained upon defeating them.
Elden Ring Bosses in Order
As you progress the game’s narrative, level up, and discover new locations, this boss order in Elden Ring will give you a quick glance over what to expect from the main game and what you can expect from the Lands Between.
All Elden Ring boss locations are usually good to know, even if you’ve been playing the game for a while, as they’ll help you set further goals. These are the main bosses you’ll need to defeat to progress the narrative:
- Margit the Fell Omen
- Godrick the Grafted
- Red Wolf of Radagon
- Rennala, Queen of the Full Moon
- God-devouring Serpent / Rykard, Lord of Blasphemy
- Starscourge Radahn
- Draconic Tree Sentinel (Capital Outskirts)
- Godfrey, First Elden Lord
- Morgott, the Omen King
- Fire Giant
- Godskin Duo
- Mliketh, the Black Blade
- Sir Gideon Ofnir, the All-Knowing
- Godfrey, First Elden Lord / Hoarah Loux
- Radagon of the Golden order / Elden Beast
Limgrave
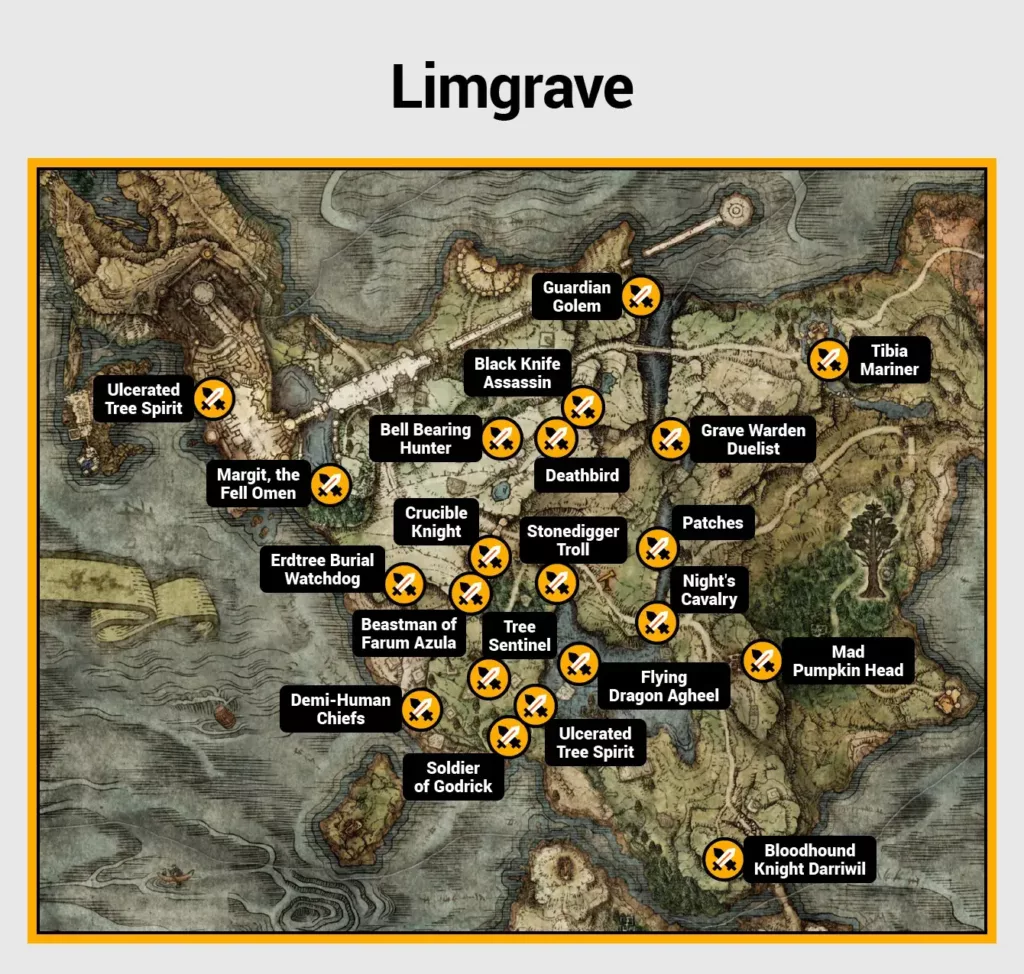
| Boss name | Location | Item drops | Pro tip |
| Soldier of Godrick | Stranded Graveyard | 400 runes | Treat this as your first “parry practice” session. This boss is highly vulnerable to parries! |
| Tree Sentinel | Limgrave Road | 3,200 runes, Golden Halberd | Use the terrain around the boss to move and lure him toward trees (or other objects) that obstruct his attacks. |
| Flying Dragon Agheel | Dragon-Burnt Ruins | 5,000 runes, Dragon Heart | Stay on Torrent and ride around until Agheel uses its fire breath attack. That’s when you should attack from the side. |
| Erdtree Burial Tree Watchdog | Stormfoot Catacombs | 1,300 runes, Noble Sorcerer Ashes | This boss usually reacts slowly to your attacks. Use this to your advantage, and stay close to him. |
| Stonedigger Troll | Limgrave Tunnels | 1,800 runes, Road medallion | Use large weapons (like Greatswords) or magic against this boss. |
| Beastman of Farum Azula | Groveside Cave | 1,000 runes, Flamedrake Talisman | When this boss starts to recover from a series of attacks, use that time to counter-attack. |
| Demi-Human Chief | Dissenter’s Cave | 1,200 runes, Tailoring Tools, Sewing Needle | Get rid of the mob surrounding the boss. This makes the fight much simpler to handle! |
| Bell Bearing Hunter | Warmaster’s Shack | 2,700 runes, Bone Peddler’s Bell Bearing | Maintain a medium distance during this fight instead of getting up close or staying too far. |
| Grave Warden Duelist | Murkwater Catacombs | 1,700 runes, Banished Knight Engvall Ashes | Predict this boss’s jump attacks and counter-attack when you get the chance. |
| Mad Pumpkin Head | Waypoint Ruins | 1,100 runes | Try to land your attacks behind the boss instead of attacking from the front. |
| Crucible Knight | Stormhill Evergaol | 2,100 runes, Aspects of the Crucible: Tail | If you can parry the attacks, do so. Otherwise, wait for the boss’s stab to be over and strike right after. |
| Bloodhound Knight Darriwil | Evergaol | Barricade Shield | When he’s about to enter the second phase, deal the most damage you can. |
| Night’s Cavalry | Bridge near Agheel Lake North at night time | 2,400 runes, Repeating Thrust, Nightride Glaive | With Torrent’s help, keep moving around until the boss is done landing sweeping lance attacks. |
| Black Knife Assassin | Deathtouched Catacombs | 1,600 runes, Assassin’s Crimson Dagger | This one has a low poise, so keep attacking aggressively until you stagger the boss. |
| Tibia Mariner | Summonwater Village | 2,400 runes, Deathroot, Skeletal Militiaman Ashes | Get rid of the skeletons first, then go for the boss. |
| Margit the Fell Omen | Stormhill | 12,000 runes, Talisman Pouch | Use Margit’s Shackle against this boss. The item lets you momentarily pin him down during the fight. |
| Ulcerated Tree Spirit | Fringefolk Hero’s Grave (unlocked through Stonesword key in Stranded Graveyard) | 15,000 runes, Banished Knight Oleg, Golden Seed | Keep moving around until the boss slams itself down. Then, attack while it’s in one place. |
| Deathbird | East of Warmaster’s Shack at night | 2,800 runes, Blue-feathered Branchsword | Try to stay under the boss to avoid most ranged and swooping attacks. |
| Guardian Golem | Highroad Cave | 1,700 runes, Blue-dancer Charm | Keep attacking its ankles until it collapses. Then, keep doing critical damage. |
| Patches | Murkwater Cave | Golden Rune (1) x2, Grovel for Mercy. If you kill him, you receive: Spear +7, Leather Armor, Leather Gloves, Leather Boots, Patches’ Bell, Bearing | This is mostly an easy fight, and the boss will surrender. You can spare him, and he will sell you valuable items later on. |
| Bell Bearing Hunter | Warmaster’s Shack at night | 2,700 runes, Bone Peddler’s Bell Bearing | The second time around, feel free to summon a Spirit Ash you trust the most. If not, follow the previous strategy. |


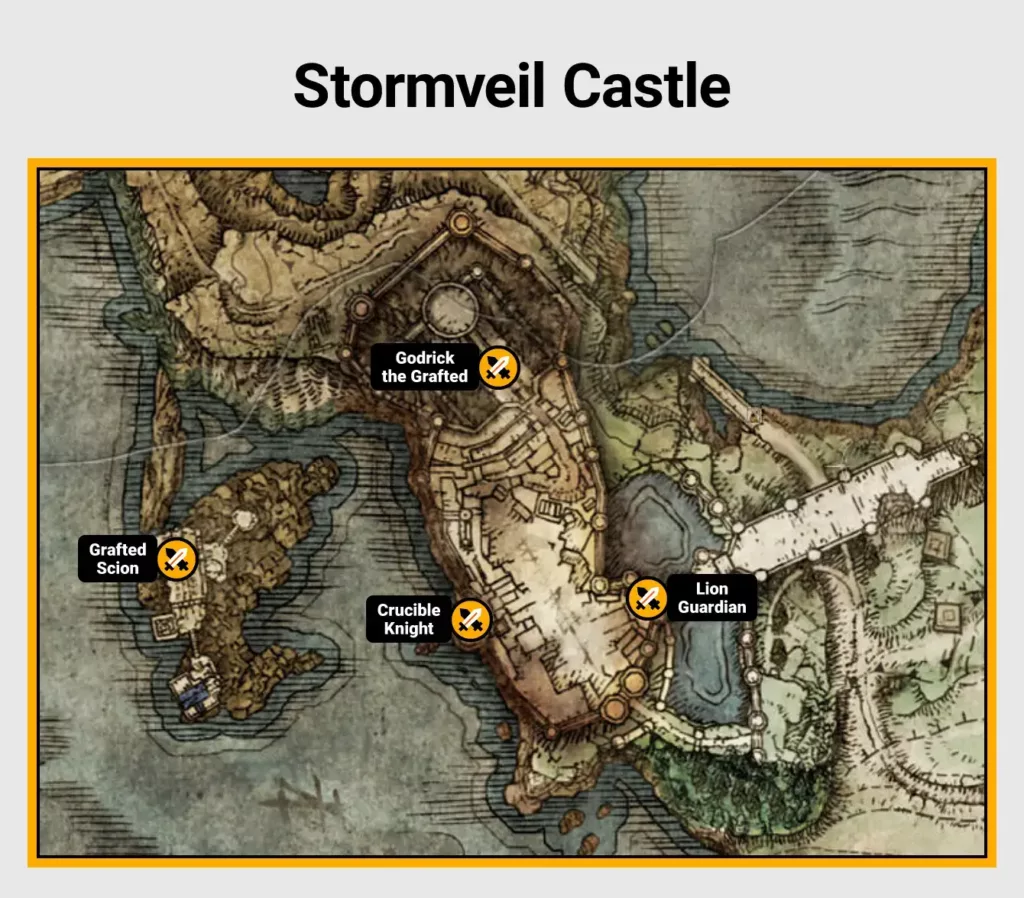
Stormveil Castle
| Boss name | Location | Item drops | Pro tip |
| Crucible Knight | Stormveil Castle | 1,500 runes, Aspects of the Crucible: Horns | These bosses can be found in the vast open world, often providing a great parry challenge. Their aggressive attacks should be parried; otherwise, they can be dodged. |
| Lion Guardian | Stormveil Castle | 1,138 runes, Somber Smithing Stone [1], Beast Blood, Old Fang x2 | This boss’s fast movements are weak to fire and frost attacks. Use weapons with those attributes. |
| Grafted Scion | Stormveil Castle | 3,200 runes, Ornamental Straight Sword, Golden Beast Crest Shield | While this one’s technically a tutorial fight, you can come back to him later once you’ve leveled up enough. Use ranged attacks to stay safe. |
| Godrick the Grafted | Stormveil Castle | 20,000 runes, Godrick’s Great Rune, Remembrance of the Grafted | During his second phase, use his area-of-effect (AoE) attacks against him. Instead of evading him, stay close to him while he does this. This gives you a lot more openings for attacks! |
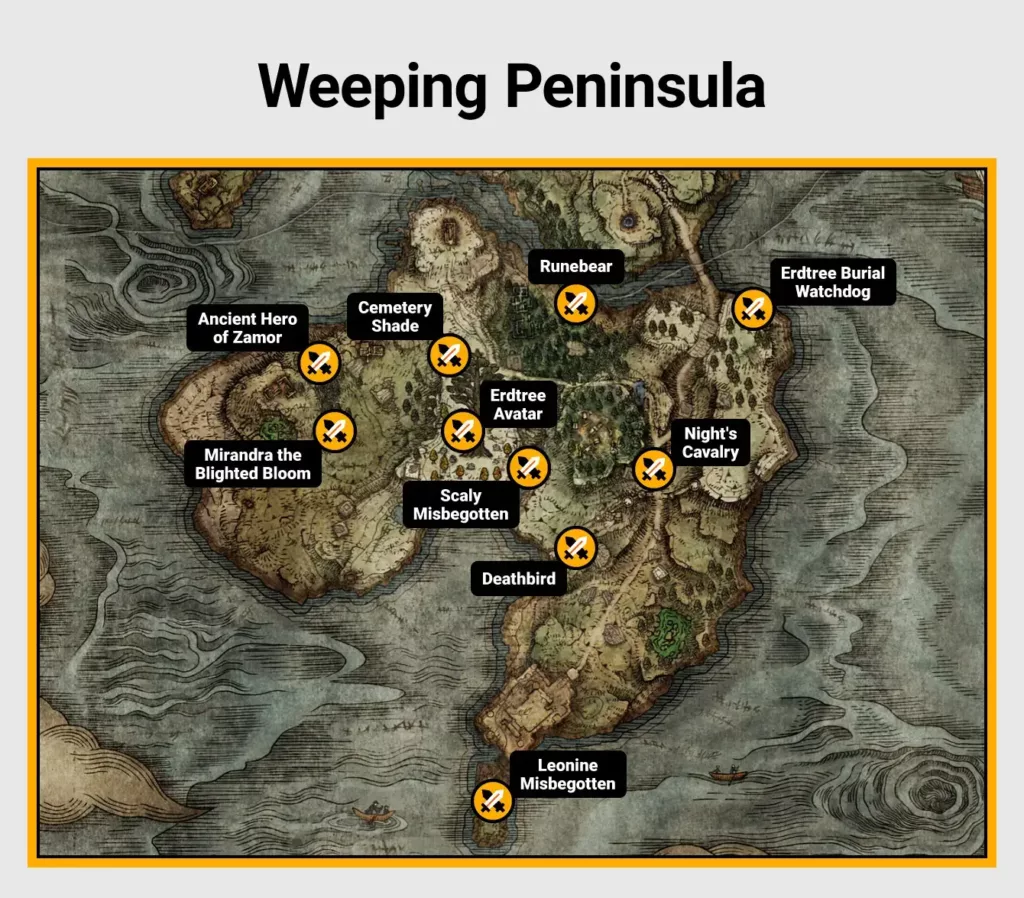
Weeping Peninsula
| Boss name | Location | Item drops | Pro tip |
| Erdtree Burial Watchdog | Impaler’s Catacombs | 2,400 runes, Demi-Human Ashes | This boss will struggle to hit you if you stay close to its legs and avoid the vertical slams. |
| Runebear | Lower levels of Earthbore Cave | 2,600 runes, Spelldrake Talisman | Weapons with high-stagger potential (such as Greatswords) are great against this one. |
| Night’s Cavalry | Road north of Castle Morne Ramparts | 3,400 runes, Barricade Shield, Nightrider Flail | Use Torrent to move around, land small hits, and then move away again. Keep repeating this strategy. |
| Scaly Misbegotten | Mourne Tunnel | 2,000 runes, Rusted Anchor | Charged attacks against this boss will help you do staggering damage, which makes the fight simpler. |
| Cemetery Shade | Tombsward Catacombs | 2,200 runes, Lhutel the Headless | Make sure to use a light source in this area; otherwise, the fight can be difficult. A torch will help! |
| Ancient Hero of Zamor | Weeping Evergaol | 5,400 runes, Radagon’s Scarseal | Even as one of the more intimidating Weeping Peninsula bosses, this boss gives you a subtle opening for attack. Wait for him to attack first, and then deal some damage. |
| Erdtree Avatar | Minor Erdtree east of Tombsward Site of Grace | 4,500 runes, Opaline Bubbletear, Crimsonburst crystal tear | If you’re struggling against the AoE attacks, keep some distance and use ranged weapons. |
| Leonine Misbegotten | Castle Morne | 3,800 runes, Grafted Blade, Greatsword | Use a tanky summon (such as Lhutel the Headless) for this fight. |
| Deathbird | North of Castle Morne at night | 3,900 runes, Sacrificial Axe | To stay safe from the boss’s ranged and swooping attack, try to stay directly underneath it. |
| Mirandra the Blighted Bloom | Tombsward Cave | 2,100 runes, Viridian Amber, Medallion | Use fire attacks to burn through the poison buildup in the area, and charge in whenever it seems safe. |
Liurnia of the Lakes

| Boss name | Location | Item drops | Pro tip |
| Grafted Scion | Chapel of Anticipation | 3,200 runes, Ornamental Straight Sword, Gold Beast Crest Shield | Some of the boss’s attacks leave its stance in a certain position that requires a reset. After each such attack, do some damage immediately before it resets the stance. |
| Cleanrot Knight | Stillwater Cave | 2,475 runes, Winged Sword Insignia | Dodge the boss’s dangerous, long-reaching thrust attack. But instead of rolling sidewards, roll toward it. Then, get behind the boss and land some hits. |
| Adan, Thief of Fire | Malefactor’s Evergaol | 3,800 runes, Flame of the Fell God | His fire-based incantation takes a long time to cast, giving you ample time to rush in while he recovers. |
| Tibia Mariner | Liurnia of the Lakes (near Study Hall) | 4,700 runes, Deathroot, Skeletal Bandit Ashes | Keep moving your camera to check for skeletons. Quick mouse movements make it one of the best PC game mechanics, allowing you to get rid of skeletons quickly. |
| Erdtree Burial Watchdog | Cliffbottom Catacombs | 2,700 runes, Kaiden Sellsword Ashes | Aim for the legs to avoid the boss’s vertical attacks, which are usually harder to dodge from afar. |
| Night’s Cavalry | South of Bellum Church at night | 5,600 runes, Giant Hunt, Nightrider Glaive | Try to dodge toward the weapon hand (right), which puts you in a better position to counter certain attacks. |
| Erdtree Avatar | Minor Erdtree at the northeast of Ruined Labyrinth | 5,800 runes, Holy-shrouding cracked tear, Lightning-shrouding cracked tear, Magic-shrouding cracked tear | Look for a large opening right after the ground slam attack. Once it’s over, run into the boss and do some damage. |
| Crystalian (Ring Blade) | Raya Lucaria Crystal Tunnel | 3,000 runes, Smithing-Stone Miner’s Bell Bearing (1) | Since this boss is resilient to slashes and pierces, use a weapon like a Mace or Great Hammer to stagger it. |
| Red Wolf of Radagon | Debate Hall in Raya Lucaria | 14,000 runes, Memory Stone | Dodge the magical projectiles, then close in the moment an opportunity shows up. Keep doing this until you defeat the boss. |
| Crystalians x2 | Academy Crystal Cave | 3,300 runes, Crystal Release | Avoid fighting both at once. Get rid of the one who wields a staff first. |
| Rennala, Queen of the Full Moon | Raya Lucaria Academy | 40,000 runes, Great Rune of the Unborn, Remembrance of the Full Moon Queen | During her first phase, hit the glowing students three times. During her second phase, try to use a summon (like Lone Wolf Ashes) that can overwhelm her. |
| Alabaster Lord | Royal Grave Evergaol | 3,600 runes, Meteorite | When gravity magic is used against you, roll toward it to avoid damage and stay within close range of the boss. |
| Royal Revenant | Underground are a of Kingsrealm Ruins | 3,100 runes | Avoid standing still since it makes the boss’s erratic movements even more difficult to counter. Keep moving and dodging during this fight instead of staying in one place. |
| Royal Knight Loretta | Caria Manor | 7,500 runes, Loretta’s Greatbow, Loretta’s Slash | The magical bow attacks have a slight delay. Use this to your advantage and dodge as soon as she pulls the bowstring. |
| Bols, Carian Knight | Cuckoo’s Evergaol | 4,600 runes, Greatblade Phalanx | Stay at the side of his shield (left) so that it’s easier for you to dodge his attacks. |
| Alecto, Blade Knife Ringleader | Ringleader’s Evergaol | 88.000 runes, Black Knife Tiche | Try to bait the boss’s grab attack. Once the move is completed, you can use the recovery time to land a lot of hits. |
| Spirit-caller Snail | Road’s End Catacombs | 2,250 runes, Glintstone Sorcerer Ashes | Since this boss uses spirit summons for the fight, ignore them and go directly for the boss in the arena. |
| Omenkiller | Village of Albinaurics | 4.900 runes, Crucible Knot Talisman | This one’s frontal attacks are relentless. Roll behind him and try to land some hits. |
| Glintstone Dragon Adula | Cathedral of Manus Celes | 120,000 runes, Adula’s Moonblade, Dragon Heart x3 | The dragon’s head is a weak point to aim for. However, staying at the rear legs can be a safer choice to avoid any breath attacks. |
| Glinstone Dragon Smarag | Lake west of Raya Lucaria Academy | 14,000 runes, Dragon Heart | Try to lead the dragon to an open area that’s safer for you to be in. This makes the fight a bit more predictable. |
| Glinstone Dragon Adula | Three Sisters | – | Use Torrent to move around, and try to stay behind the dragon as much as you can. |
| Death Rite Bird | Ruins south of Gale Town North Site of Grace | 7,800 runes, Ancient Death Rancor | Stay watchful of the unpredictable attack timings, and attack at the very last moment for a good dodge and hit. |
| Bell Bearing Hunter | Church of Vows at night | 6,000 runes, Meat Peddler’s Bell Bearing | Stay at mid-range to avoid a grab attack. |
| Death Bird | North of Scenic Isle at night | 6,600 runes, Red-feathered Branchsword | Staying close to the boss makes it harder for it to hit you, especially when it comes to swooping attacks. |
| Black Knife Assassin | Black Knife Catacombs | 4,200 runes, Assassin’s Cerulean Dagger, Black Knifeprint | This one may be fast but has a big weakness: low poise. Keep dealing heavy attacks until you stagger the boss. |
| Bloodhound Knight | Lakeside Crystal Cave | 2,700 runes, Cerulean Amber Medallion | During the teleportation move where the boss slashes forward, dodge into the attack instead of rolling away. |
| Bell Bearing Hunter | Church of Vows at night | 6,000 runes, Meat Peddler’s Bell Bearing | Use ranged spells and keep a safe distance. Rely on heavy attacks, while dodging and blocking when necessary. |
| Cemetery Shade | Black Knife Catacombs | 3,500 runes, Twinsage Sorcerer ashes | Keep your environment well-lit to track the boss’s teleportation. |
| Godskin Noble | Divine Tower of Liurnia | 4,810 runes, Godskin Noble hood, Godskin Noble robe, Godskin Noble bracelets, Godskin Noble trousers | Avoid the rolling attack as much as you can. Right after the boss finishes this move, dive in and do as much damage as you can. |
| Magma Wyrm Makar | Ruin-strewn Precipice | 24,000 runes, Magma Wyrm’s Scalesword, Dragon Heart | Bait the slam or any AoE attacks, then strike when the head is exposed. Run around and attack from its side. |
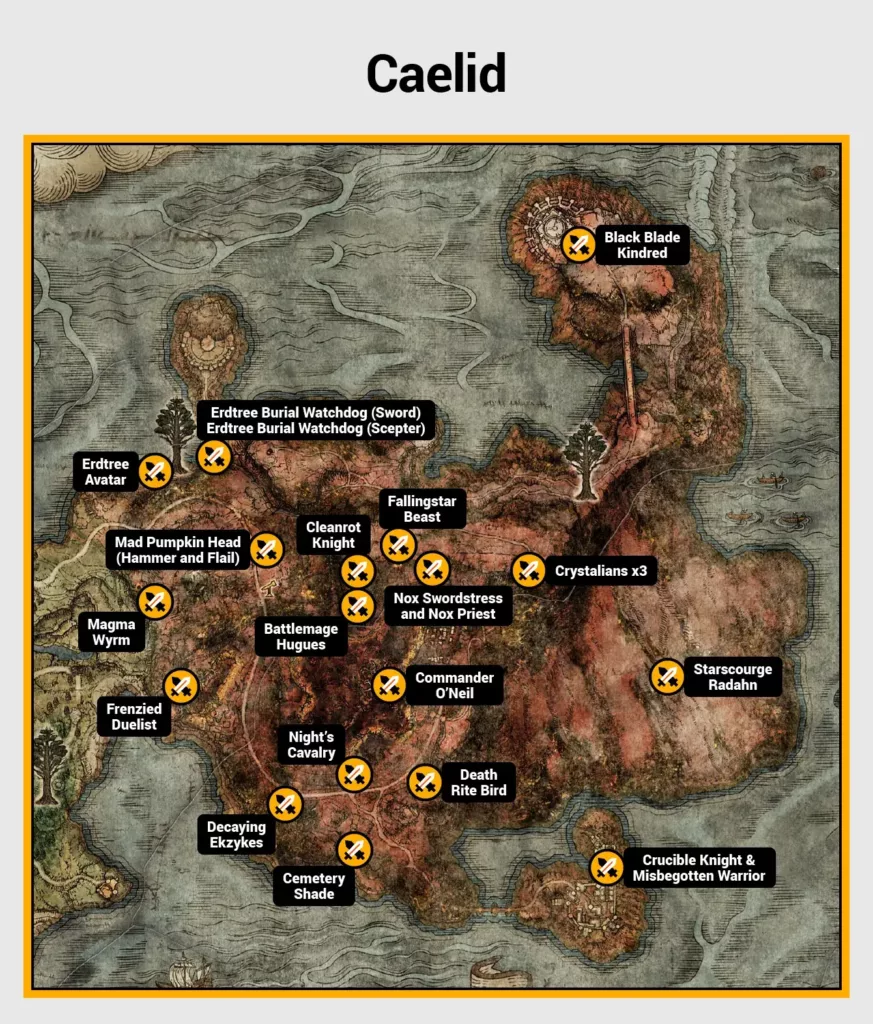
Caelid
| Boss name | Location | Item drops | Pro tip |
| Magma Wyrm | Gael Tunnel | 7,500 runes, Dragon Heart, Moonveil | The boss’s lava pools make direct frontal attacks dangerous. Stay at its sides and do damage after the boss’s sweeping attacks. |
| Erdtree Avatar | Minor Erdtree northeast of the Smouldering Church (northwest region) | 5,800 runes, Greenburst crystal tear, Flame-shrouding cracked tear | Slam attacks and AoE damage are dangerous, so keep rolling and jumping whenever necessary. |
| Mad Pumpkin Head (Hammer and Flail) | Caelem Ruins | 6,300 runes | Some of the boss’s attacks leave a huge opening for you to dive in. Focus on making the most of those opportunities. |
| Erdtree Burial Watchdog (Sword) and Erdtree Burial Watchdog (Scepter) | Minor Erdtree Ruines | 7,400 runes, Mad Pumpkin Head Ashes | When the boss starts hovering before slamming down, dodge right before it falls. Also, make sure you move sideways when magic (fire) is projected toward you. |
| Decaying Ekzykes | South of Caelid Highway South Site of Grace | 38,000 runes, Dragon Heart | Avoid the Scarlet Rot breath, and stay near the boss’s front legs. |
| Night’s Cavalry | East road of Caelid Highway South Site of Grace | 8,500 runes, Poison Moth Flight | Try to get as many hits as you can in the beginning so you can knock him off his horse, making the fight much more manageable. |
| Commander O’Neil | Middle of the swamp close to the Inner Aeonia Site of Grace | 12,000 runes, Commander’s Standard, Unalloyed Gold Needle | Get rid of his summons first so you can focus on the fight better. |
| Nox Swordstress and Nox Priest | The road that leads to the northeast side of Caelid, close to the Sellia Crystal Tunnel | 6,400 runes, Nox Flowing Sword | Defeat the Priest first since the sorceries can be a distraction and makes the fight harder. |
| Black Blade Kindred | Greyoll’s Dragonbarrow | 88,000 runes, Gargoyle’s Black Axe, Gargoyle’s Black Blades | Stay close to this boss. This can help you dodge many attacks and give you the much-needed opening for dealing damage. |
| Fallingstar Beast | Sellia Crystal Tunnel | 7,600 runes, Somberstone Miner’s Bell Bearing (1), Smithing Stone (7) x5, Somber Smithing Stone (6), Gravity Stone Chunk x4 | Try to land charged heavy attacks in an attempt to stagger the boss. This will lead to further openings of dealing damage. |
| Starscourge Radahn | Redmane Castle | 70,000 runes, Radahn’s Great Rune, Remembrance of the Starscourge | With the help of Torrent, keep moving toward the boss as if you’re going on an adventure. Summon as many NPCs in the arena as you can, and stay away from Radahn when he’s about to do AoE damage. |
| Death Rite Bird | Hill east of Caelid Highway South Site of Grace at night | 15,000 runes, Death’s Poker | Try to get behind a massive structure (like a fallen tree) to avoid the boss’s attacks, and stick to its sides. |
| Frenzied Duelist | Gaol Cave | 6,700 runes, Putrid Corpse ashes | Dodge back during the roar attack, then jump in once the animation is over. |
| Cleanrot Knight x2 | Abandoned Cave | 7,800 runes, Gold Scarab | Fighting both at the same time can be deadly, so focus on defeating one at a time. Try to keep them distanced from each other. |
| Battlemage Hugues | Sellia Evergaol | 7,800 runes, Battlemage Hugues Ashes | The spell directed toward you is slow but powerful, so bait it out first and then rush before he casts it again. |
| Cemetery Shade | Caelid Catacombs | 6,800 runes, Kindred of Rot ashes | Wait for the boss to do the grab attack, and once you notice the arm being extended, roll out in an attempt to dodge the attack. Then, do some damage. |
| Crystalians x3 | Sellia Hideaway | 7,000 runes, Crystal Torrent | Just like most multi-bosses in the same arena, the strategy here is to focus on one at a time. |
| Crucible Knight & Misbegotten Warrior | Redmane Castle | 16,000 runes, Ruins Greatsword | Defeat the Misbegotten Warrior first since this boss is much more aggressive and faster. Then, focus on the Crucible Knight. |
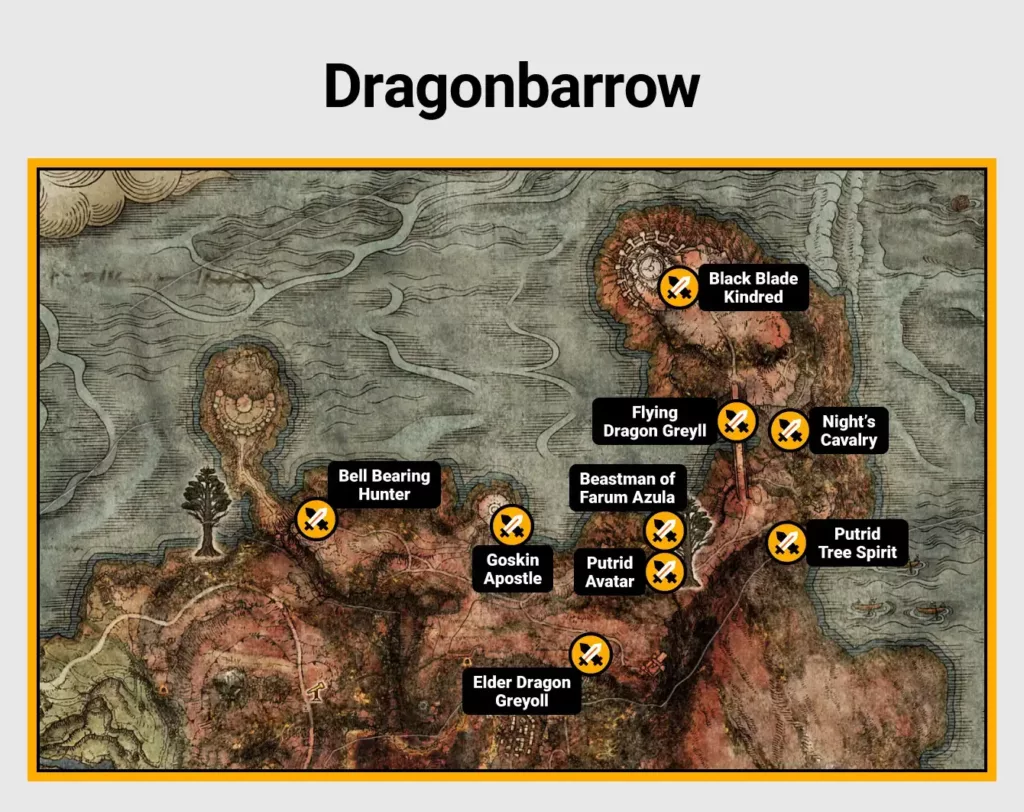
Dragonbarrow
| Boss name | Location | Item drops | Pro tip |
| Elder Dragon Greyoll | West of Dragonbarrow West Side of Grace | 50,000 runes (for the boss), 3,470 (for each other dragon), Dragon Heart x5 | Take down the smaller dragons quickly to drain the main boss’s health. |
| Godskin Apostle | Basement of Divine Tower of Caelid | 94,000 runes, Godskin Apostle Hood, Godskin Apostle Robe, Godskin Apostle Bracers, Godskin Apostle Trousers. | During the boss’s deadly spinning attack, roll toward it instead of dodging away |
| Beastman of Farum Azula | Dragonbarrow Cave | 65,000 runes, Flamedrake Talisman +2 | There’s a roar before a big combo that helps you predict the incoming moves. Dodge through the first strike and then keep hitting the boss. |
| Flying Dragon Greyll | Near Farum Greatbridge Site of Grace | 80,000 runes, Dragon Heart | Stay near the dragon’s legs to keep yourself safe and land hits consistently. |
| Bell Bearing Hunter | Isolated Merchant | 50,000 runes, Gravity Stone, Peddler’s Bell Bearing | Try to find obstacles in the arena that help block against the boss’s sword throw. |
| Black Blade Kindred | Near the Bestial Sanctum in the northeast peninsula | 88,000 runes, Gargoyle’s Blackblade, Gargoyle’s Black Halberd | During the huge leaping slam, take the boss’s recovery time as an opportunity to land big hits. |
| Bell Bearing Hunter | Isolated Merchant’s Shack at night | 50,000 runes, Gravity Stone, Peddler’s Bell Bearing | Wait longer than you usually would before dodging his swings. |
| Putrid Avatar | East of Dragonbarrow Fork Site of Grace | 91,000 runes, Opaline Hardtear, Stonebarb cracked tear | Jump over the Scarlet Rot AoE to avoid getting infected. |
| Night’s Cavalry | North of Lenne’s Rise Site of Grace at night | 42,000 runes, Bloodhound’s Step | When the boss is about to do a heavy swing attack, dodge and throw his balance off. Try to get early hits to knock him off his horse. |
| Putrid Tree Spirit | War-Dead Catacombs | 64,000 runes, Redmane Knight Ogha Spirit Ashes, Golden Seed | Instead of rolling backward during the grab attacks, roll toward the boss and slightly to the side to avoid getting caught. |
Altus Plateau
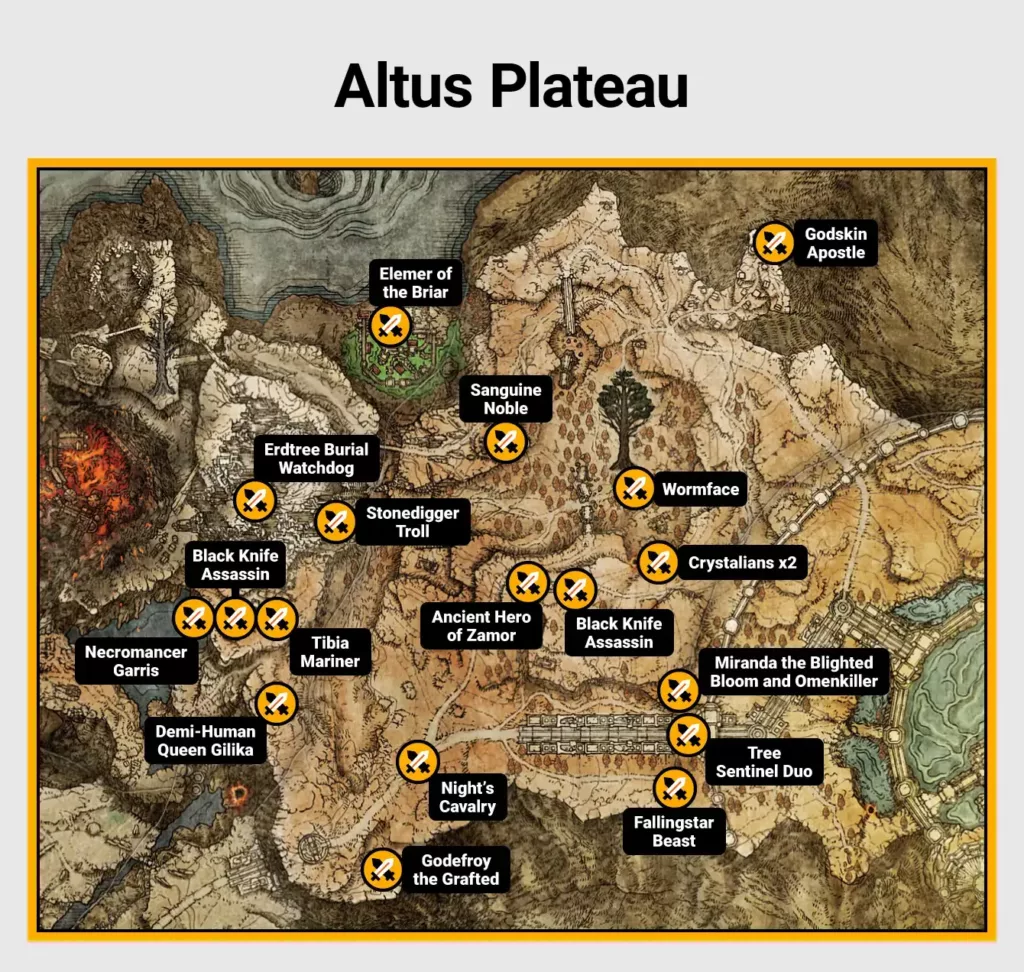
| Boss name | Location | Item drops | Pro tip |
| Stonedigger Troll | Old Atlus Tunnel | 9,600 runes, Great Club | If you stay close to the boss, he will likely use more overhead slams, giving you time to roll through and counterattack. |
| Elemer of the Briar | The Shaded Castle | 24,000 runes, Marais Executioner’s Sword, Briar Greatshield | The floating sword attacks have a long wind-up time. Use this to your advantage and dodge sideways when the attack happens. |
| Black Knife Assassin | Sainted Hero’s Grave | 11,339 runes, Black Knife | Instead of rolling away, simply move aside to track the boss’s attacks and avoid the sharp lunges. |
| Godskin Apostle | Windmill Village | 14,000 runes, Godskin Peeler, Scouring Black Flame | The moment the spinning attack ends, push forward and land as many hits as you can. |
| Tibia Mariner | Wyndham Ruins | 14,000 runes, Deathroot, Tibia’s Summons | Before he starts summoning minions to fight for him, use the time to attack a bit and interrupt the animation. |
| Necromancer Garris | Sage’s Cave | 9,000 runes, Family Heads | Try to get rid of the floating skull that the boss summons to avoid damage. |
| Erdtree Burial Watchdog | Wyndham Catacombs | 12,000 runes, Glovewort Picker’s Bell Bearing (1) | Just like the similar bosses before him, keep in mind the slamming-down animation. The moment it hovers, it’s time for you to dodge when it starts falling down. |
| Tree Sentinel Duo | Outside Leyndell, Royal Capital’s western gate | 20,000 runes, Hero’s Rune [1], Erdtree Greatshield | Use obstacles to break their line of sight and defeat one after the other. Avoid attacking both of them at the same time. |
| Godefroy the Grafted | Golden Lineage Evergaol | 26,000 runes, Godfrey Icon | Instead of rolling away from the spinning attacks, roll through them. This prevents you from getting caught in a series of deadly attacks. |
| Demi-Human Queen Gilika | Lux Ruins | 8,500 runes, Ritual Sword talisman | The roar attack has a long recovery time, which should give you the opening for landing a few big attacks. |
| Black Knife Assassin | Sage’s Cave (requires Sentry Torch to access) | 9,000 runes, Concealing Veil | Try to keep track of the footstep sounds and weapon swings. Time your dodges accordingly. |
| Night’s Cavalry | Southwest of Atuls Highway Junction Site of Grace at night | 10,000 runes, Shared Order | When on the bridge, knock him off his horse as quickly as you can. |
| Sanguine Noble | Writheblood Ruins | 8,800 runes | Move sideways every time the boss tries to do ranged attacks. |
| Wormface | Minor Erdtree at the northeast of Bower of Bounty Site of Grace | 10,000 runes, CRimsonspill crystal tear, Speckled Hardtear | Try to stay behind the boss to avoid the Death Blight attacks. |
| Crystalians x2 | Atlus Tunnel | 9,000 runes, Somberstone Miner’s Bell Bearing (2) | Blunt weapons work best against Crystalians, so try to break their poise as quickly as you can. |
| Miranda the Blighted Bloom and Omenkiller | Perfumer’s Grotto | 8,400 runes, Great Omenkiller Cleaver | Defeat Miranda first since her poison clouds make the fight much more difficult. |
| Fallingstar Beast | South of Perfumer’s Grotto Site of Grace | 11,000 runes, Somber Smithing Stone x5, Smithing Stone (6) x5, Gravity Stone Fan x1, Gravity Stone Chunk x1 | Try to stick to a wall and bait the boss’s charge attack. If it gets stuck, you can get a lot of free hits. |
| Ancient Hero of Zamor | Sainted Hero’s Grave | 24,000 runes, Ancient Dragon Knight Kristoff | His frost breath attack takes a while to recover. Dodge to the side, then attack when he resets. |
Mt. Gelmir
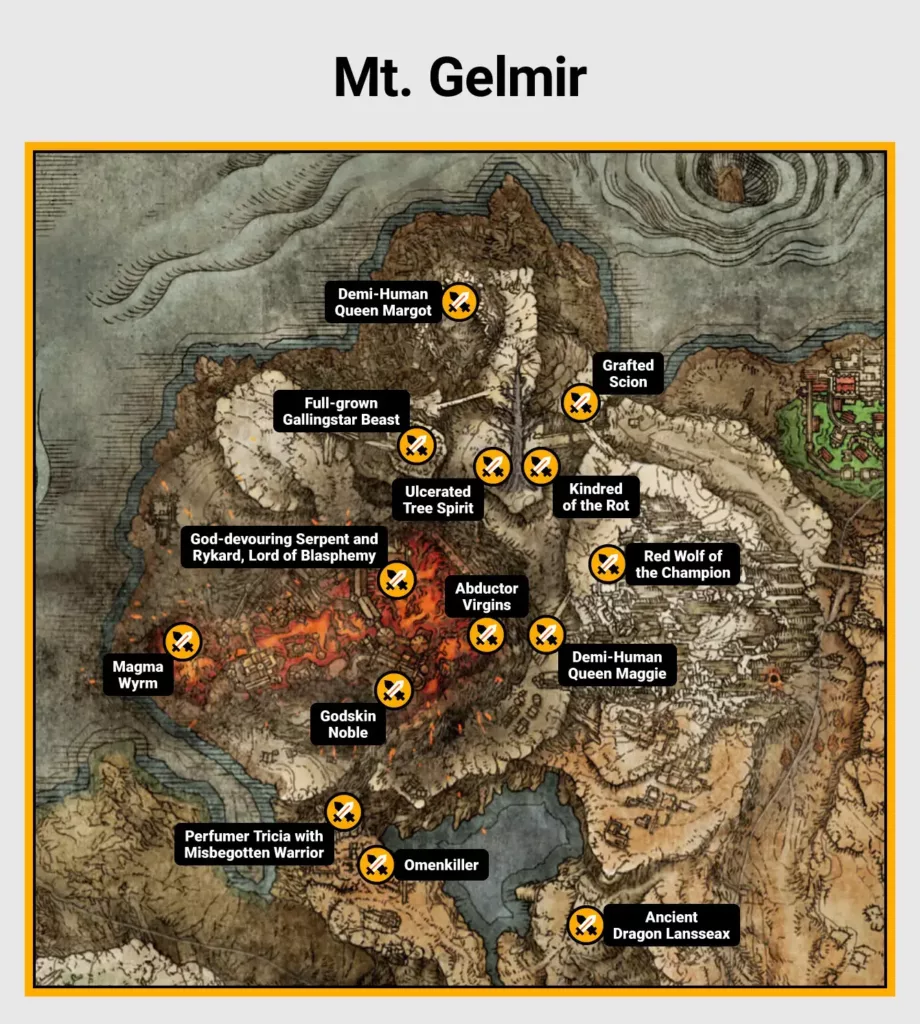
| Boss name | Location | Item drops | Pro tip |
| Ancient Dragon Lansseax | East of Abandoned Coffin Site of Grace | 60,000 runes, Lansseaux’s Glaive | When the boss raises the left wing to summon a lightning attack, sprint to the side so you can stay safe. |
| Perfumer Tricia with Misbegotten Warrior | Unsightly Catacombs | 9,400 runes, Perfumer Tricia Ashes | Defeat Tricia first so she doesn’t buff the Misbegotten Warrior’s defenses. |
| Grafted Scion | Destroyed camp at the bottom of Mt. Gelmir | 2,313 runes | Bait the jumping lunge attack since it has a long recovery time. Dodge sideways and counterattack. |
| Ulcerated Tree Spirit | North of Mt. Gelmir close to Ninth Mt. Gelmir Site of Grace | 18,000 runes, Leaden Hardtear, Cerulean Hidden tear | Roll toward the grab attack instead of dodging away from it so you can avoid getting pulled in. |
| Full-grown Gallingstar Beast | Close to Ninth Mt. Gelmir Site of Grace | 21,000 runes, Somber Smithing Stone, Smithing Stone [6] x5, Fallingstar Beast Jaw | Sprint away during the gravity pull attack to avoid getting staggered. |
| Kindred of the Rot | Seethewater Cave | 10,000 runes, Kindred of Rot’s Exultation | Stay close to the boss so you can force it to do more predictable melee attacks. |
| Demi-Human Queen Maggie | Northeast of Hermit Village, near the Primeval Sorcerer Azur Site of Grace | 13,000 runes, Memory Stone, Golden Rune [1] | Take out the sorcerers accompanying the boss first, as this makes the fight much easier. |
| Abductor Virgins | Volcano Manor | 10,000 runes, Inquisitor’s Girandole | Roll toward the grab attack instead of backward to keep from getting caught. |
| Omenkiller | Volcano Manor | 1,674 rune, Great Omenkiller Cleaver | Stay behind him to avoid his deadly frontal attacks (like his swings). |
| Demi-Human Queen Margot | Lowest level of Volcano Cave | 11,000 runes, Jar Cannon | When she powers up during the roar animation, use this time to do some damage and cancel the buff. |
| God-devouring Serpent and Rykard, Lord of Blasphemy | Mt. Gelmir | 130,000 runes, Rykard’s Great Rune, Remembrance of the Blasphemous | Once you enter the arena, immediately pick up the Serpent-Hunter weapon, as it deals immense damage to the boss. |
| Magma Wyrm | Lava pool at the south of Fort Laiedd | 19,000 runes, Dragon Heart, Magma Breath | Try to stay at mid-range. This can provoke the boss to charge more often, leaving it open for you to get more hits. |
| Red Wolf of the Champion | Fort Laiedd | 21,000 runes, Bloodhound Knight Fioh | Whenever the boss does a bite attack, roll into it instead of dodging away. |
| Godskin Noble | Volcano Manor | 50,000 runes, Godskin Sticher, Noble Presence | Once again, keep track of his rolling attacks, and when it’s your turn to attack, roll in instead of dodging away. |
Leyndell, Royal Capital
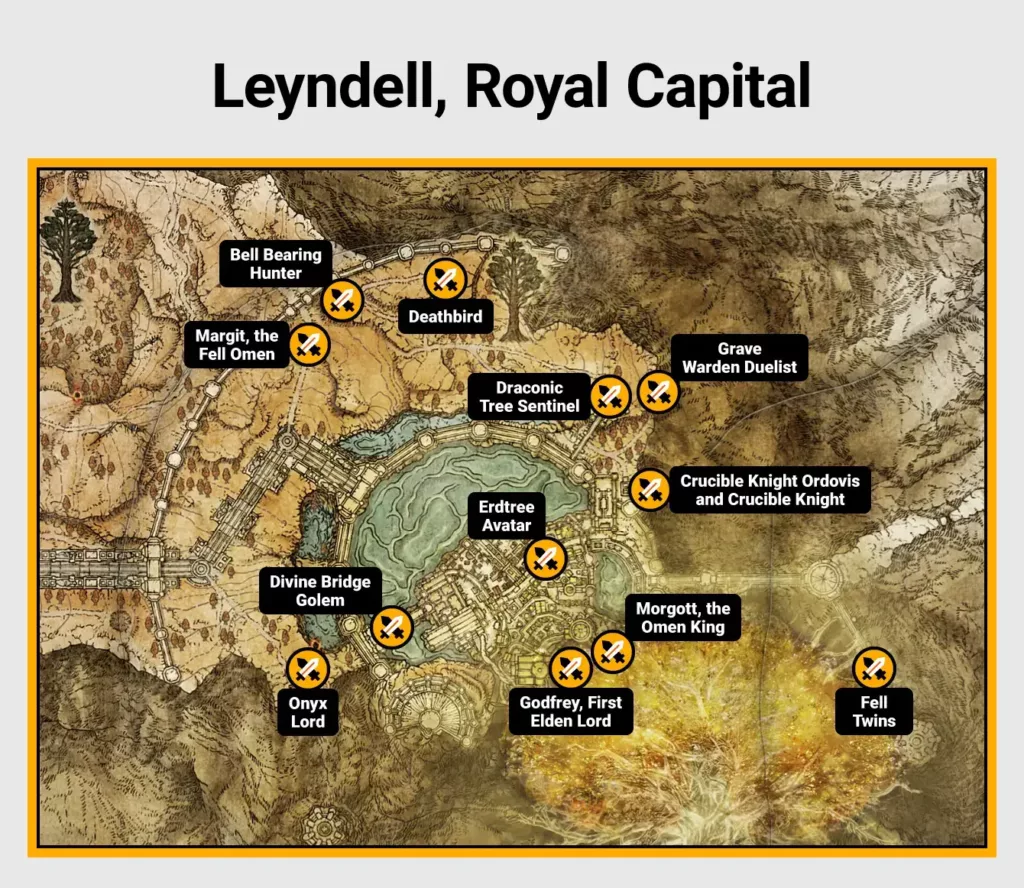
| Boss name | Location | Item drops | Pro tip |
| Divine Bridge Golem | Leyndell, Royal Capital | 2,992 runes | The boss’s overhead slam has a long recovery period. Use this time to dodge to the side and get some hits while it resets. |
| Bell Bearing Hunter | Hermit Merchant’s Shack | 20,000 runes, Medicine Peddler’s | The floating sword attacks have a wide reach, so stick to a wall and find objects that can take the damage instead of you. |
| Draconic Tree Sentinel | Capital Outskirts | 50,000 runes, Dragon Greatclaw, Dragonclaw Shield | When the boss starts charging up the fire attack, quickly get to the side and do some damage before it recovers. |
| Crucible Knight Ordovis and Crucible Knight | Aruiza Hero’s Grave | 28,000 runes, Ordovis’s Greatsword, Crucible Helm, Crucible Armor, Crucible Gauntlets, Crucible Greaves | Try to defeat Ordovis (the one with the golden sword) first since he’s more aggressive than the other knight. |
| Fell Twins | Capital Outskirts | 29,000 runes, Omenkiller Rollo | Keep track of the twins through their glowing red eyes, and stay behind one twin to minimize the damage taken by both. |
| Morgott, the Omen King | Near the Elden Throne Site of Grace | 120,000 runes, Remembrance of the Omen King, Morgott’s Great Rune | When the boss is using a holy blade buff, stay defensive and only attack when the buff fades. |
| Onyx Lord | Sealed Tunnel | 16,000 runes, Onyx Lord’s Greatsword | The gravity attacks have a long wind-up period, so jumping attacks can help you stagger him before he casts an attack. |
| Erdtree Avatar | Patrolling the road found southwest of the East Capital Rampart Site of Grace | 10,062 runes, Lord’s Rune | Roll into the slam attack AoE instead of rolling away to minimize your chances of getting hit. |
| Godfrey, First Elden Lord | Leyndell, Royal Capital | 300,000 runes, Remembrance of Hoarah Loux | The boss’s stomps have a slight delay before the shockwave hits. Wait for the impact, and then dodge! |
| Deathbird | East of Hermit Merchant’s Shack at night | 28,000 runes, Twinbird Kite Shield | Try to aim for its legs and keep attacking them. This will allow you to stagger it quickly. |
| Bell Bearing Hunter | Hermit Merchant’s Shack at night | 20,000 runes, Medicine Peddler’s Bell Bearing | Stay aware of the grab move’s wind-up and dodge backward when it happens. Then, counterattack before it resets. |
| Margit, the Fell Omen | Near the Outer Wall Battleground Site of Grace | 16,800 runes, Viridian Amber Medallion | Roll toward the spectral daggers so you’re at melee range, where he’s easier to fight. |
| Grave Warden Duelist | Auriza Side Tomb | 15,000 runes, Soldjars of Fortune Ashes | Stay at mid-range, as it’s easier to dodge his jumping attacks. |
Forbidden Lands
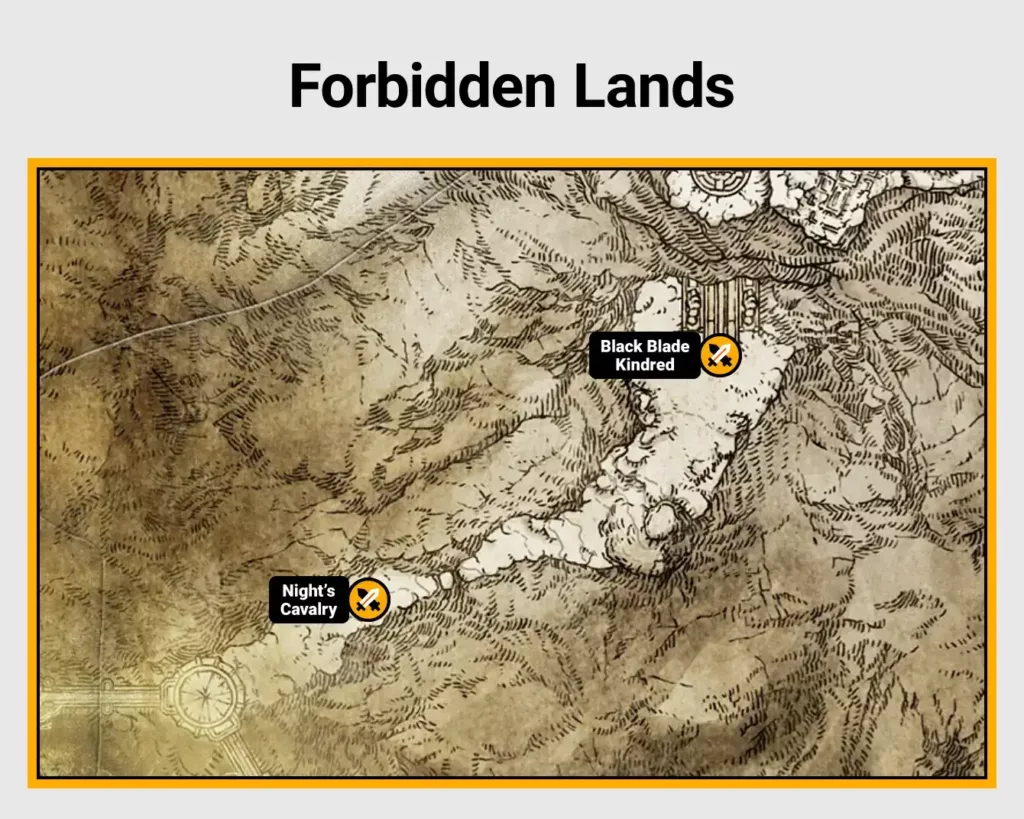
| Boss name | Location | Item drops | Pro tip |
| Black Blade Kindred | Forbidden Lands | 60,000 runes, Gargoyle’s Black Axe, Gargoyle’s Black Blades | Use the arena’s terrain against this boss. Try to fight near the Grand Lift of Rold stairs, as some of his attacks will miss you. |
| Night’s Cavalry | Near the lift in the Forbidden Lands at night | 36,000 runes, Phantom Slash | Once you stagger the horse, the boss falls off. That’s when you need to push in and land heavy attacks. |
Consecrated Grounds
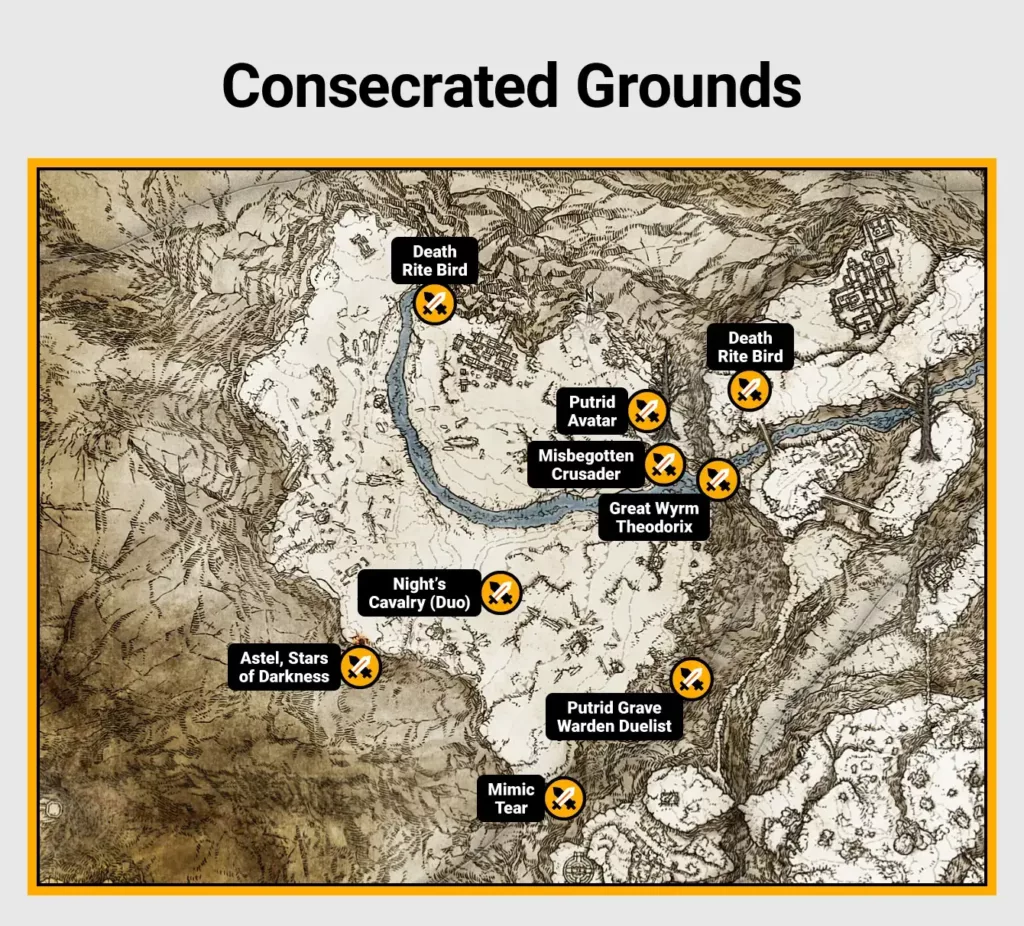
| Boss name | Location | Item drops | Pro tip |
| Putrid Grave Warden Duelist | Consecrated Snowfield Catacombs | 78,000 runes, Great Grave Glovewort, Rotten Gravekeeper Cloak | During the boss’s red-glowing grab, use the animation time to your advantage and dodge backward. |
| Mimic Tear | Hidden Path to the Haligtree | 50,000 runes, Blackflame Monk Amon | This boss copies your weapons/gear. So, before entering the fight, unequip everything and then re-equip your weapons once the fight starts. |
| Night’s Cavalry (Duo) | Southwest of Inner Consecrated Snowfield Site of Grace at night | 84,000 runes, Night’s Cavalry helm, Night’s Cavalry armor, Night’s Cavalry gauntlets, Night’s Cavalry greaves, Ancient Dragon Smithing Stone | Try to position them in a way that one Night’s Cavalry can block the other’s charge attacks. |
| Astel, Stars of Darkness | Tunnel at Yelough Anix | 120,000 runes, Meteorite of Astel | Dodge away from him during the grab’s pull effect. |
| Death Rite Bird | Southeast of Apostate Derelict Site of Grace at night | 220,000 runes, Explosive Ghostflame | Stay near its legs to avoid incoming long-range magic barrages. |
| Putrid Avatar | Minor Erdtree east of Ordina, Liturgical Town Site of Grace | 160,000 runes, Ruptured Crystal Tear, Thorny Cracked Tear | Try to fight near trees or hills and use them as a cover when the boss uses a Scarlet Rot attack. |
| Great Wyrm Theodorix | Outside Cave of the Forlorn at night | 180,000 runes, Dragon Heart x3 | The frost breath attacks usually have a long wind-up time. Use that to your advantage and hit the boss’s legs. |
| Misbegotten Crusader | Cave of the Forlorn | 93,000 runes, Golden Order Greatsword | When he starts to buff his weapon with Holy energy, he’s vulnerable for some time. When this happens, land heavy attacks. |
Mountaintops of the Giants

| Boss name | Location | Item drops | Pro tip |
| Borealis The Freezing Fog | Mountaintops of the Giants | 100,000 runes, Dragon Heart | Try to stay right under the boss, as the frost attack will likely be a miss, which gives you room to attack. |
| Godskin Apostle and Godskin Noble | Spiritcaller’s Cave | 70,000 runes, Godskin Swaddling Cloth, Black Flame Ritual | Use the pillars in the arena to block one boss while focusing on the other. |
| Erdtree Avatar | Near the northeast of the Ancient Snow Valley Ruins Site of Grace | 70,000 runes, Cerulean crystal tea, Crimson Bubbletear | Dodge the charge move and use the time to counterattack. |
| Fire Giant | Mountaintops of the Giants near the Forge of the Giants | 180,000 runes, Remembrance of the Fire Giant | During the first phase, keep slashing and hitting his ankle as if you’re in an action role-playing game (ARPG). Aim for the eye in the next phase. |
| Commander Niall | Castle Sol | 90,000 runes, Veteran’s Prosthesis | Defeat the summons first and then focus on the boss. |
| Roundtable Knight Vyke | Lord Contender’s Evergaol | 75,000 runes, Fingerprint Helm, Fingerprint Armor, Fingerprint Gauntlets, Fingerprint Greaves, Vyke’s Dragonbolt | His grab attack builds the Madness effect fast, so avoid it at all costs by dodging away. |
| Death Rite Bird | Southwest of Castle Sol Main Gate Site of Grace at night | 77,000 runes, Death Ritual Spear | Dodge a bit later than usual to avoid the magic attacks. |
| Ancient Hero of Zamor | Giant-conquering Hero’s Grave | 83,000 runes, Zamor Curved Sword, Zamor Mask, Zamor Armor, Zamor Bracelets, Zamor Legwraps | Use fire attacks or weapons against this boss to stagger him easily. |
| Ulcerated Tree Spirit | Giant’s Mountaintop Catacombs | 48,000 runes, Golden Seed, Glovewort Picker’s Bell Bearing [2] | Roll toward the boss, as it’s safer than rolling backward. |
| Astel, Stars of Darkness | Yelough Anix Tunnel | 120,000 runes, Meteorite of Astel | During the meteor summons attack, sprint away instead of dodging. |
Miquella’s Haligtree
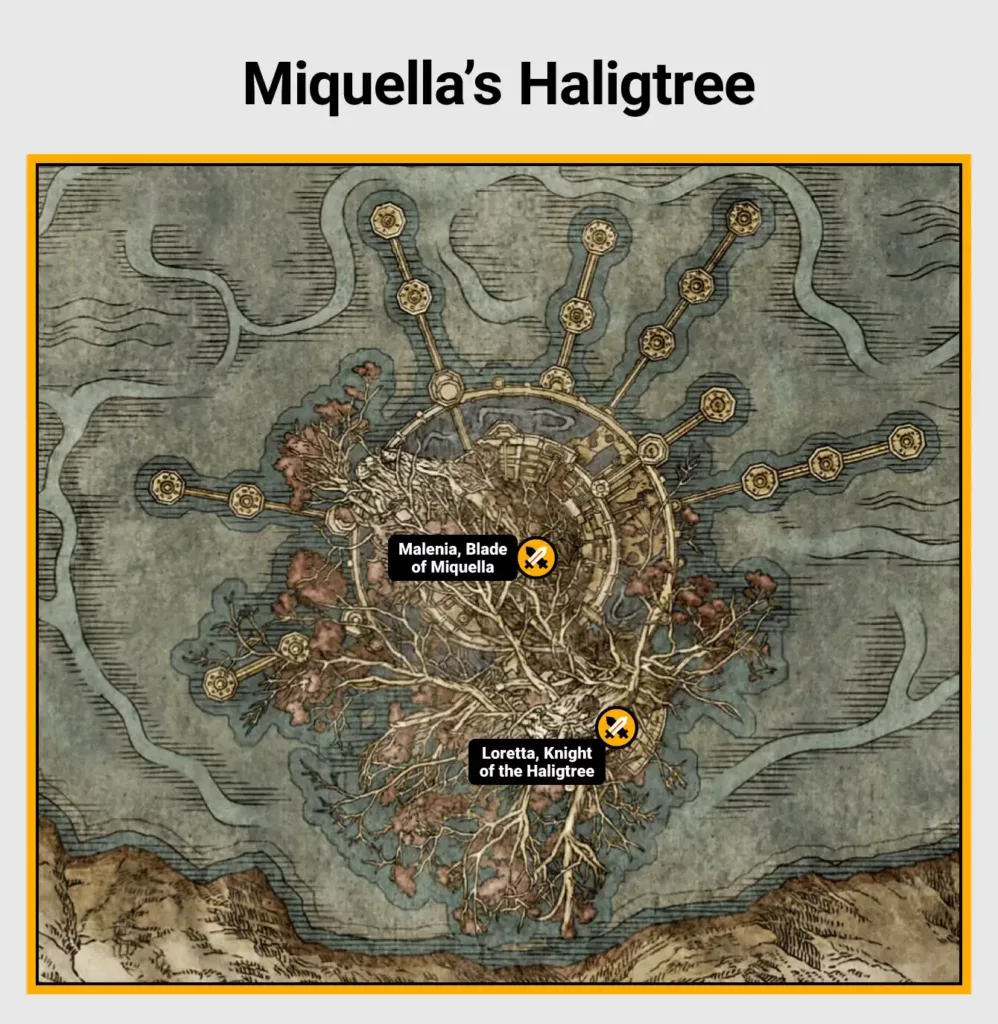
| Boss name | Location | Item drops | Pro tip |
| Loretta, Knight of the Haligtree | Courtyard in a temple in Miquella’s Haligtree | 200,000 runes, Loretta’s Mastery, Loretta’s War Sickle | During her multi-arrow attack, dodge forward and slightly to the side. |
| Malenia, Blade of Miquella | Elphael, Brace of the Haligtree | 480,000 runes, Malenia’s Great Rune, REmembrance of the Rot Goddess | Try to practice some solo gameplay first before calling for co-op help. During her Waterfowl Dance move, sprint directly away from her. |
Siofra River

| Boss name | Location | Item drops | Pro tip |
| Ancestor Spirit | Siofra River | 13,000 runes, Ancestral Follower Ashes | Wait for the boss’s head to lower since you’ll do more damage when that happens. |
| Mimic Tear | Nokron, Eternal City | 10,000 runes, Larval Tear x2. Silver Tear Mask | Similar to the last fight, unequip your gear before entering the arena, then re-equip it once the fight starts. |
| Regal Ancestor Spirit | Nokron, Eternal City | 24,000 runes, Remembrance of the Regal Ancestor | If you stay aggressive and keep landing, the boss is less likely to heal up frequently. |
| Dragonkin Soldier | Siofra River | 16,000 runes, Dragon Halberd | Hit the boss’s legs repeatedly, which will cause it to collapse, giving you chance to land a critical hit. |
| Valiant Gargoyle and Valiant Gargoyle (Twinblade) | Siofra Aqueduct | 32,000 runes, Gargoyle’s Greatsword, Gargoyle’s Twinblade | The second one will take a while to activate. Be quick and defeat the first one before they both fight together. |
| Mohg, Lord of Blood | Mohgwyn Palace | 420,000 runes, Mohg’s Great Rune, Remembrance of the Blood Lord | Use the Purifying Crystal Tear to significantly reduce the impact of this boss’s second phase. |
Deeproot Depths
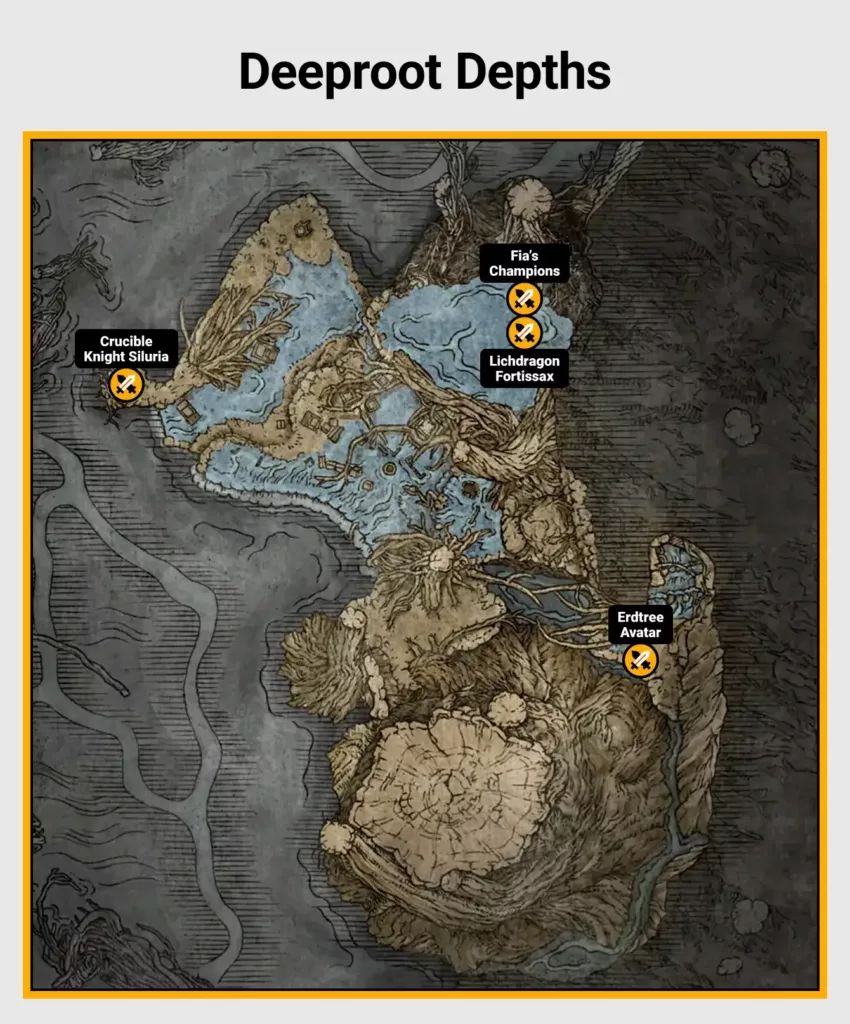
| Boss name | Location | Item drops | Pro tip |
| Fia’s Champions | Across the Roots | 40,000 runes, Fia’s Mist | Take out the first wave as fast as you can before the second one shows up since the second wave is much stronger. |
| Crucible Knight Siluria | The Nameless Eternal City | 25,000 runes, Siluria’s Tree | Try to parry the shield bash attack, as it will give you ample opportunity to deal damage. |
| Lichdragon Fortissax | Across the Roots (part of Fia’s quest and narrative) | 90,000 runes, Remembrance of the Lichdragon | If you stay directly underneath him, there’s a big chance he’ll miss most of his lightning attacks. |
| Erdtree Avatar | Near the Great Waterfall Crest Sitre of Grace | 10,000 runes, Staff of the Avatar | Try to bait the charge attack to land heavy hits. |
Lake of Rot
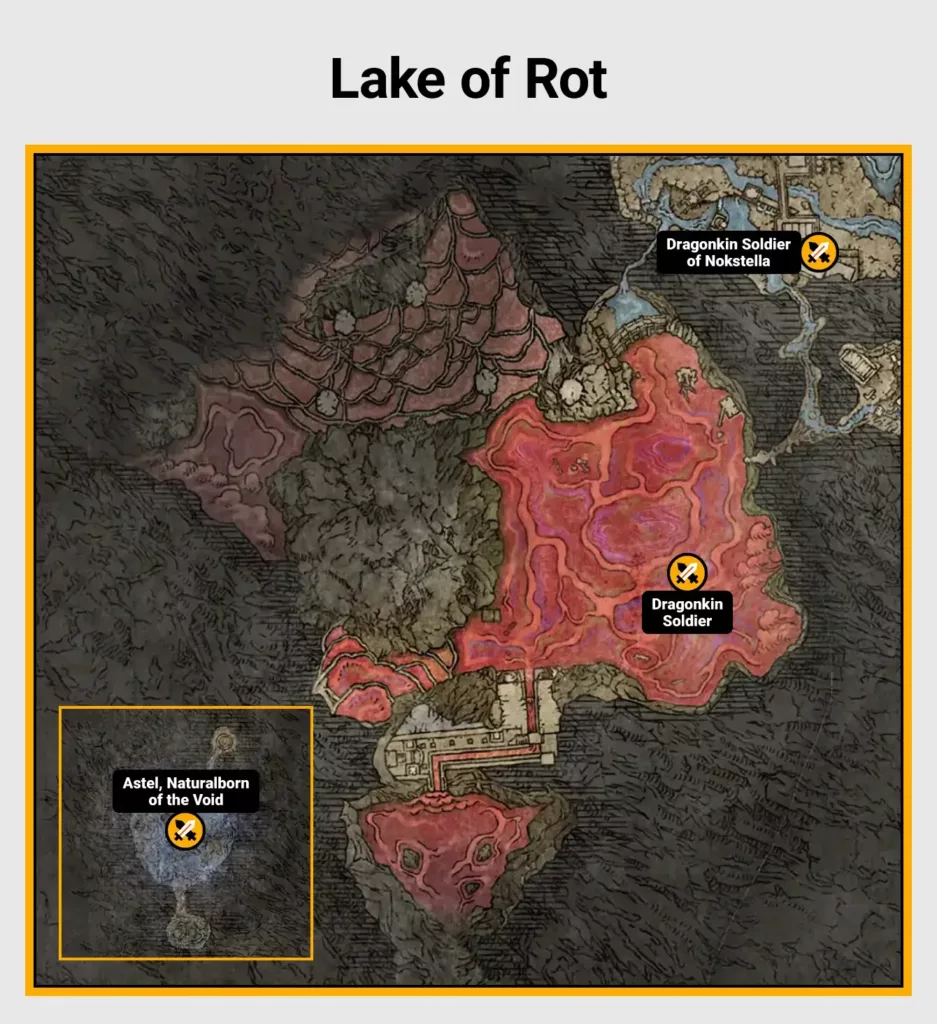
| Boss name | Location | Item drops | Pro tip |
| Dragonkin Soldier | Lake of Rot | 58,000 runes, Dragonscale Blade | Look for a platform nearby with a small tower next to it. This lets you have the high ground, putting you at an advantage. |
| Dragonkin Soldier of Nokstella | Uhl Palace Ruins in Ainsel River | 12,000 runes, Frozen Lightning Spear | The lightning moves have a long recovery time. That’s when you need to land some heavy hits. |
| Astel, Naturalborn of the Void | Grand Cloister | 80,000 runes, Remembrance of the Naturalborn | Sprint away from the meteor attacks instead of dodging. |
Crumbling Farum Azula
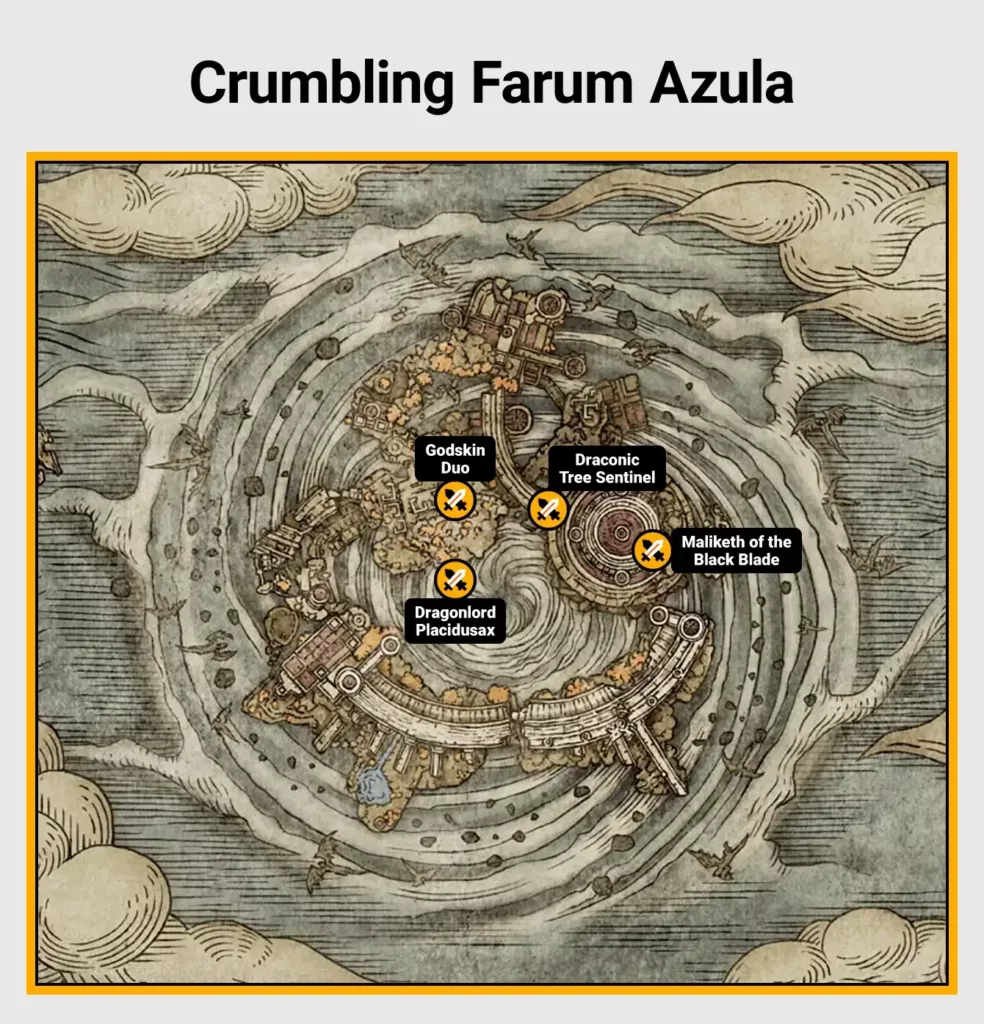
| Boss name | Location | Item drops | Pro tip |
| Godskin Duo | Crumbling Farum Azula | 170,000 runes, Smithing-stone Miner’s Bell [4], Bearing Flame Tornado | These two are extremely weak to the sleep effect. So, use Sleep Pots against them and fight one boss at a time. |
| Maliketh of the Black Blade | Crumbling Farum Azula | 220,00 runes, Remembrance of the Black Blade | During phase two, roll toward him rather than away, as it reduces the chance of getting hurt by the rapid slashes. |
| Dragonlord Placidusax | Crumbling Farum Azula | 280,000 runes, Remembrance of the Dragonlord | The lightning spear move has a long recovery period, giving you an advantage. |
| Draconic Tree Sentinel | Crumbling Farum Azula | 28,080 runes, Malformed Dragon helm, Malformed Dragon armor, Malformed Dragon gauntlets, Malformed Dragon greaves | Bait the fireball attack to give you an opening for some heavy hits. |
Leyndell, Ashen Capital
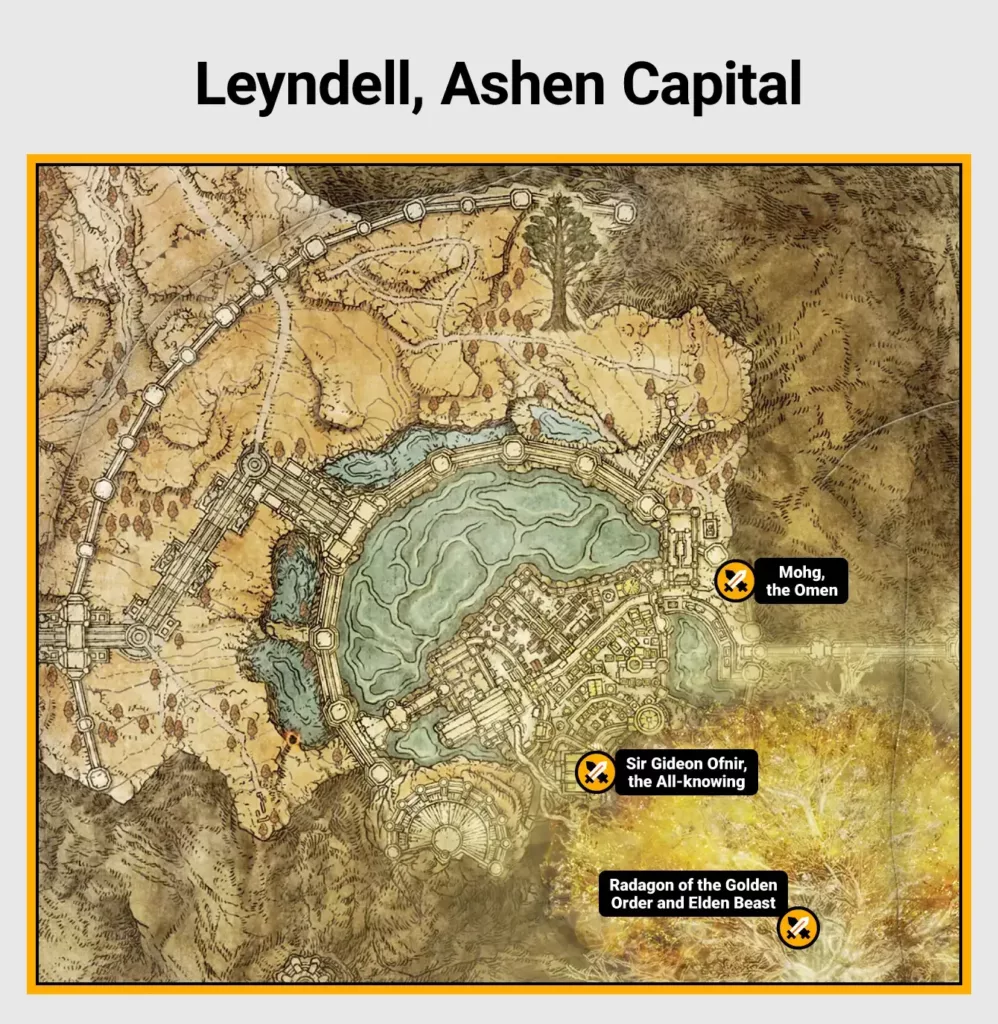
| Boss name | Location | Item drops | Pro tip |
| Mohg, the Omen | Subterranean Shunning-Grounds | 100,000 runes, Bloodflame Talons | Even if you’re playing solo, Mohg’s Shackle can be used twice during the first phase to stagger him. |
| Sir Gideon Ofnir, the All-knowing | Leyndell, Ashen Capital | 35,000 runes, Scepter of the All-knowing, All-knowing Helm, All-knowing Armor, All-knowing Gauntlets, All-knowing Greaves | Make sure to rush in right before he casts any magic. He relies too much on it, and that’s his weakness. |
| Radagon of the Golden Order and Elden Beast | Leyndell, Ashen Capital | 500,000 runes, Elden Remembrance | For Radagon, roll toward his hammer slam. For Elden Beast, stay close to avoid the homing sword attacks. Remember, you can always have an online friend to help you out. |
Tips for Beating the Hardest Bosses in Elden Ring
All main bosses in Elden Ring have some kind of weakness. However, learning their movement and attack patterns is the key to victory. As you defeat Elden Ring bosses in order, you’ll notice that certain status effects (such as Bleed, Sleep, or Frostbite) can be used against certain bosses. Use them to your advantage!
Malenia, Blade of Miquella
In Elden Ring, bosses can sometimes become predictable due to their movesets. But Malenia? Let’s just say that defeating her is no easy task — not even if you’re a Soulslike veteran. However, here are some tips to make sure you’re well-prepared:
- During her first phase, avoid panic rolling. Instead, stay aggressive but watch out for her parries. During the Waterfowl Dance, immediately run away.
- During her second phase, avoid the Scarlet Aeonia AoE damage since there will be a Scarlet Rot explosion at the end of it. At other times, stay close to her but not too close!
- Some weapons and gear to equip: The Bloodhound’s Step Ash of War works well when you need to escape the Waterfowl Dance attack. Use Fire, Frost, and Bleed Buffs in your attacks. Additionally, Colossal Weapons do a great job of staggering her.
Maliketh, the Black Blade
New players may find this fight a bit intimidating and seek co-op support. Keep these strategies in mind when going against this boss:
- During his first phase, you need to stay close. The Beast Clergy man throws fast daggers and AoE slashes, which you can avoid if you follow this strategy.
- When he slams the ground to throw rocks, dodge diagonally toward him to close the gap and punish him.
- During his second phase, stay mid-range to be in control of the fight. At the same time, use pillars to block his projectiles. This can buy you some time in case you need to heal (which is going to happen, isn’t it?).
- Some weapon and gear to equip: Use Holy or Magic Resistance to stay safe from his attacks. Using Frost and Bleed damage against him can be quite efficient.
Radagon of the Golden Order
As Elden Ring’s final boss, this one’s a relentless, hard-hitting boss with Holy-infused attacks. His aggressive nature makes the fight about being sure of his delayed attacks and dodging at the right time. Here are some tips to keep in mind:
- During the first phase, you need to stay close to him so he keeps swinging his mace instead of casting a spell. The moment he’s done swinging, punish him with a few attacks. Avoid using a lot of Flasks during this phase since you’ll need them for the second one.
- Phase two is all about staying up close so you can aim for his rear legs. However, instead of mindlessly attacking, bait him to do one of his slower melee attacks. Once he starts swimming away, you’ll need to chase him a bit.
- Some weapons and gear to consider: Equip holy talismans and any armor that negates Holy damage. Hoarfrost Stomp (Ashes of War) is quite effective, too.
Try a New Challenging RPG Today
Elden Ring boss locations certainly make it one of the most popular games ever, as the game masterfully blends environment design with boss fights. With several Game of the Year awards, Elden Ring has been a source of inspiration for many newer games in the genre.
Naturally, you’ll want to check out a strong collection of games to explore what’s next for you. It may be fantastical realms to explore, powerful bosses to beat, or simply mastering a new RPG all over again.