Starfield: 11 Best Ships For Every Player

Starting your expedition in Starfield is one step closer to unlocking infinite possibilities across the galaxies. You’re met with endless characters, stories, weapons, quests, and things to do. All of this is tied to Starfield’s best ships, since traversing across different planets is part of the game’s core mechanics. Of course, you can just walk and float your way through the game, but we don’t have 4,000 spare hours on our hands, do we?
Before you venture into different quests and commit yourself to a single part of the game’s massive narrative, you should find a ship worthy of your playstyle, personality, and ambitions in Starfield. In this guide, I’ll cover the best ships you can find in Starfield, and the kind of gameplay they excel at.
Elements of Starfield Ships
Your ship needs certain components to make sure you’re safe and sound. Otherwise, Starfield’s ship design mechanics can limit your performance, survivability, and strategy, regardless of whether you’re on PC or console. These are parts you need to be aware of.
- Ballistics: These weapons fire kinetic rounds and shred enemy hulls. They’re reliable and use standard ammunition, making them a source of offense in many loadouts.
- Cannons: Heavier ballistic weapons that deal powerful burst damage. While they have a slower fire rate, they’re great for one-shot takedowns and damaging armored enemies.
- Cargo Capacity: Determines how much you can carry. Everything from loot, contraband, and resources is a part of this, and it’s essential to focus on if you’re an explorer or trader.
- Class: Class rankings affect the size of parts a ship can equip and the kind of modules it can support. Higher classes entail stronger builds.
- Cost: Total price of the ship in credits. Premium ships may offer top-notch stats, but can be expensive.
- Fuel: Determines how far you can travel in a single grav jump. More fuel means more travel without needing to stop at every system.
- Hull: Your ship’s base health. When shields are destroyed, the hull takes direct damage.
- Jump Range: The maximum distance your ship can traverse between different star systems.
- Location: Place where your ship can be bought or found. Some ships are only available through certain quests or rare vendors at specific settlements.
- Maximum Crew: Limits how many companions or crew members you can assign to the ship. More crew entails better boosts to weapons, engineering, and other systems.
- Missiles: Explosive weapons that lock onto targets and deal extreme damage, especially to shields.
- Shield: Your first layer of defense. Shields absorb damage before something hits the hull and recharge over time.
| Ship | Class | Equipped Modules | Weapons |
| Narwhal | C | Pinch 8A Reactor (Class C, adds +1950 hull strength) 2x Nova 1000 Engines, 2x Nova 1020 Engines J-52 Gamma Grav Drive Odin 3040-C Shield Generator 4x 400G He3 Tanks (560 fuel capacity) Galleon S204 Cargo Hold (1760 capacity) Shogun Cockpit Ship Bed 200 Landing Bay | 3x Blaze-P 2GW SX Pulse Laser Turrets 2x Marauder 115N 2x Railguns 2x Tsukisasu 40k Missile Launcher |
| Star Eagle | A | Tokamak X-300 reactor SGD-1400 Grav Drive 4x SA-4330 Engines Marduk 1040-A Shield 2x M20 Ulysses He3 Tanks 2x 30T Hauler Cargo Holds CP-220 Cockpit Ship Bed 200 Landing Bay 2x Supaku 250GC Suppressors 2x Infiltrator SC-02 Missile Launchers 2x Reza 30 THz IR Pulse Lasers | 2x Infiltrator SC-02 Missile Launchers 2x Reza 30 THz IR Pulse Lasers 2x Supaku 250GC Suppressors |
| Razorleaf | A | Tokamak X-100 Reactor R-1000 Alpha Grav Drive 2x Ares DT60 + 2x White Dwarf 1000 Engines Bastille S81 Shield 400 G He3 Tank 100 CM Ballast Shielded Cargo DS20.2 Phobos Cockpit Ship Bed 200 Landing Bay Slim Docket and Pinpoint landing gear Deimos Hab modules | 2x Flare-P 15 MW IR Pulse Lasers 2x Disruptor 3300A Auto Electron Beam CE-09 Missile Launcher |
| Abyss Trekker | C | Pinch 6Z Reactor SGD 3100 Grav Drive SAL-6110 and Sal-6220 Engines 102D Guardian Shield 900T He3 Tank Base cargo capacity of 340 Kon-Tiki B-400 Bridge Cockpit | PBO-300 Auto Alpha Beam PBO-300 Auto Alpha Beam Turrets CE-49 Missile Launcher |
| Silent Runner | C | SF30 Sheared Flow Reactor Armstrong 10R Cockpit Hope 4 Landing Bay SGD 3300 Grav Drive 2x Supernova 2200 Engines Assurance SG-2000 Shield 2x M40 Ulysses He3 Tanks 4x Galleon S202 Cargo Hold 2x 400CM Ballast Cargo Hold 2x 10T Hauler Cargo Hold | 2x Disruptor 334A Auto Alpha Turrets CE-49 Missile Launcher |
| Aegis | B | Z-Machine 2020 Reactor 2x Nova 1050 Engines Aurora 12G Grav Drive 22T Defender Shield 2x H30 Atlas He3 Tanks Standard Cargo capacity of 200 120LD Landing Bay | 2x Scorch-P 60 MW Pulse Lasers 2x Mauler 106S Shot-Cannons Atlatl 270B Missile Launcher |
| Stronghold | C | SF20 Sheared Flow Reactor SGD 3300 Grav Drive 2x Supernova 2000 Engines Assurance SG-1800 Shield 4x H800T He3 Tanks 4x 300CM Ballast Cargo Hold 4x StorMax 30 Cargo Hold Armstrong 20 Cockpit Stability Pro Landing Bay HopeTech Hab modules | 2x Dragon 261 SX Laser Turrets 2x Jishaku Nd RF Rapid Railgun Turrets |
| Wanderwell | A | 134 MM Toroidal Reactor R-4000 Alpha Grav Drive 2x White Dwarf 1000 + Amun-2 Engine Bastille S82 2x M30 Ulysses He3 2x Caravel V102 Cargo Holds Magellan C1 Cockpit Hope 4 Landing Bay | 2x Mauler 104L Cannons EMP-80 Suppressor |
| Dragonfire II | C | SF20 Sheared Flow Reactor SGD 3200 Grav Drive Supernova 2100 Engine 102D Guardian Shield 500T + 600T He3 Tanks StorMax 40 + 30T Hauler Cargo Holds Cabot C3X Bridge Cockpit | Jishaku Nd Railgun PBO-100 Auto Neutron Turret |
| Shieldbreaker | B | DC302 Fast Ignition Reactor Aurora 11G Grav Drive 2x Dunn-51 + Dunn-31 Engine 22T Defender Shield H40 Atlas He2 Tank 2x 30T Hauler Cargo Hold DS20.3 Phobos Cockpit 120LD Landing Bay Full Deimos hangar | 3x Scorch-S 80 MW Pulse Laser Turrets Jishaku AlNiCo RF Rapid Railgun CE-29 Missile Launcher |
| Frontier | A | 330T Stellarator Reactor NG-160 Grav Drive 2x White Dwarf2000 Engines 10S Protector 100G He3 Tank 100CM Ballast Cargo Hold Magellan C2 Cockpit NG-6 Landing Bay Nova Galactic Frontier 2×1 Hab | 2x Dragon221P MW Pulse Laser Mauler 104L Cannon Atlatl270A Missile Launcher |
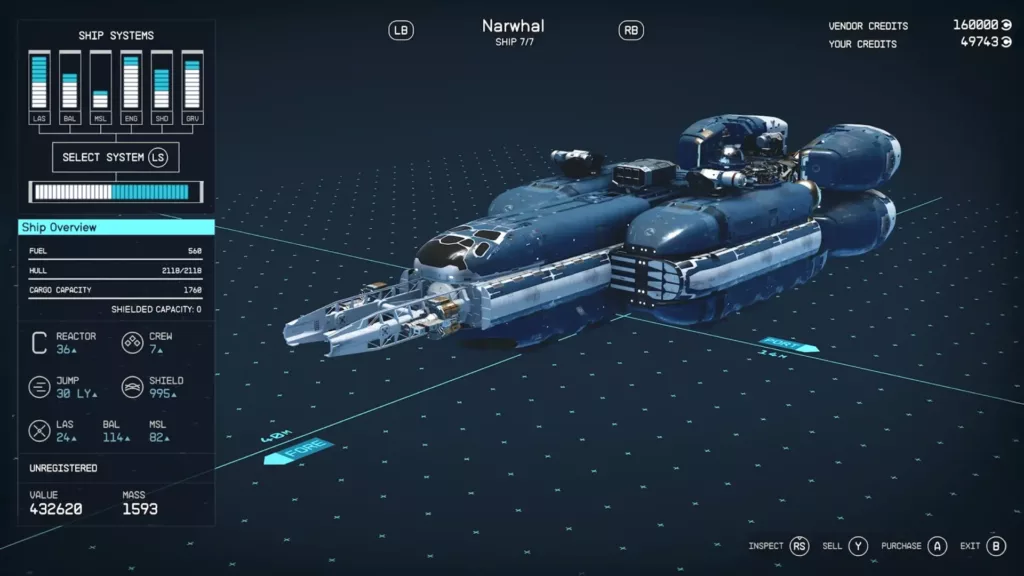
1. Narwhal
| Ballistics: | 114 |
| Cannons: | 0 |
| Cargo Capacity: | 1,760 |
| Class: | C |
| Cost: | 432,630 |
| Fuel: | 560 |
| Hull: | 2,118 |
| Jump Range: | 30 LY |
| Location: | Neon (Taiyo HQ) |
| Maximum Crew: | 7 |
| Missiles: | 82 |
| Shield: | 114 |
Best For: All-around combat and cargo
Narwhal is, hands down, one of the best ships in Starfield. It builds on making the best of Starfield’s RPG mechanics and flying controls. It’s a class C behemoth that boasts massive hull strength, powerful shields, and covers impressive amounts of light-years (LY). It also comes fully stocked with pulse lasers, rail guns, and missile launchers, giving you a great advantage in space-bound dogfights.
It’s also great for dominating endgame content, which may require several hours of playtime, making its cargo capacity something to be proud of. Its only major drawback lies in its steep price tag and the requirement for Piloting Rank 4, which you’ll need to invest skill points for. But once you do, it’s certainly worth the purchase.

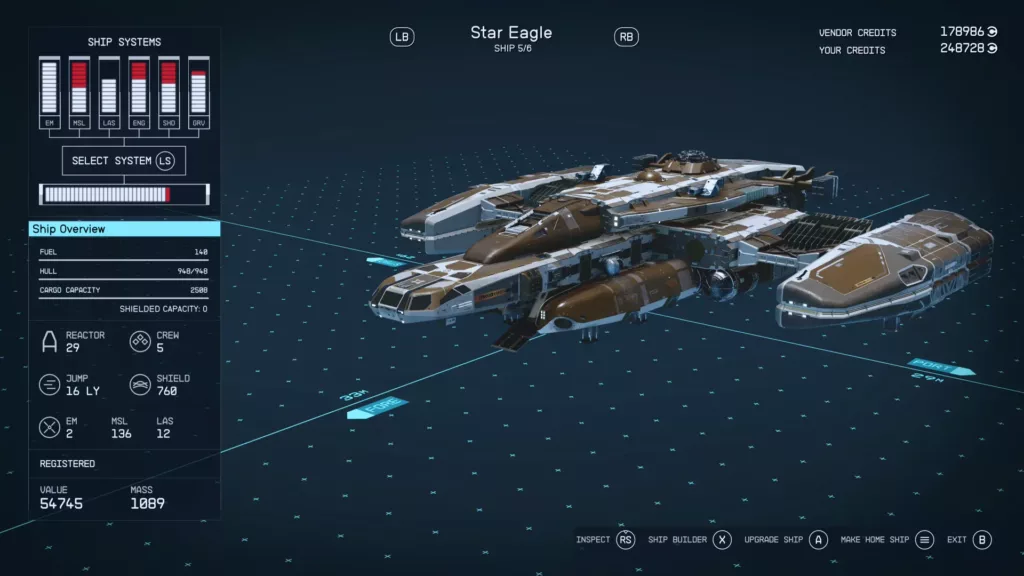
2. Star Eagle
| Ballistics: | 0 |
| Cannons: | 0 |
| Cargo Capacity: | 2,280 |
| Class: | A |
| Cost: | 3,398 |
| Fuel: | 140 |
| Hull: | 948 |
| Jump Range: | 16 LY |
| Location: | Freestar Rangers quest reward |
| Maximum Crew: | 5 |
| Missiles: | 130 |
| Shield: | 760 |
Best For: Free combat ship
The Star Eagle has many things that make it an awesome ship: high cargo capacity, missiles, lasers, suppressors, and an overall balanced design. But the best thing about it? It’s completely free. It’s a quest reward by the Freestar Rangers, almost like a carefully crafted reward for an epic solo adventure across the galaxies.
Even with the zero fee, it packs a solid punch that rivals many ships sold for thousands of credits. Many Starfield ship builds often lack a feature or two, but the same can’t be said for the Star Eagle. Its generous cargo space alone makes it a reliable pick, while the trip weapon configuration gives you plenty of flexibility in fights. If you favor a lawful and bounty-hunter style playthrough, this ship is the perfect one for you!
3. Razorleaf
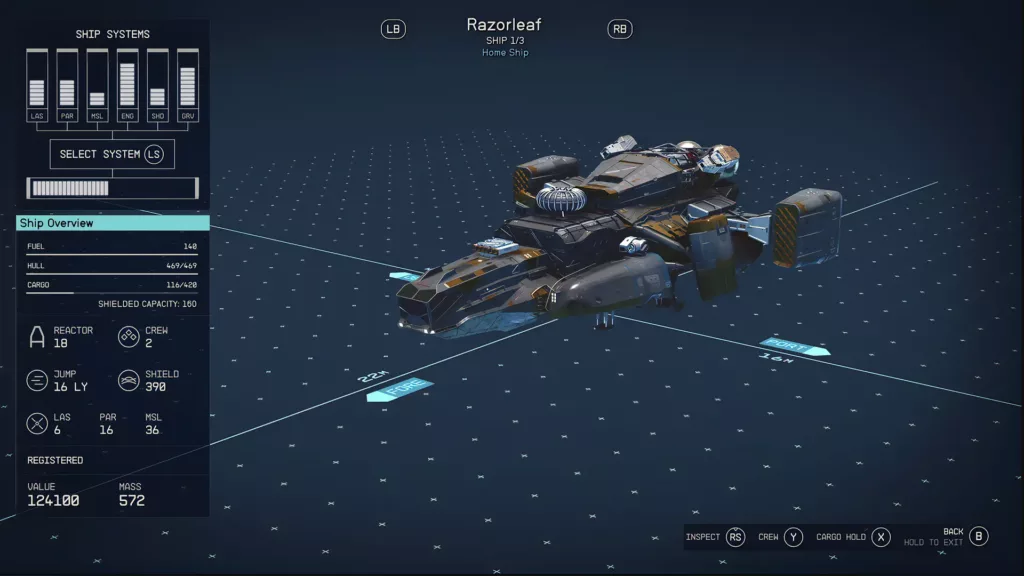
| Ballistics: | 0 |
| Cannons: | 0 |
| Cargo Capacity: | 420 |
| Class: | A |
| Cost: | 0 |
| Fuel: | 140 |
| Hull: | 469 |
| Jump Range: | 16 LY |
| Location: | Denebola I-b |
| Maximum Crew: | 2 |
| Missiles: | 36 |
| Shield: | 390 |
Best for: Early-game intimidation
Razorleaf has a modest profile, fast engines, and a built-in shielded cargo hold tailored to pirates and smugglers who wish to fly under the radar. When combined with Starfield’s core RPG traits of Starfield, it becomes a stealthy and reliable ship. If you’ve been a Bethesda fan for a while, you know how much stealth plays a role in many gameplay scenarios, and that’s where the Razorleaf shines.
Its blend of agility, hidden contraband space, and stylish design makes it an easy pick, essentially for players who like to be extra careful with how they go about day-to-day activities. While its hull and shields are a bit weaker than other high-end ships, you’ll enjoy flying light and fast while carrying questionable goods. Remember, you’re in the wrong only if someone catches you!
4. Abyss Trekker
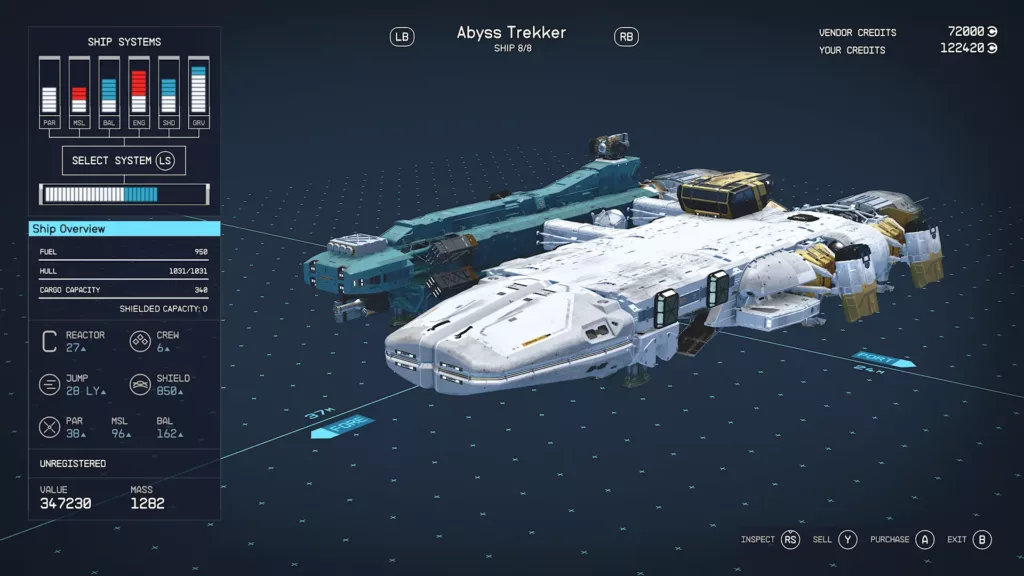
| Ballistics: | 162 |
| Cannons: | 0 |
| Cargo Capacity: | 340 |
| Class: | C |
| Cost: | 365,525 |
| Fuel: | 950 |
| Hull: | 1,031 |
| Jump Range: | 25 LY |
| Location: | Paradiso |
| Maximum Crew: | 6 |
| Missiles: | 96 |
| Shield: | 850 |
Best for: Pure combat and offense
This one excels in versatility, with a powerful and balanced weapon array. Whether it’s the ballistics, particle beams, or missiles you favor, the Abyss Trekker is here to please and provide. It’s a great choice for explorers who carry crew and cargo across several systems and wish to be ready for any combat scenario that may unexpectedly show up.
Fortunately, it doesn’t require heavy upgrades to perform well. It’s great for longer grav jumps while having reliable shields, plus over 1,000 hull health, which basically makes it a flying tank. Though the default cargo capacity isn’t much, it’s easily expandable (if needed). The Abyss Trekker will be a great companion, whether running bounties, transporting rare loot, or simply free-roaming.
5. Silent Runner

| Ballistics: | 0 |
| Cannons: | 0 |
| Cargo Capacity: | 6,060 |
| Class: | C |
| Cost: | 390,150 |
| Fuel: | 300 |
| Hull: | 1,164 |
| Jump Range: | 29 LY |
| Location: | HopeTech showroom, Valo |
| Maximum Crew: | 5 |
| Missiles: | 96 |
| Shield: | 975 |
Best for: Smuggling and massive cargo
This ship has the largest cargo capacity in Starfield, making it an easy choice for traders, smugglers, and explorers. Seriously, this thing can carry practically everything you can imagine, even your companions’ emotional baggage after all that burdensome adventuring. Despite being a Class C ship, it offers enough shielding and hull strength to go through minor skirmishes.
Its speed-forward design lets you move cargo across different systems, enabling quicker travel with lots of goods. While it doesn’t have the best weapons to protect itself, its built-in missile and particle turrets can give you a solid punch if you’re ever confronted by hostile ships. Its respectable power generation and crew capacity further improve the ship’s value, making it a smart pick for anyone doing several quests and exploring Starfield’s content to its fullest.
6. Aegis
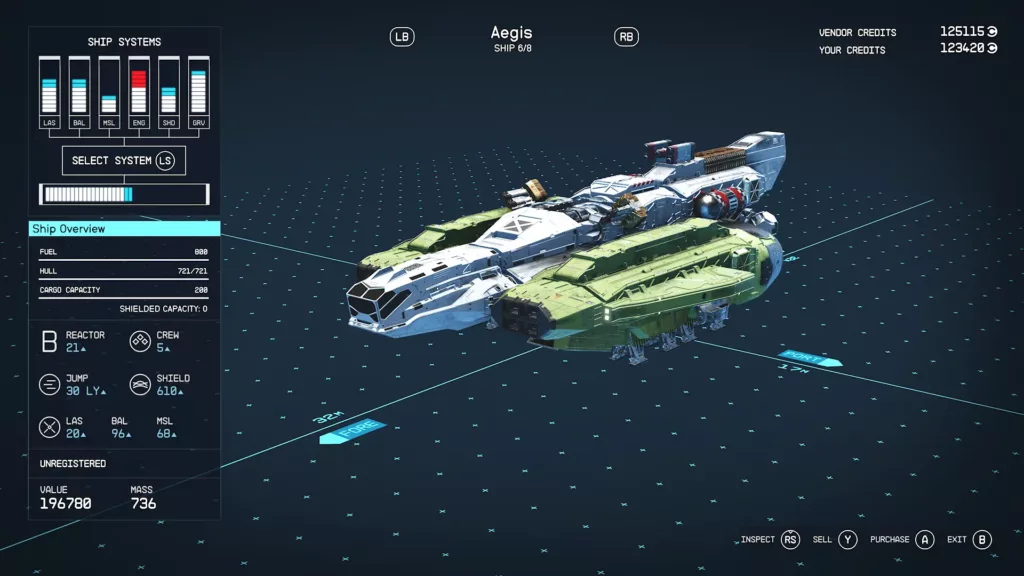
| Ballistics: | 96 |
| Cannons: | 0 |
| Cargo Capacity: | 200 |
| Class: | B |
| Cost: | 207,150 |
| Fuel: | 800 |
| Hull: | 721 |
| Jump Range: | 29 LY |
| Location: | Deimos Staryards |
| Maximum Crew: | 5 |
| Missiles: | 68 |
| Shield: | 200 |
Best for: Balanced mid-game combat/cargo
This sleek Class B destroyer-style ship stands out for its offensive versatility and compact layout. It’s much faster and agile than bulkier warships, offering high mobility while packing a punch thanks to its balanced-out weapon systems. Its modest crew and cargo capacity keep it agile without compromising on offensive capabilities, making it viable in most mid-game situations.
It’s accessible early in Starfield’s journey, assuming you have Piloting Rank 3 and enough credits. Its standard loadout features pulse lasers, shot-cannons, and missile launchers, which ensure it’s ready for engagement in case hostile situations arise. Aegis strikes a healthy balance regardless of pirate tactics or lawful engagement.
7. Stronghold
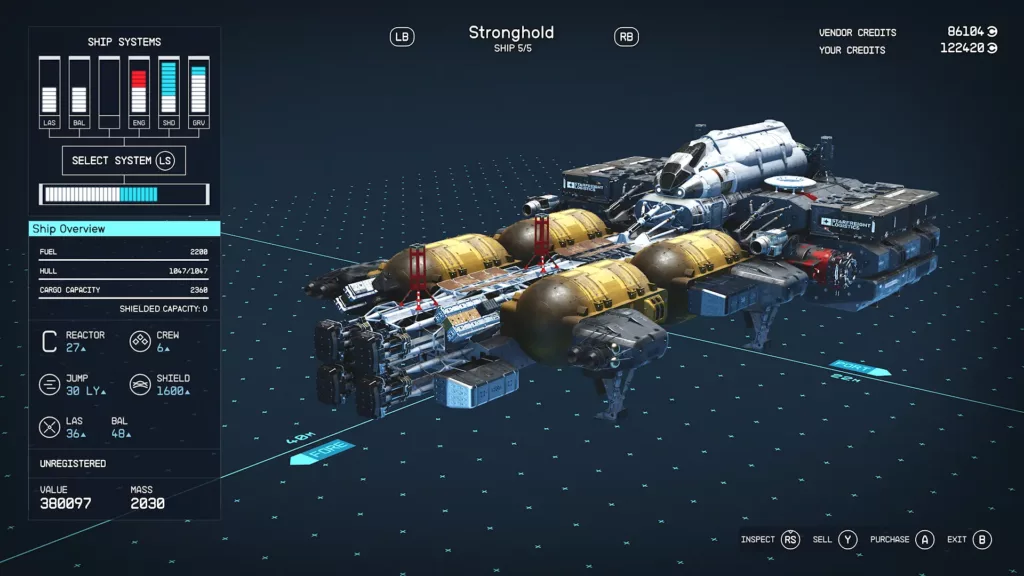
| Ballistics: | 48 |
| Cannons: | 0 |
| Cargo Capacity: | 2,360 |
| Class: | C |
| Cost: | 400,125 |
| Fuel: | 2,200 |
| Hull: | 1,047 |
| Jump Range: | 30 LY |
| Location: | Akila City |
| Maximum Crew: | 6 |
| Missiles: | 0 |
| Shield: | 1,600 |
Best for: Tanking damage with huge cargo
This ship is engineered for maximum crew transport, cargo space, and defensive strength. It’s essentially a mobile fortress that thrives in long-haul quests and transporter-heavy roles. Its massive shield and cargo capacity can absorb hits and carry out valuable missions without causing much trouble. Its high fuel capacity and jump range let you cover vast distances, so exploration never stops!
Stronghold’s multi-role endurance is what makes it special. It’s equipped with ballistic and laser turrets by default, providing balanced firepower while keeping its main focus on personnel and cargo transportation. So, if you’re on a faction-based quest run and get into a fight, there’s a good chance the ship will get through the situation.
8. Wanderwell
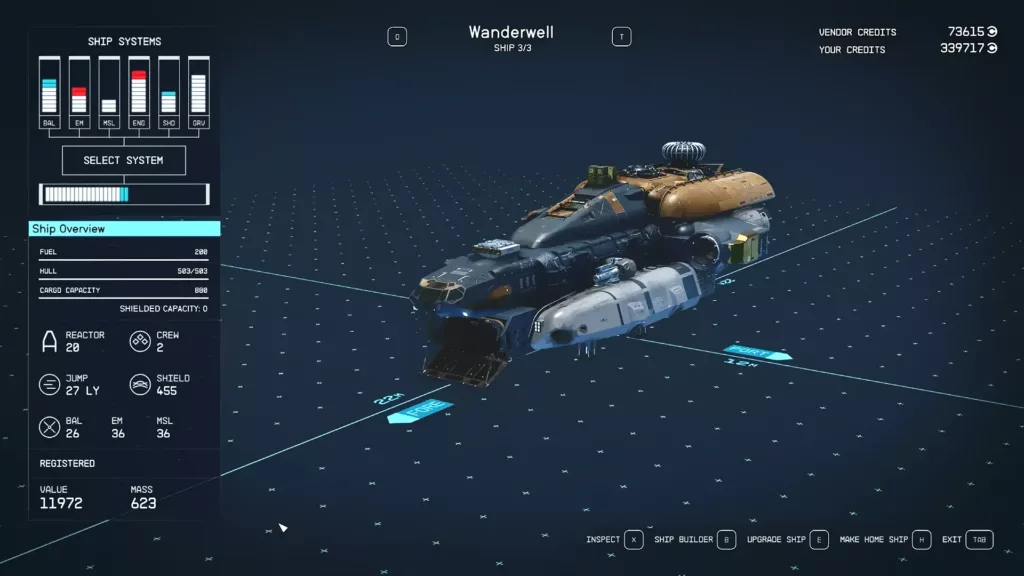
| Ballistics: | 26 |
| Cannons: | 0 |
| Cargo Capacity: | 800 |
| Class: | A |
| Cost: | 0 |
| Fuel: | 200 |
| Hull: | 502 |
| Jump Range: | 27 LY |
| Location: | Obtained via Kid Stuff trait |
| Maximum Crew: | 2 |
| Missiles: | 0 |
| Shield: | 455 |
Best for: Exploration and long-distance travel
This ship is gifted to you when you’re starting a new game and loading into Starfield’s massive in-game universe — you just need to choose Kid Stuff as a trait in the character selection screen. This unlock stands out as a charming and unconventional ship. It has a cozy interior, low crew capacity, and medium jump range.
This nimble little vessel blends a balanced loadout of ballistics and EM weaponry, making it a surprisingly awesome early-game pick, especially for quick skirmishes. While its power may not impress, it’s still perfect for lightweight exploration and smuggler-style runs. All this without spending a single credit!
9. Dragonfire II
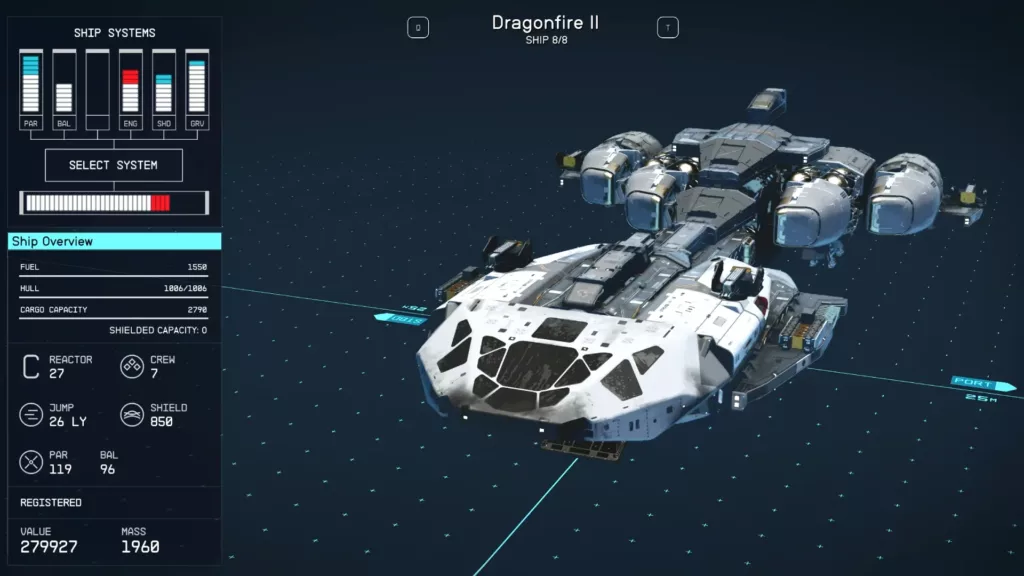
| Ballistics: | 92 |
| Cannons: | 0 |
| Cargo Capacity: | 2,790 |
| Class: | C |
| Cost: | 368,325 |
| Fuel: | 1,550 |
| Hull: | 1,006 |
| Jump Range: | 26 LY |
| Location: | Ship vendors |
| Maximum Crew: | 7 |
| Missiles: | 0 |
| Shield: | 850 |
Best for: Balanced high-end stats
This ship is one of the best combat-driven Class C vessels due to its impressive balance of firepower, cargo, and endurance. Even though its Reactor power isn’t the best for its class, it combines a strong hull with reinforced shields. Its wide weapon spread also makes it resilient during prolonged fights, especially during challenging early-to-mid game scenarios.
You can get it from vendors scattered across systems like Eleos Retreat, Neon, Gagarin, and Paridos, making the ship quite accessible if you’re simply exploring the game in search of content. The Dragonfire II is crafted for captains who demand survivability and damage output from a mid-tier design without compromising accessibility.
10. Shieldbreaker
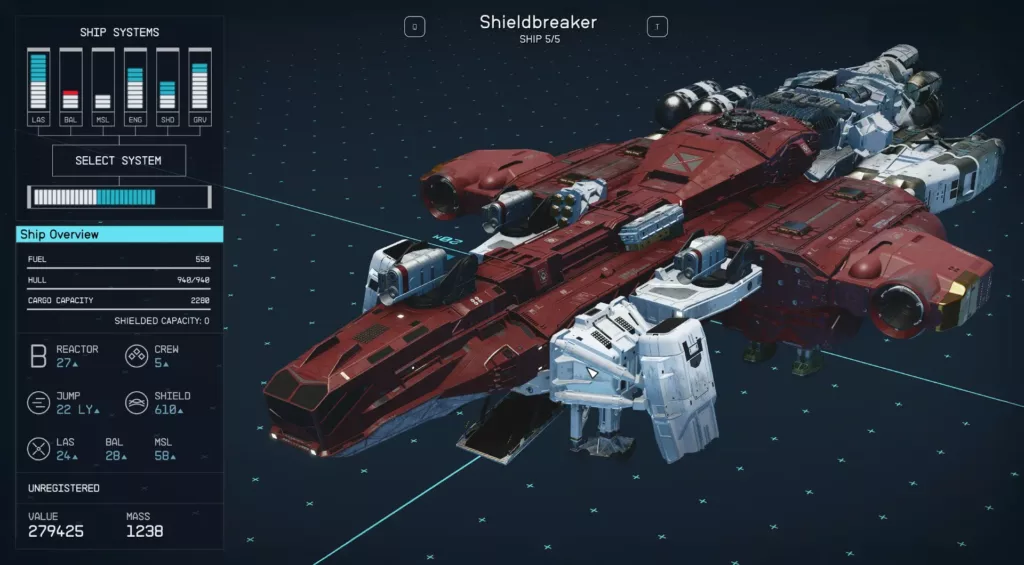
| Ballistics: | 28 |
| Cannons: | 0 |
| Cargo Capacity: | 2,280 |
| Class: | B |
| Cost: | 279,425 |
| Fuel: | 550 |
| Hull: | 940 |
| Jump Range: | 22 LY |
| Location: | New Atlantis Ship Services Technician |
| Maximum Crew: | 5 |
| Missiles: | 58 |
| Shield: | 610 |
Best for: Early-game combat upgrade
This ship fights hard and makes its presence known with top-notch weapons and layered defenses. During many fights, core RPG elements (such as weapon stats) can shift in the enemy’s favor if you’re not careful, and that’s where its three pulse laser turrets and fast maneuverability come into play.
While you may assume the ship’s stats set it apart…its availability does the job! You see, the Shieldbreaker is available early in the game, and you can get it from New Atlantis’ Ship Services Technician once you’re at Piloting Rank 3. So, no need to steal ships. Instead, work hard and save money for this one. It also has massive modding potential, boosting its versatility even further.
11. Frontier

| Ballistics: | 14 |
| Cannons: | 0 |
| Cargo Capacity: | 450 |
| Class: | A |
| Cost: | 7,375 |
| Fuel: | 50 |
| Hull: | 366 |
| Jump Range: | 16 LY |
| Location: | One Small Step quest reward |
| Maximum Crew: | 2 |
| Missiles: | 47 |
| Shield: | 310 |
Best for: Learning ship customization
The Frontier is the first ship most players embark on, introducing them to Starfield’s vibrant open-world experience. Even with its unimpressive stats, it holds deep lore and narrative value, shaping the game’s early hours. Its lightweight build with low raw power rewards those who steadily upgrade the ship’s engines, reactors, and weapons as the game progresses.
This ship also feels special because it’s earned, not purchased. It’s awarded after a quest, marking a proof of your adventure and commitment to the game’s exploration. When you combine such narrative relevance with early-game introductions, Frontier becomes a ship that may not stay with you for long, but it’ll certainly stay in your memory throughout Starfield.
Tips For Building the Best Ship in Starfield
Starfield’s ship classes and stats are important aspects of your playstyle in the game. Ideally, having the best ship reflects your gameplay stats and how you choose to customize your experience. That said, there are some important things to consider when building the perfect ship for your character.
- Don’t neglect ship mobility: Your ship’s turning speed and thrust impact how dogfights happen. Lightweight engines and balanced thruster placement can make your ship feel agile instead of slow and heavy.
- Focus on particle beam weapons: Particle weapons deal both hull and shield damage, making them highly efficient against all enemy types.
- Install the best reactor: A strong reactor gives you more energy to allocate across engines, weapons, and shields. This is essential for sustaining pressure during long fights.
- Maximize your shield strength: Shields are your first line of defense, and investing in high-capacity shield generators can be the difference between survival and demise.
- Use structural components as aesthetics: These components don’t affect stats, but improve visibility in third-person mode, and add personality to your ship’s build.
Embark on Your Next RPG Quest
Exploring Starfield’s ship ideas can reflect your adventures in the game. A well-built ship showcases your expertise and how far you’ve come. Just like that, your journey across RPGs should reflect your taste. Whether it’s an online game or an offline experience, a powerful RPG title can shape memories, stories, and moments of joy for you.
It’s recommended that you browse through a reliable RPG collection and pick a game that balances deep lore and customization. While there’s only one Skyrim or Starfield, there are several others built on the shoulders of giants like Bethesda, and the world of RPGs is one that you must brave!
FAQ
What Is the Best Ship To Have in Starfield?
The Narwhal is widely considered to be the best all-around ship thanks to its elite Class C performance. It boasts a huge hull, excellent shield protection, high crew capacity, and powerful weapon loadout. It is certainly expensive, but a promising ship that will carry you gracefully through Starfield’s endgame content.
Who Has the Best Ship Parts in Starfield?
Taiyō Astroneering offers top-notch structural and defensive components (like the ones found in Narwhal), while Deimos provides great reactors and cockpits for most tactical builds. However, HopeTech specializes in freighter-class hulls with huge cargo capacity.
Who Is the Best Ship Crew in Starfield?
Barrett is often considered the best companion in this context. His exceptional skills in Starship Engineering, Particle Beam Weapon Systems, and Robotics make him extremely valuable for boosting durability and ship damage.
What Is the Biggest Ship You Can Get in Starfield?
The Silent Runner and Stronghold are some of the biggest ships you can find and own in the game. Silent Runner has a 6,060 cargo capacity, and the Stronghold offers top-tier crew support, size, and shielding.