All Sites of Grace Locations in Elden Ring + Tips


Getting lost in the Lands Between is sort of like a rite of passage, but it puts you in challenging situations. So, what’s the best way to deal with this kind of anxiety? Finding Sites of Grace in Elden Ring. There are over 300 of these golden lifesavers scattered across the map, and you should consider unlocking all of them.

We’re here to save your runes and sanity. This guide breaks down essential Grace locations region by region, ensuring you always have a fast-travel point ready to use before blindly entering a boss fight, which you absolutely will, won’t you?
Editor’s note: Many of the Sites of Grace are optional and aren’t needed for story progression. However, unlocking all of them saves you a lot of time as you approach the endgame content.
Sites of Grace Locations at a Glance
| Region | Recommended Level | Key Boss / Objective | Unique Reward |
| Roundtable Hold | Any | NPC Quest Hub | Upgrading Gear & Spirits |
| Stranded Graveyard | 1–10 | Soldier of Godrick | Fringefolk Hero’s Grave access |
| Limgrave | 1–20 | Flying Dragon Agheel | Torrent (Spectral Steed) |
| Stormhill | 10–20 | Margit the Fell Omen | Talisman Pouch |
| Weeping Peninsula | 20–30 | Leonine Misbegotten | Sacred Tears (x3) |
| Stormveil Castle | 30–40 | Godrick the Grafted | Godrick’s Great Rune |
| Liurnia of the Lakes | 40–50 | Glintstone Dragon Smarag | Academy Glintstone Key |
| Academy of Raya Lucaria | 50–60 | Rennala, Queen of Full Moon | Respec (Stat Reset) |
| Ainsel River | 50–60 | Dragonkin Soldier | Frozen Lightning Spear |
| Siofra River | 50–60 | Ancestor Spirit | Clarifying Horn Charm |
| Caelid (South) | 60–70 | Starscourge Radahn | Radahn’s Great Rune |
| Swamp of Aeonia | 60–70 | Commander O’Neil | Unalloyed Gold Needle |
| Altus Plateau | 70–80 | Elemer of the Briar | Golden Seeds / Sacred Tears |
| Bellum Highway | 50+ | Night’s Cavalry | Sacred Tear (Bellum Church) |
| Ruin-Strewn Precipice | 50–60 | Magma Wyrm Makar | Altus Plateau Access (Lift Skip) |
| Nokron, Eternal City | 70–80 | Mimic Tear | Mimic Tear Ashes |
| Deeproot Depths | 80–100 | Lichdragon Fortissax | Mending Rune of Death-Prince |
| Ainsel River Main | 90–100 | Astel, Naturalborn of Void | Progression for Ranni’s Quest |
| Lake of Rot | 85-95 | Dragonkin Soldier | Dragonscale Blade |
| Moonlight Altar | 90–100 | Glintstone Dragon Adula | Dark Moon Greatsword |
| Mt. Gelmir | 90-100 | Full-Grown Fallingstar Beast | Comet Azur (Nearby NPC) |
| Volcano Manor | 100-110 | Rykard, Lord of Blasphemy | Blasphemous Blade |
| Greyoll’s Dragonbarrow | 90–110 | Black Blade Kindred | Huge Rune Gains |
| Leyndell, Royal Capital | 100-110 | Morgott the Omen King | Access to Mountaintops |
| Forbidden Lands | 110-120 | Night’s Cavalry | Grand Lift of Rold Access |
| Mountaintops of Giants | 110–120 | Fire Giant | Remembrance of Fire Giant |
| Flame Peak | 110–120 | Forge of the Giants | Progression to Farum Azula |
| Subterranean Shunning-Grounds | 110-120 | Mohg, the Omen | Lord of Frenzied Flame Path |
| Consecrated Snowfield | 120–140 | Astel, Stars of Darkness | Somber Ancient Dragon Stone |
| Mohgwyn Palace | 120–140 | Mohg, Lord of Blood | Lord of Blood’s Exultation |
| Miquella’s Haligtree | 130–150 | Loretta, Knight of Haligtree | Haligtree Access |
| Elphael, Brace of Haligtree | 130–150+ | Malenia, Blade of Miquella | Malenia’s Great Rune |
| Crumbling Farum Azula | 130–150 | Maliketh, the Black Blade | Destined Death Unlock |
| Leyndell, Ashen Capital | 140–150 | Godfrey / Elden Beast | Final Boss Gauntlet |
Roundtable Hold

| Recommended level: | Any (Hub area) |
| How to reach: | Rest at any Grace outside Limgrave, or attempt to fight Margit. Melina will then appear and offer to take you there. |
| Key NPCs and quests: | Corhyn (Incantations), D (Beast Quest), Fia (Hug/Quest), Roderika (Spirit Tuning), Smithing Master Hewg (Upgrades), Gideon Ofnir (Lore/Boss Info). |
| Essential pickups: | Cipher Pata (Lower hall), Crepus’s Black-Key Crossbow (Behind Stonesword Key door), Assassin’s Prayerbook. |
| Major encounter: | Mad Tongue Alberich (Lower hall invasion); Ensha (Ambush occurs after finding a Medallion half). |
| Biggest hazards: | Alberich’s Frostbite: The lower hall is a trap for low-level players. Fia’s Blessing: Hugging her gives you a -5% Max HP debuff until the item she gives you is consumed. |
This place serves as a safe haven, existing outside the physical map of the Lands Between, where all Sites of Grace in Elden Ring are found. Melina will bring you here once you either rest at a Site of Grace outside Limgrave or after you take a nasty beating from Margit the Fell Omen and rest up.
Before you head to Stormveil Castle or Raya Lucaria, this is where you should spend some time. Visit Smithing Master Hewg to upgrade your weapons beyond the basic level and speak to Roderika to unlock Spirit Tuning. Also, consider buying a few incantations from Corhyn, or giving Fia a hug for… an interesting buff.


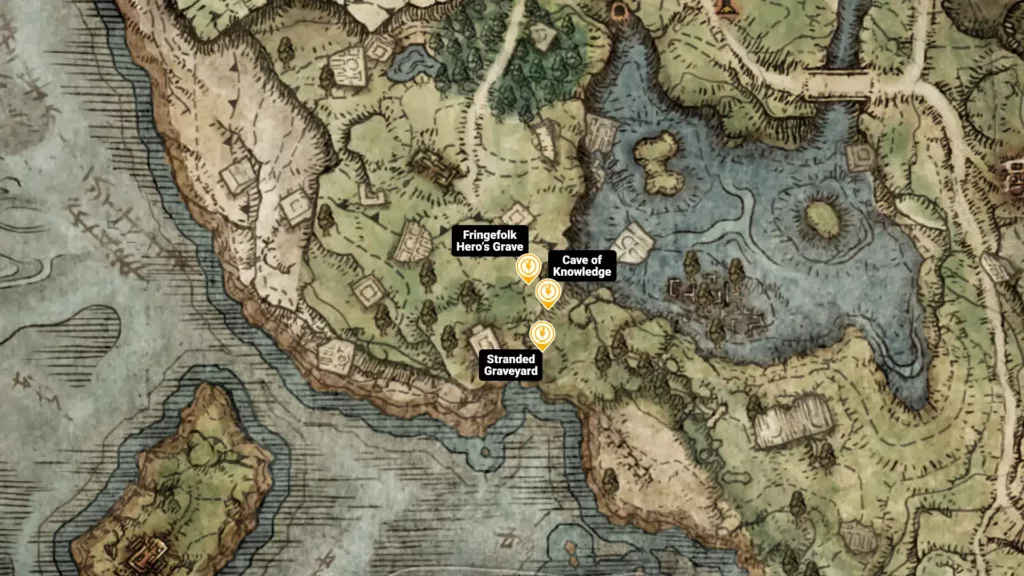
Stranded Graveyard
| Recommended level: | 1-10 |
| How to reach: | This is the starting area, so you’ll wake up here |
| Key NPCs and quests: | N/A |
| Essential pickups: | Strength Gesture, Tarnished’s Wizened Finger, Flask of Crimson Tears, Flask of Cerulean Tears, basic crafting materials |
| Major encounter: | Grafted Scion |
| Biggest hazards: | Narrow corridors, enemies that ambush |
Beneath Limgrave lies Stranded Graveyard, an introductory dungeon and tutorial spot. In any Elden Ring Sites of Grace map, you’ll likely start navigating from this point, as this part of the game introduces you to key mechanics like combat, stealth, guard counters, and Sites of Grace.
From this place, you can head on toward the first major Legacy Dungeon, Stormveil Castle. However, before you proceed, we highly recommend activating the nearby Sites of Grace, meeting Melina, and unlocking Torrent. Collect the Limgrave Map Fragment and upgrade flasks using Golden Seeds and Sacred Tears.
Specific locations
- Cave of Knowledge
- Stranded Graveyard Site of Grace
- Fringefolk Hero’s Grave
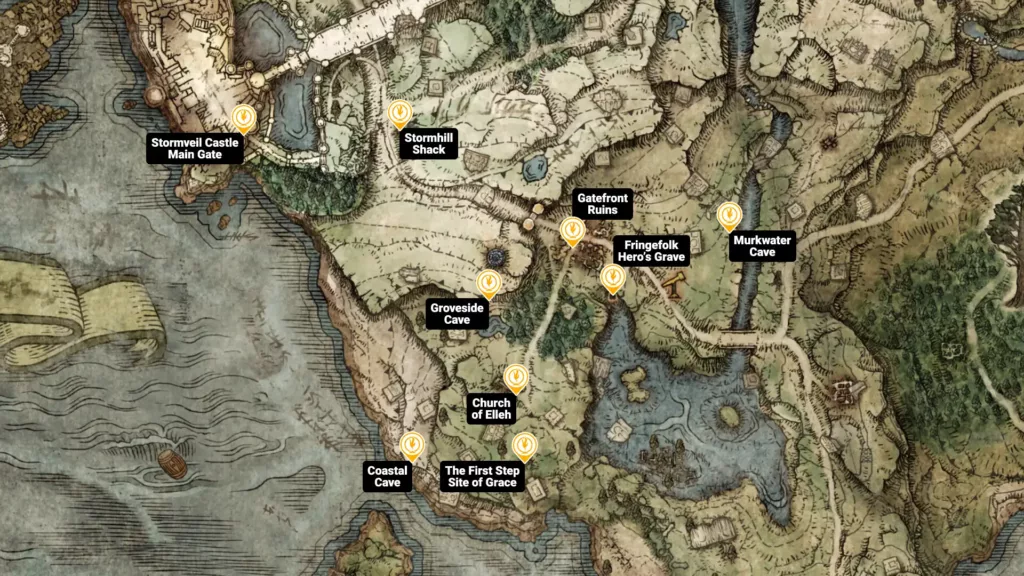
Limgrave
| Recommended level: | 1–20 |
| How to reach: | Exit the Stranded Graveyard lift, and you’ll find yourself in Limgrave |
| Key NPCs and quests: | White-Faced Varre, Melina, Boc the Seamster, Sorceress Sellen |
| Essential pickups: | Limgrave West & East Map Fragments, Flask upgrades, Whetstone Knife, Spirit Calling Bell |
| Major encounter: | Margit, the Fell Omen |
| Biggest hazards: | Roaming and mounted enemies, powerful field bosses (like the Tree Sentinel) |
Limgrave is the first open-world region you will fully explore, and is directly west of the Lands Between’s central landmass.You unlock it automatically once you leave the tutorial area and it sets the foundation for Elden Ring’s challenging skill curve. It gradually introduces the game’s key elements, such as dungeons, NPCs, and bosses.
Before heading to Stormveil Castle or exploring the Divine Tower of Limgrave, you should secure both Limgrave map fragments and unlock leveling and Torrent. Consider clearing Gatefront Ruins for essential items like the Whetstone Knife and Spirit Ash access.
Specific locations
- The First Step Site of Grace
- Church of Elleh
- Gatefront Ruins
- Groveside Cave
- Stormhill Shack
- Murkwater Cave
- Coastal Cave
- Limgrave Tunnels
- Stormveil Castle Main Gate
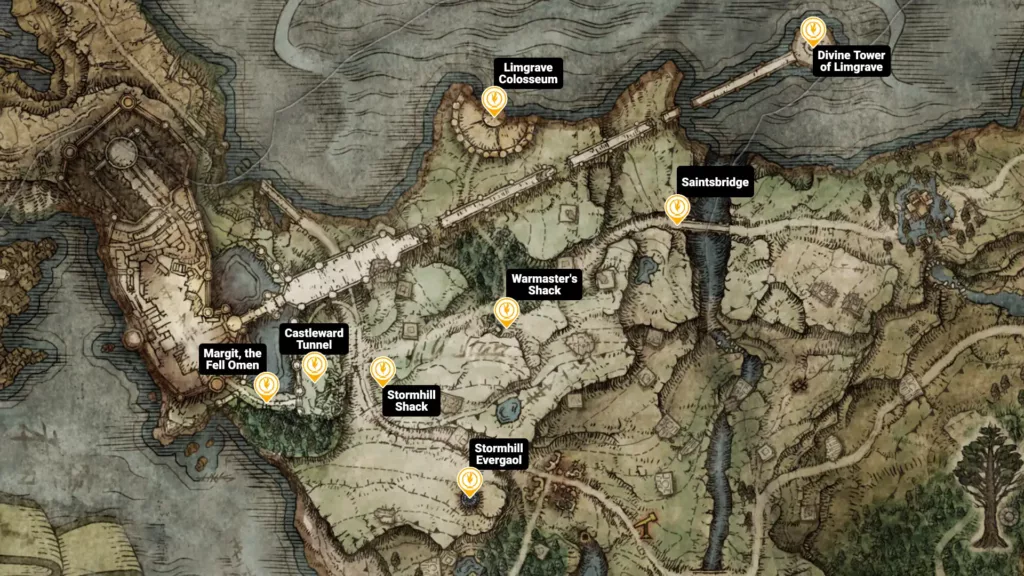
Stormhill
| Recommended level: | 10–20 |
| How to reach: | Travel up north from Limgrave via the road past Gatefront Ruins |
| Key NPCs and quests: | Roderika, Sorcerer Rogier |
| Essential pickups: | Golden Seeds, Sacred Tears, Smithing Stones, early Spirit Ashes |
| Major encounter: | Margit, Fell Omen |
| Biggest hazards: | Cluster of enemy groups, ambushes by soldiers and wolves, strong early bosses |
You will find Stormhill located between central Limgrave and Stormveil Castle, acting as a transitional zone that brings in a lot of new challenges. It’s your first “skill check” that layers vertical exploration, aggressive enemy patrols, and frequent ambushes that punish reckless behavior. Expect to use most of the game’s core mechanics here!
This region directly takes you to Stormveil Castle, and you must prepare yourself for tough encounters. Try to claim all nearbySites of Grace, complete Roderika’s quest at Stormhill Shack to unlock Spirit Tuning, and upgrade weapons using Smithing Stones.
Specific locations:
- Stormhill Shack
- Saintsbridge
- Margit, the Fell Omen (boss arena)
- Warmaster’s Shack
- Castleward Tunnel
- Divine Tower of Limgrave
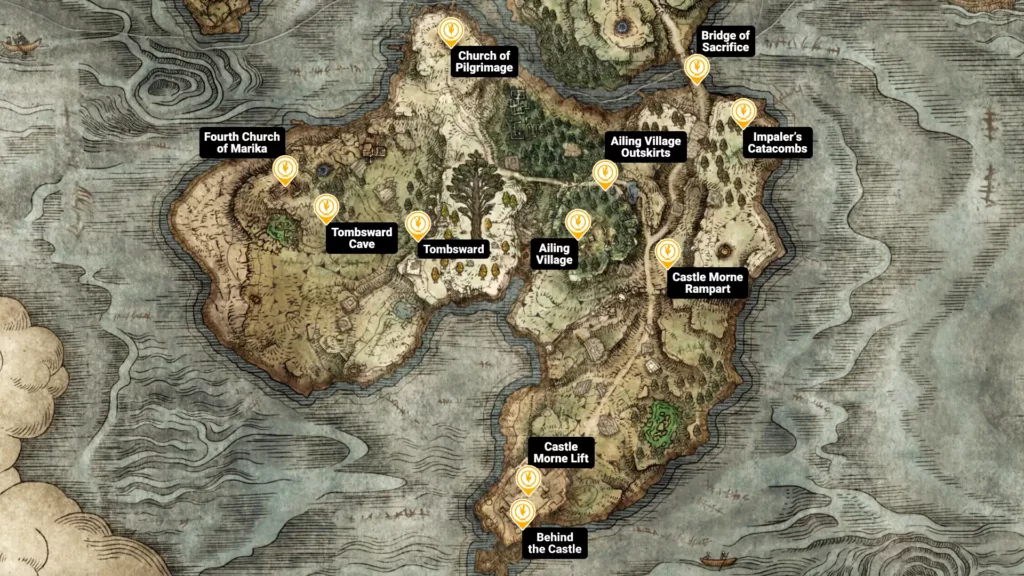
Weeping Peninsula
| Recommended level: | 20–30 |
| How to reach: | Cross the Bridge of Sacrifice south of Limgrave |
| Key NPCs and quests: | Irina, Edgar |
| Essential pickups: | Golden Seeds, Sacred Tears, Weeping Peninsula Map Fragment, Smithing Stones |
| Major encounter: | Leonine Misbegotten |
| Biggest hazards: | Firing at the main bridge, aggressive demi-human mobs, wide enemy patrols in open areas |
The Weeping Peninsula is located south of Limgrave, which you can access by crossing the Bridge of Sacrifice. Although the area is optional, it’s one of the most beginner-friendly regions in Elden Ring. In fact, you can find three Sacred Tear locations here, which provide useful upgrades.
Exploring the peninsula prepares you for Stormveil Castle, or later progression into Liurnia of the Lakes. It’s essential to pick up a regional map fragment, upgrade flasks at churches, clear side dungeons for Smithing Stones, and complete Irina’s quest.
Specific locations:
- Bridge of Sacrifice
- Church of Pilgrimage
- Ailing Village Outskirts
- Castle Morne Lift
- Behind the Castle
- Tombsward
- Impaler’s Catacombs
- Fourth Church of Marika
Stormveil Castle
| Recommended level: | 30–40 |
| How to reach: | Move north through Stormhill and defeat Margit, the Fell Omen |
| Key NPCs and quests: | Gatekeeper Gostoc, Sorcerer Rogier, Nepheli Loux |
| Essential pickups: | Smithing Stones, Stonesword Keys, Golden Seeds, Stormveil item/weapon drops |
| Major encounter: | Godrick the Grafted |
| Biggest hazards: | Tight corridors, ambush-heavy enemies, vertical hazards |
Welcome to the first true Legacy Dungeon. The entry requires you to defeat Margit, the Fell Omen, after which you can choose between entering through a heavily guarded main gate or a dangerous side path filled with ambushes. Stormveil demands mastery over spacing and stamina management.
Clearing Stormveil opens the route to Liurnia of the Lakes, marking a significant progression point in the game’s narrative. Before moving on, though, make sure to fully explore the castle and collect upgrade materials, and advance Rogier’s and Nepheli Loux’s questlines.
Specific locations:
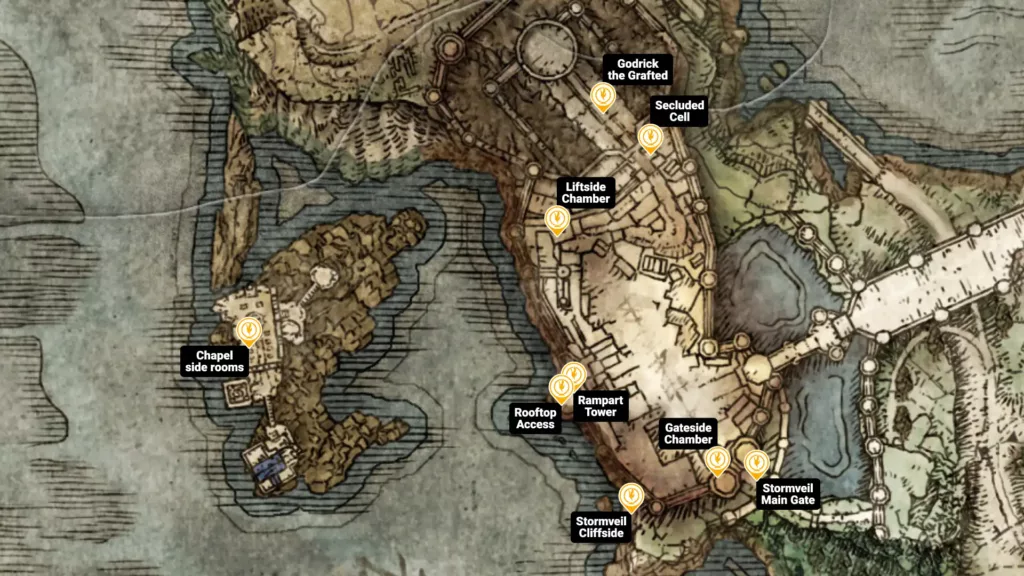
- Stormveil Main Gate
- Gateside Chamber
- Stormveil Cliffside
- Rampart Tower
- Liftside Chamber
- Secluded Cell
- Godrick the Grafted (boss arena)
Liurnia of the Lakes
| Recommended level: | 40–50 |
| How to reach: | Exit Stormveil Castle through the north cliffside path, or bypass the castle using the hidden mountain route |
| Key NPCs and quests: | Ranni the Witch, Sorceress Sellen, Thops |
| Essential pickups: | Liurnia East, West, and North Map Fragments, Golden Seeds, Sacred Tears |
| Major encounter: | Rennala, Queen of the Full Moon |
| Biggest hazards: | Shallow swamp that slows movement, magic-heavy enemies |
North of Stormveil Castle lies this large zone — a vast, mist-covered area dominated by shallow water, ruined twins, and towering academies. It marks a noticeable shift in Elden Ring’s narrative pacing. It may not be inherently “tougher,” but it is different if you’re not a magic user.
Progression through this zone requires you to head to Raya Lucaria Academy. Before entering, you should collect regional map fragments for navigation, upgrade flasks, discover the Scenic Isle Site of Grace, and secure the Academy Glintstone Key to unlock the dungeon itself. Keep an eye out for environmental hazards!
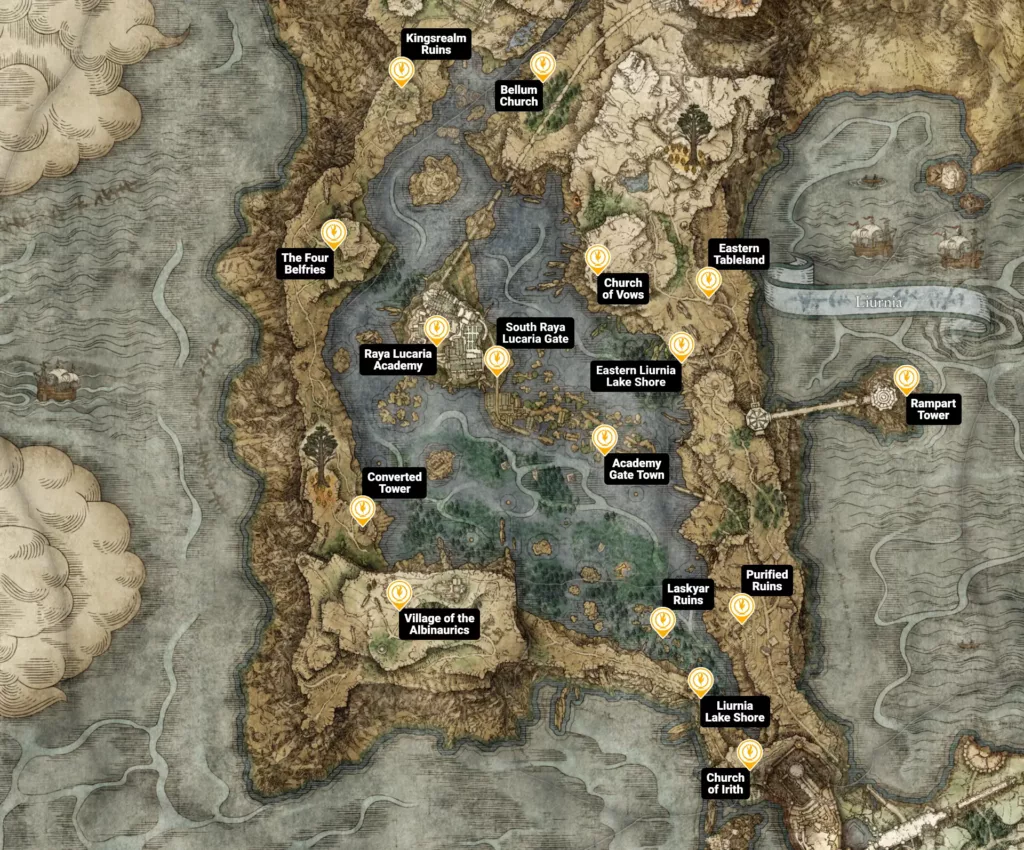
Specific locations:
- Liurnia Lake Shore
- Academy Gate Town
- Church of Vows
- South Raya Lucaria Gate
- Eastern Liurnia Lake Shore
- Village of the Albinaurics
- Converted Tower
- Bellum Church
- The Four Belfries
- Laskyar Ruins
Academy of Raya Lucaria
| Recommended level: | 50–60 |
| How to reach: | Obtain the Academy Glintstone Key and enter through the Raya Lucaria Gate |
| Key NPCs and quests: | Sorceress Sellen, Thops |
| Essential pickups: | Smithing Stones, Glintstone Crowns, sorcery scrolls, Golden Seeds |
| Major encounter: | Renalla, Queen of the Full Moon |
| Biggest hazards: | Magic-heavy foes, long-range spell spamming, cramped interiors |
The Academy of Raya Lucaria rises from the center of Liurnia of the Lakes and serves as the region’s primary Legacy Dungeon. Entry is gated by the Academy Glintstone Key, found in the surrounding lake. This reinforces Liurnia’s focus on exploration, rather than a linear path. Basically, explore as much as you can without rushing into a boss fight.
Completing this area grants you access to the northern reaches of Liurnia of the Lakes and awards the Great Rune of Rennala, Queen of the Full Moon, letting you respec, or reset, your stats. The more you explore, the more you learn, regardless of your character’s class or build.
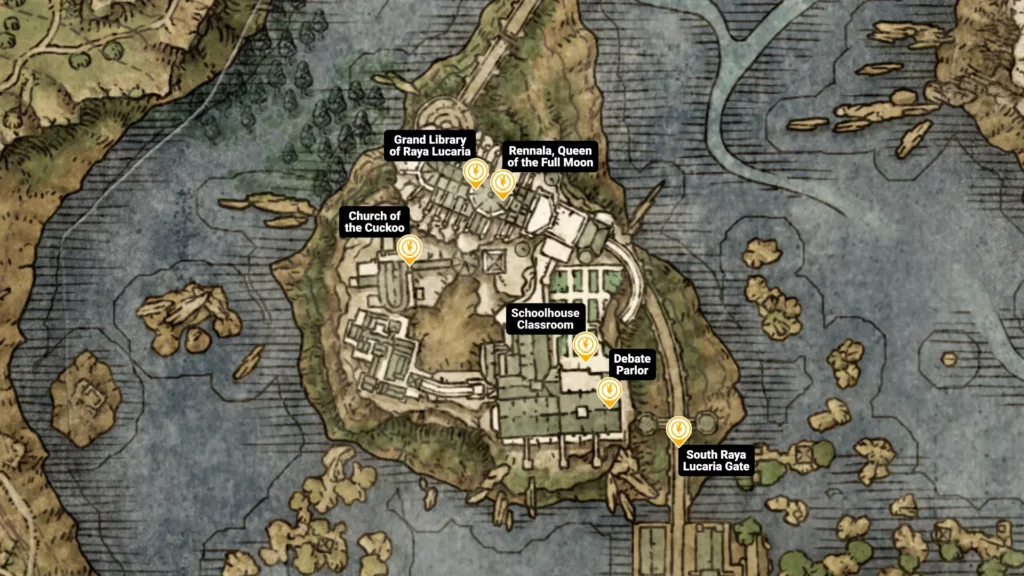
Specific locations:
- Church of the Cuckoo
- Debate Parlor
- Schoolhouse Classroom
- Raya Lucaria Grand Library
Ainsel River
| Recommended level: | 50–60 |
| How to reach: | Descend via Ainsel River Well in the eastern part of Liurnia, or access later through Ranni’s questline |
| Key NPCs and quests: | Ranni the Witch |
| Essential pickups: | Somber Smithing Stones, Glovewort, Starlight Shards |
| Major encounter: | Dragonkin Soldier of Nokstella |
| Biggest hazards: | Status-damaging enemies, cramped spaces, and ambushes |
Ainsel River is a massive underground region located beneath eastern Liurnia of the Lakes, accessible through the Ainsel River Well or later on in the story through Ranni’s questline. It introduces players to Elden Ring’s subterranean biomes with glowing flora, crumbling ruins, and dangerous foes that rely heavily on magic and status effects.
Progression through this region usually connects with Nokstella, Eternal City, and deeper endgame content. However, before moving on, you should focus on Glovewort to strengthen Spirit Ashes, secure Somber Smithing Stones for special weapons, and progress through Ranni’s quest as required.
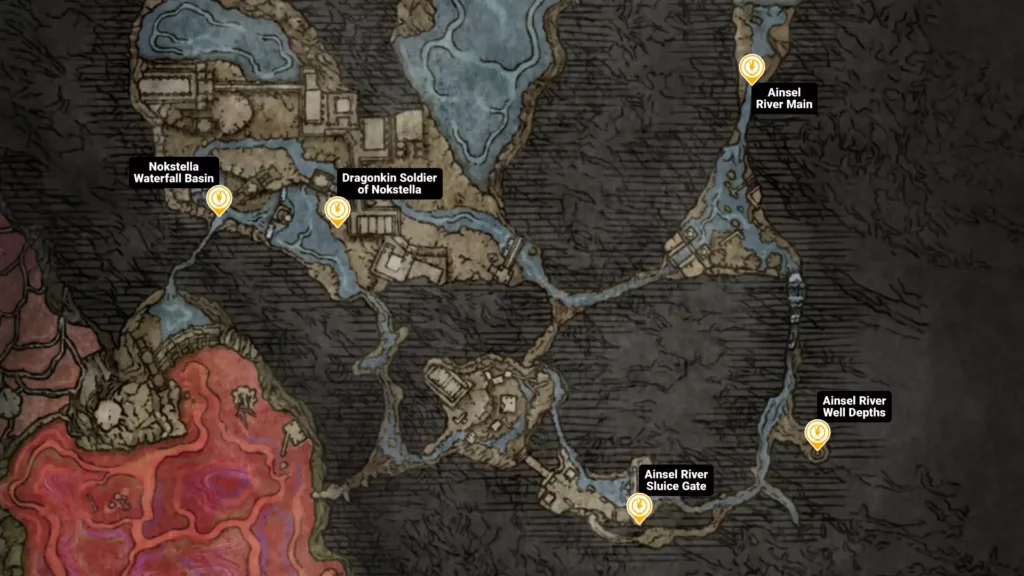
Specific locations:
- Ainsel River Well Depths
- Ainsel River Main
- Dragonkin Soldier of Nokstella (boss arena)
- Nokstella Waterfall Basin
- Ainsel River Sluice Gate
Siofra River
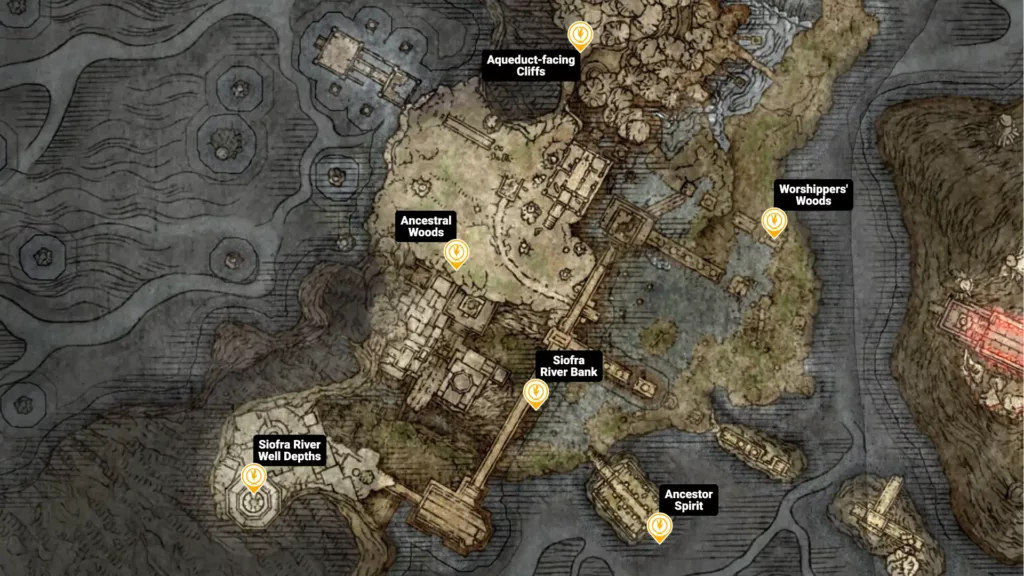
| Recommended level: | 50–60 |
| How to reach: | Go downward through Siofra River Well in eastern Limgrave |
| Key NPCs and quests: | Blaidd the Half-Wolf, Ancestor Spirit ritual |
| Essential pickups: | Somber Smithing Stones, Glovewort, Map Fragment (Siofra River) |
| Major encounter: | Ancestor Spirit |
| Biggest hazards: | Long-range archers, jumpscares from enemies |
Siofra River lies deep beneath eastern Limgrave and is accessed through the Siofra River Well. It is one of the earliest underground regions in the game, offering a sharp contrast to the wide, open regions found on the surface of the Lands Between. While much of this area is largely optional, its scale and enemy placement can catch you off guard.
Exploration here eventually leads to Nokron, Eternal City, which is unlocked later through story progression. Before moving on, you must ignite the ancestral braziers to summon the Ancestor Spirit, collect the Siofra River map fragment for navigation, and gather Glovewort to upgrade Spirit Ashes.
Specific locations:
- Siofra River Well Depths
- Siofra River Bank
- Worshippers’ Woods
- Ancestral Woods
- Aqueduct-facing Cliffs
- Ancestor Spirit (boss arena)
Caelid (South)
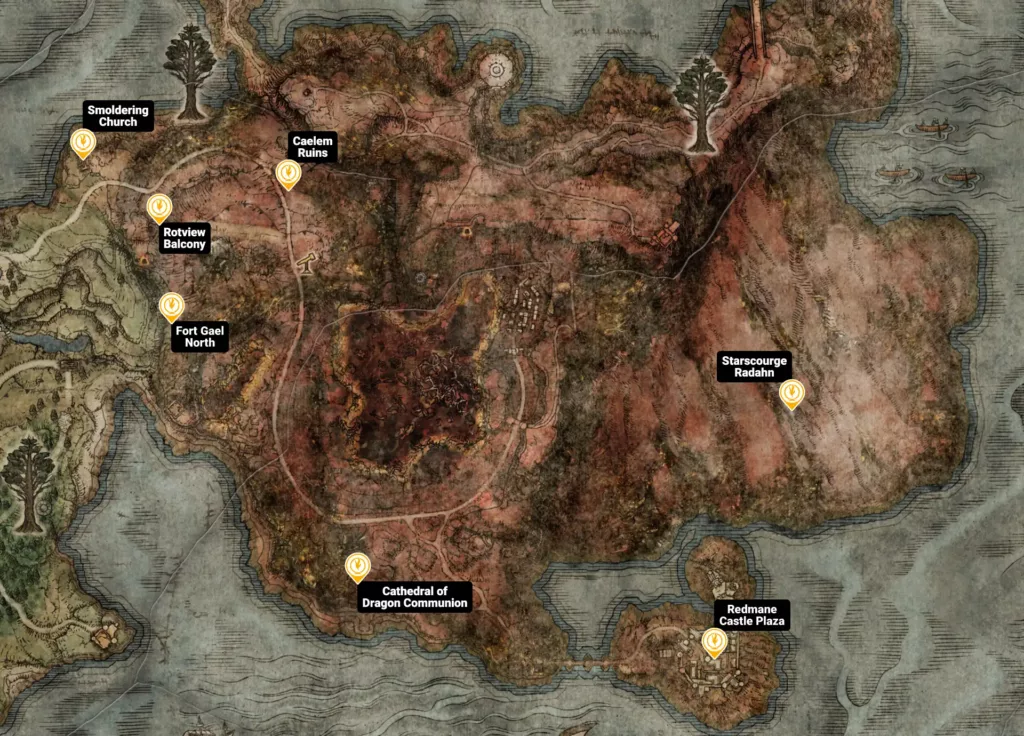
| Recommended level: | 60–70 |
| How to reach: | Move east from Limgrave through the Smoldering Church, or follow the road through Dragon-Burnt Ruins |
| Key NPCs and quests: | Gowry, Blaidd |
| Essential pickups: | Caelid Map Fragment (South), Golden Seeds, Preserving Boluses, Smithing Stones |
| Major encounter: | Starscourge Radahn |
| Biggest hazards: | Scarlet Rot zones, aggressive wildlife, high-damage enemies |
South Caelid marks a prominent role in the game’s story, as the tone and enemy type shift significantly from earlier zones. As a result, you’ll have to make sure you’ve leveled up enough to take on Radahn. This region is accessible relatively early, but is tuned for midgame content, especially when Scarlet Rot becomes a recurring annoyance.
Progression through this area ultimately leads you to Redmane Castle and the Radahn Festival. Before advancing, make sure you claim the southern Caelid map fragment, stock up on Preserving Boluses to counter Scarlet Rot, and upgrade your weapons and flasks accordingly.
Specific locations:
- Smoldering Church
- Rotview Balcony
- Fort Gael North
- Cathedral of Dragon Communion (Caelid)
- Redmane Castle Plaza
- Caelem Ruins
- Starscourge Radahn (boss arena)
Swamp of Aeonia
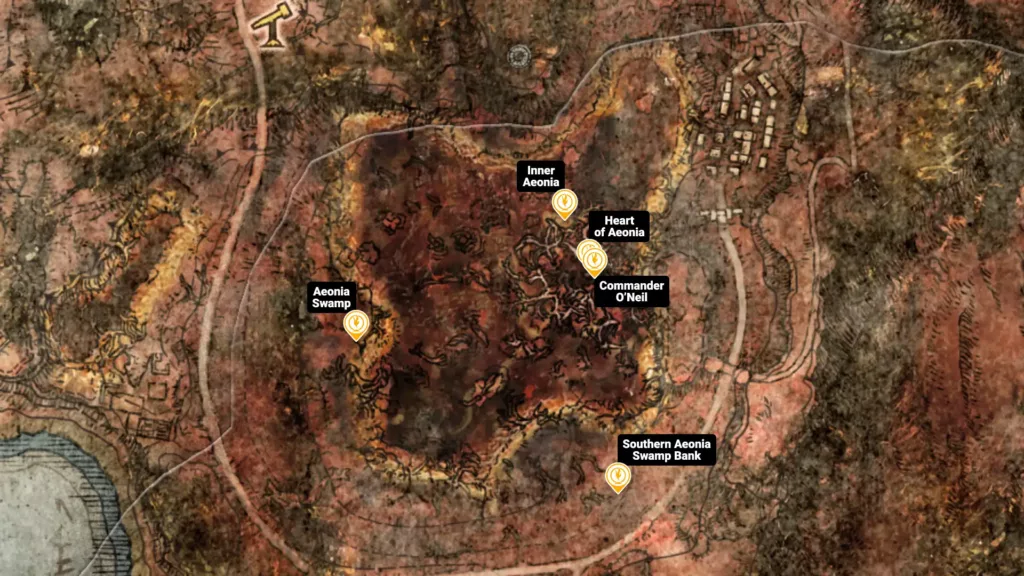
| Recommended level: | 60–70 |
| How to reach: | Travel north into central Caelid from South Caelid |
| Key NPCs and quests: | Gowry, Milicent |
| Essential pickups: | Golden Seeds, Preserving Boluses, Somber Smithing Stones |
| Major encounter: | Commander O’Neil |
| Biggest hazards: | Constant Scarlet Rot buildup, limited safe spaces, daunting enemy groups |
In Elden Ring, all Grace locations are scattered in a way that connects one part of a region to another. In the case of Caelid, these spots are unevenly distributed, with imminent danger lurking around almost every corner. The Swamp of Aeonia is extremely hazardous in that sense, forcing careful route planning and item management.
Clearing the swamp advances the Millicent questline and opens the path toward deeper Caelid progression and Dragonbarrow. You should prioritize crafting or purchasing Preserving Boluses, and activate nearby Sites of Grace to stay safe (sort of). Oh, and try to defeat Commander O’Neil if you can, it’s worth it!
Specific locations:
- Aeonia Swamp Shore
- Inner Aeonia
- Heart of Aeonia
- Commander O’Neil (boss arena)
- Southern Aeonia Swamp Bank
Altus Plateau
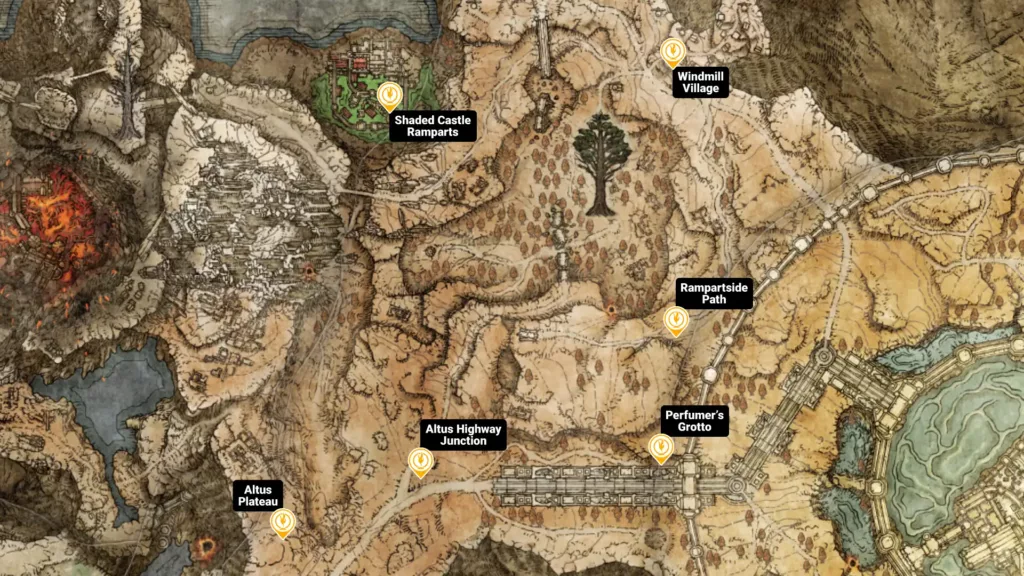
| Recommended level: | 70–80 |
| How to reach: | Use the Grand Lift of Dectus with both Dectus Medallion halves, or travel through the Ruin-Strewn Precipice |
| Key NPCs and quests: | Goldmask, Brother Corhyn, Millicent |
| Essential pickups: | Atlus Plateau Map Fragment, Golden Seeds, Sacred Tears, Smithing Stones |
| Major encounter: | Draconic Tree Sentinel |
| Biggest hazards: | Aggressive mounted enemies, lightning damage |
Altus Plateau lies beyond Liurnia of the Lakes and marks Elden Ring’s transition into its midgame. Reaching this place requires either assembling the Dectus Medallion or surviving the brutal Ruin-Strewn Precipice dungeon. Enemy density and damage output noticeably increase here, especially around Rampartside Path Site of Grace.
From this place, you’ll move toward the capital outskirts and the next major location, Leyndell, Royal Capital. Before moving on, it’s important to collect the Altus map fragment, upgrade flasks at churches, and defeat the Draconic Tree Sentinel guarding Leyndell’s entrance.
Specific locations:
- Altus Highway Junction
- Windmill Village
- Shaded Castle Ramparts
- Perfumer’s Grotto
- Rampartside Path
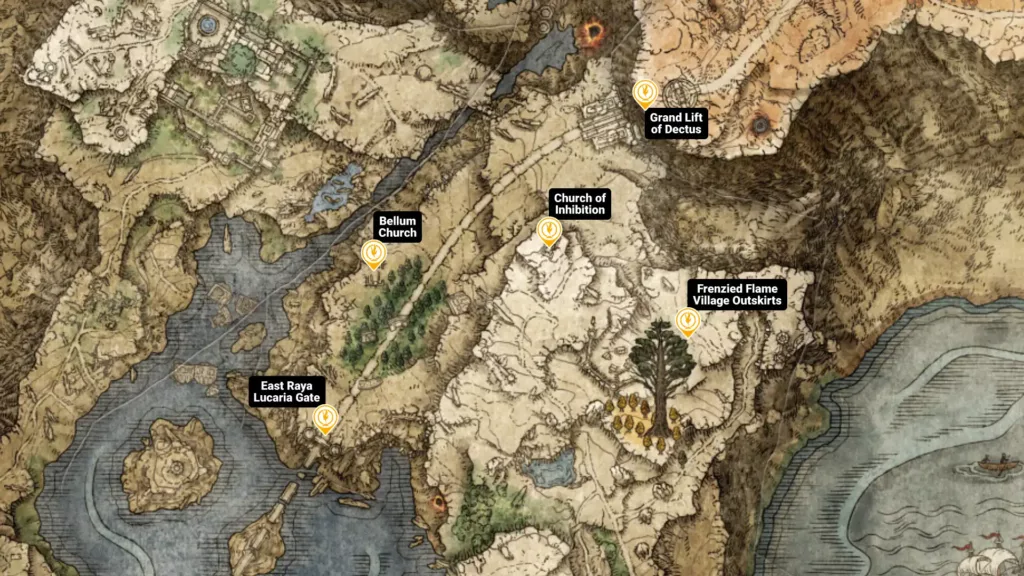
Bellum Highway
| Recommended level: | 50+ |
| How to reach: | Travel north through Liurnia of the Lakes, toward the Grand Lift of Dectus |
| Key NPCs and quests: | Brother Corhyn, Hyetta |
| Essential pickups: | Golden Seeds, Sacred Tears, Liurnia North Map Fragment |
| Major encounter: | Frenzied Flame-afflicted enemies |
| Biggest hazards: | Long-range firing, Frenzy buildup, narrow paths |
The Bellum Highway forms the northern passage of Liurnia of the Lakes, linking the region to the Grand Lift of Dectus and onward to Altus Plateau. It’s smaller than other regions, but features sharp environmental dangers in the form of confined roads, siege weapons, and Frenzy-inflicting foes.
The route is one of the primary paths toward Altus Plateau, making preparation essential. You should secure the Liurnia North map fragment, upgrade flasks at Bellum Church, and plan your movement to avoid sustained fire. Be mindful of Frenzy buildup near certain spots and sudden ambushes along narrow paths.
Specific locations:
- Bellum Church
- Church of Inhibition
- East Raya Lucaria Gate
- Frenzied Flame Village Outskirts
- Grand Lift of Dectus
Ruin-Strewn Precipice
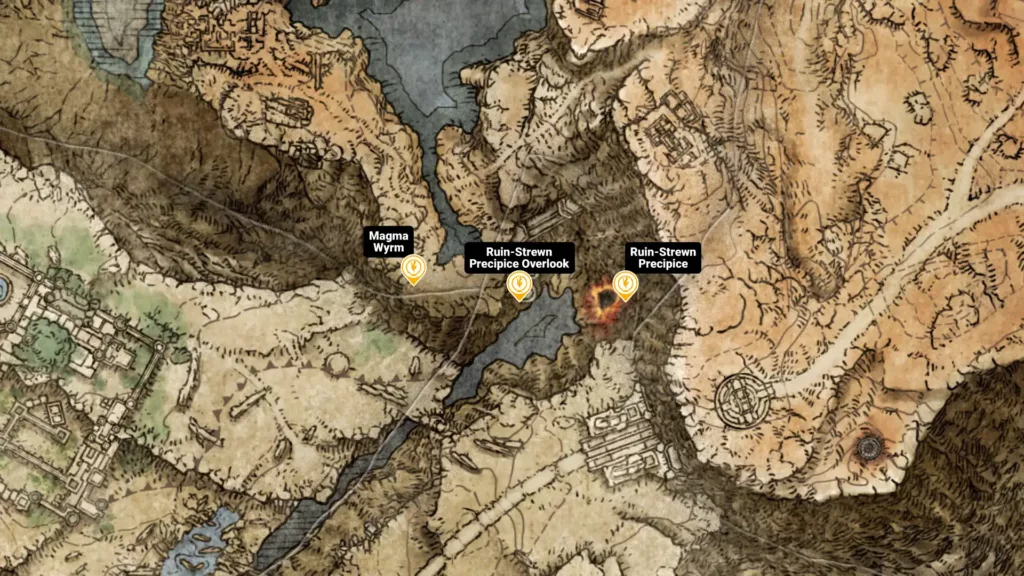
| Recommended level: | 50–60 |
| How to reach: | Keep following the ravine north of Liurnia of the Lakes, beneath the Bellum Highway |
| Key NPCs and quests: | Blackguard Big Boggart (indirect progression) |
| Essential pickups: | Smithing Stones, Somber Smithing Stones, Golden Seed |
| Major encounter: | Magma Wyrm Makar |
| Biggest hazards: | Narrow paths, enemy ambushes, magma damage |
This place is a vertical dungeon carved into the cliffs connecting northern Liurnia to the Altus Plateau. It emphasizes platforming and environmental hazards, offering an alternative to the Grand Lift of Dectus for those who haven’t collected both medallion halves.
Completing the Precipice lets you access the Altus Plateau, bypassing the lift entirely. Before advancing, you should thoroughly explore side ledges for upgrade materials, ensure weapons are reinforced for sustained fights, and prepare for fire damage during the boss encounter.
Specific locations:
- Ruin-Strewn Precipice
- Magma Wyrm
- Ruin-Strewn Precipice Overlook
Nokron, Eternal City
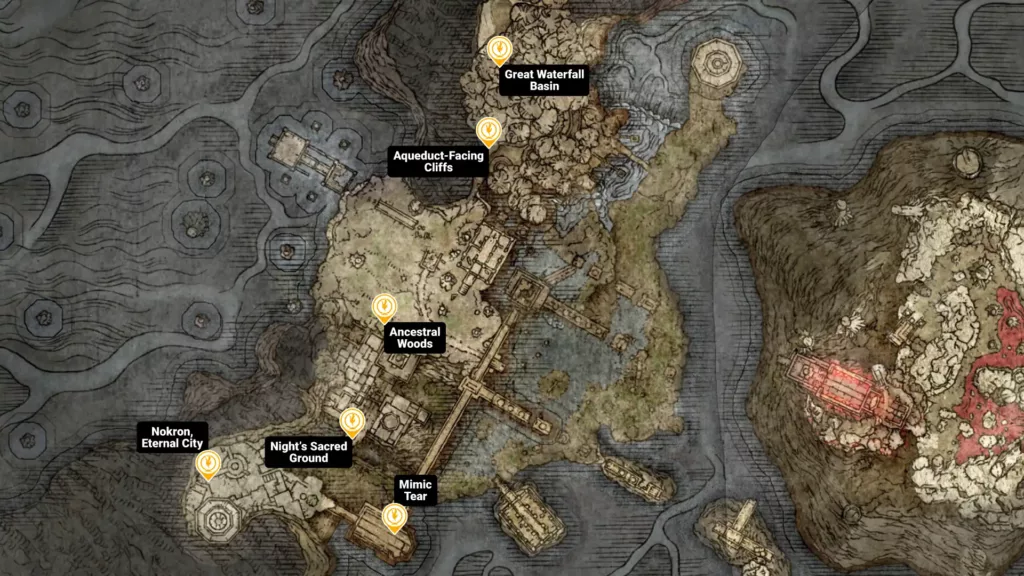
| Recommended level: | 70–80 |
| How to reach: | Defeat Starscourge Radahn to open the falling star crater in eastern Limgrave |
| Key NPCs and quests: | Ranni the Witch, Blaidd the Half-Wolf |
| Essential pickups: | Mimic Tear Ashes, Ghost Glovewort, Fingerslayer Blade |
| Major encounter: | Mimic Tear |
| Biggest hazards: | Fast and aggressive enemies, vertical traversal, ambush-heavy foes |
This vast underground metropolis is revealed only after defeating Starscourge Radahn. It’s a significant change of pace in the game, combining open exploration with tightly layered dungeon spaces and featuring some of Elden Ring’s most aggressive enemy designs. It also holds several essential questlines.
You can find several Larval Tear locations here, and you should consider exploring Night’s Sacred Ground while upgrading Spirit Ashes with the plentiful Ghost Glovewort you find. Defeating the Mimic Tear unlocks one of the game’s strongest summons.
Specific locations:
- Nokron, Eternal City
- Mimic Tear (boss arena)
- Ancestral Woods
- Night’s Sacred Ground
- Aqueduct-Facing Cliffs
- Great Waterfall Basin
Deeproot Depths
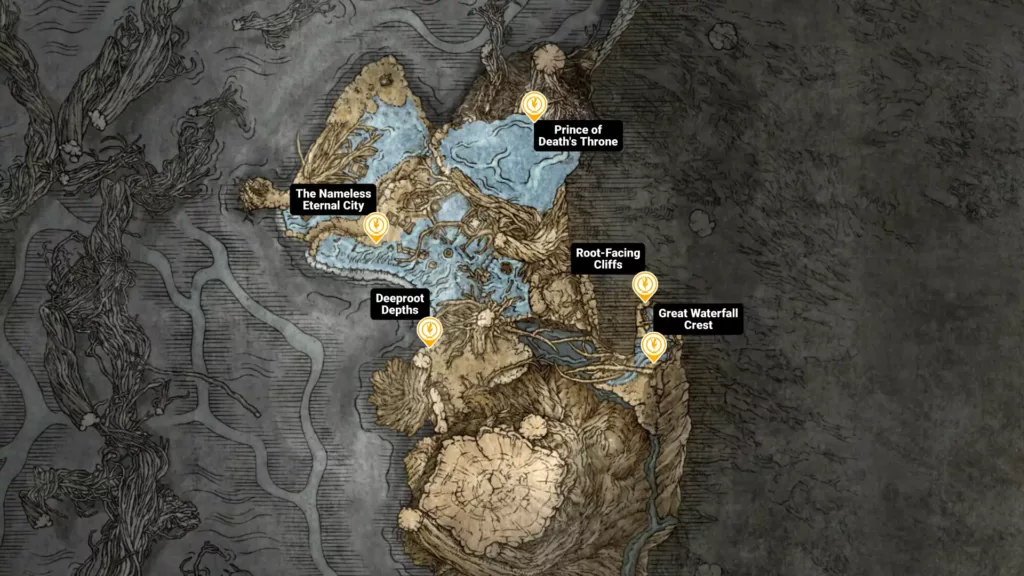
| Recommended level: | 80–100 |
| How to reach: | Defeat the Valiant Gargoyles in Nokron and use the coffin, or access via the Frenzied Flame Proscription |
| Key NPCs and quests: | Fia, D’s brother |
| Essential pickups: | Prince of Death’s Pustule, Ghost Glovewort, Smithing Stones |
| Major encounter: | Fia’s Champions |
| Biggest hazards: | Massive vertical drops, deathblight enemies |
The Deeproot Depths lie at the deepest layer of Elden Ring’s underground world, directly beneath the Erdtree’s roots. You unlock this hidden late-game zone through less obvious routes, most commonly by defeating the Valiant Gargoyles in Nokron and riding a coffin down the river.
This area is central to Fia’s questline and leads to major story twists and revelations tied to Deathroot and the Prince of Death. Before moving forward, you should methodically activate the Sites of Grace in the area and prepare for deathblight-inflicting foes.
Specific locations:
- Deeproot Depths
- Great Waterfall Crest
- Root-Facing Cliffs
- Prince of Death’s Throne
- The Nameless Eternal City
Ainsel River Main

| Recommended level: | 90–100 |
| How to reach: | Progress Ranni’s quest to access Ainsel River Main via a portal from Renna’s Rise |
| Key NPCs and quests: | Ranni the Witch, miniature Ranni, Blaidd |
| Essential pickups: | Somber Smithing Stones, Ghost Glovewort, Dark Moon Ring |
| Major encounter: | Baleful Shadow |
| Biggest hazards: | Magic-heavy enemies, dangerous Scarlet Rot zones |
Ainsel River Main is a deeper expansion of the Ainsel River you’ll unlock through Ranni the Witch’s questline, and it’s accessible via a teleport gate at Renna’s Rise. The underground region combines narrow corridors with massive cityscapes, most notably Nokstella, Eternal City.
Progressing through this area pushes you toward the Lake of Rot and the culmination of Ranni’s quest objectives. Before moving ahead, you should thoroughly explore Nokstella for high-tier upgrade materials, defeat the Baleful Shadow, and prepare Preserving Boluses for the unavoidable Scarlet Rot encounters ahead.
Specific locations:
- Ainsel River Main
- Nokstella, Eternal City
- Nokstella Waterfall Basin
- Baleful Shadow boss arena
- Lake of Rot entrance
- Grand Cloister lift approach
Lake of Rot
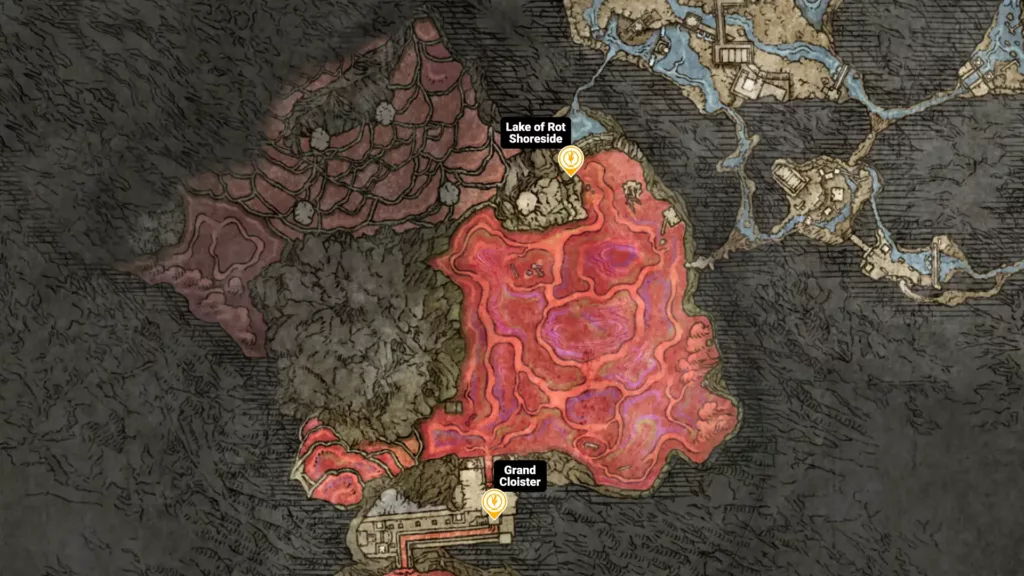
| Recommended level: | 85–95 |
| How to reach: | Travel through Ainsel River Main and descend from Nokstella into the Lake of Rot |
| Key NPCs and quests: | Ranni the Witch, miniature Ranni |
| Essential pickups: | Somber Smithing Stones, Golden Seed, Scorpion’s Stinger |
| Major encounter: | Dragonkin Soldier of Nokstella |
| Biggest hazards: | Extreme Scarlet Rot buildup, limited safe ground, limited healing windows |
The Lake of Rot is one of the most punishing environmental hazards in Elden Ring. Instead of using the top weapons, you’ll rely on movement and healing abilities to survive this area. Unlike previous rot-infested places, this one offers very little natural refuge.
Progressing across the lake is required to continue Ranni’s quest and reach the Grand Cloister. You should arrive fully prepared with Preserving Boluses, high Vigor, upgraded flasks, and strong Spirit Ashes to handle whatever comes your way.
Specific locations:
- Lake of Rot Shoreside
- Grand Cloister
Moonlight Altar
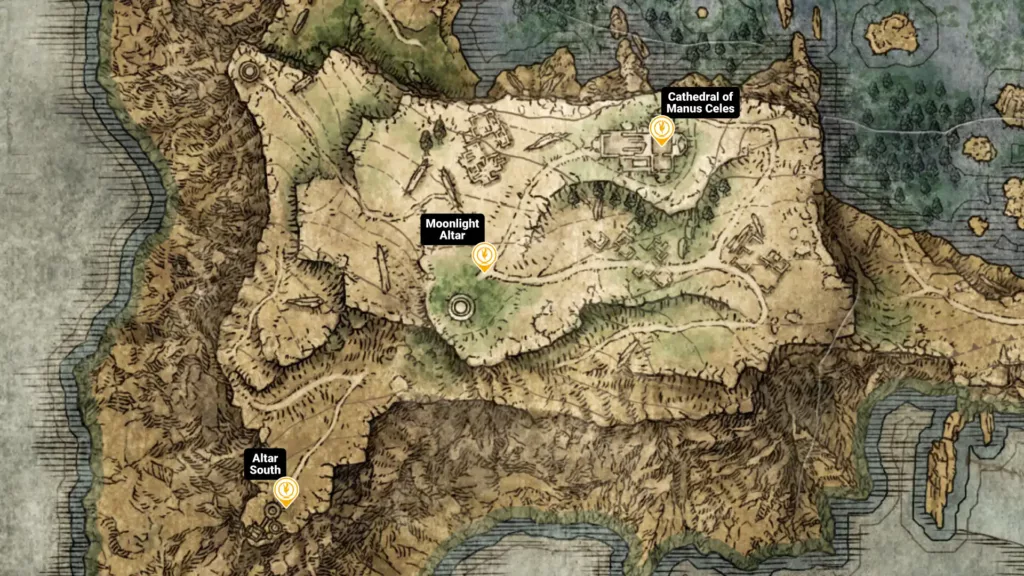
| Recommended level: | 90–100 |
| How to reach: | Explore the Lake of Rot and defeat Astel, then use the lift behind the boss arena |
| Key NPCs and quests: | Ranni the Witch |
| Essential pickups: | Dark Moon Ring, Somber Smithing Stones, Golden Seed |
| Major encounter: | Glintstone Dragon Adula |
| Biggest hazards: | Powerful dragon attacks, magic-heavy enemies |
The Moonlight Altar is a hidden plateau high above Liurnia of the Lakes, unlocked once you’ve defeated Astel, Naturalborn of the Void, at the end of the Lake of Rot. This secluded region marks the final destination of Ranni’s questline and features some of the most visually striking moments of Elden Ring.
From here, you’ll want to move to the Cathedral of Manus Celes as part of Ranni’s narrative. Before moving on, it’s a good idea to defeat Glintstone Dragon Adula, collect high-tier upgrade materials scattered across the plateau, and activate all nearby Sites of Grace.
Specific locations:
- Altar South
- Cathedral of Manus Celes
- Moonlight Altar
Mt. Gelmir

| Recommended level: | 90–100 |
| How to reach: | Travel west from Altus Plateau via the bridge north of the Grand Lift of Dectus, or follow the Seethewater River path |
| Key NPCs and quests: | Tanith, Patches |
| Essential pickups: | Smithing Stones, Somber Smithing Stones, Golden Seeds, Fire-based gear |
| Major encounter: | Full-Grown Fallingstar Beast |
| Biggest hazards: | Lava, narrow paths, heavy fire damage |
Mt. Gelmir stands tall at the western edge of the Altus Plateau and is considered to be one of the most hostile traversal-focused regions in Elden Ring. Collapsing bridges, winding mountain roads, enemy-filled ravines…you name it. It’s all about environmental hazards here, so brace yourself.
Exploration of Mt. Gelmir leads directly to Volcano Manor, an optional but narratively rich Legacy Dungeon. Before moving forward with this journey, consider upgrading your fire resistance where available, and prepare for ambush-heavy paths with limited room for mobility.
Specific locations:
- Seethewater River
- Seethewater Terminus
- First Mt. Gelmir Campsite
- Craftsman’s Shack
- Ninth Mt. Gelmir Campsite
- Road of Iniquity
- Gelmir Hero’s Grave
Volcano Manor
| Recommended level: | 100–110 |
| How to reach: | Traverse Mt. Gelmir, be abducted by the Abductor Virgin at Raya Lucaria, or accept Tanith’s invitation |
| Key NPCs and quests: | Tanith, Rya, Patches |
| Essential pickups: | Serpent-Hunter, Smithing Stones, Somber Smithing Stones, Golden Seed |
| Major encounter: | Rykard, Lord of Blasphemy |
| Biggest hazards: | Lava-filled areas, tricky interiors, powerful serpent enemies |
Deep within Mt. Gelmir sits Volcano Manor, one of Elden Ring’s most unconventional Legacy Dungeons. Progression is heavily reliant on NPC interactions, assassination quests, and a web of optional objectives that discourage traditional dungeon crawling. This region represents the mid-to-late game challenge spike, but offers substantial rewards.
Completing Volcano Manor lets you confront Rykard, Lord of Blasphemy, unlocking powerful loot, including the famous Blasphemous Blade, one of the best Faith weapons, and permanently alter the manor’s state. Completing finish Tanith’s contracts grants access to the optional areas and reveals the manor’s hidden passages.
Specific locations:
- Volcano Manor
- Guest Hall
- Prison Town Church
- Temple of Eiglay
- Audience Pathway
- Rykard, Lord of Blasphemy (boss arena)
Greyoll’s Dragonbarrow
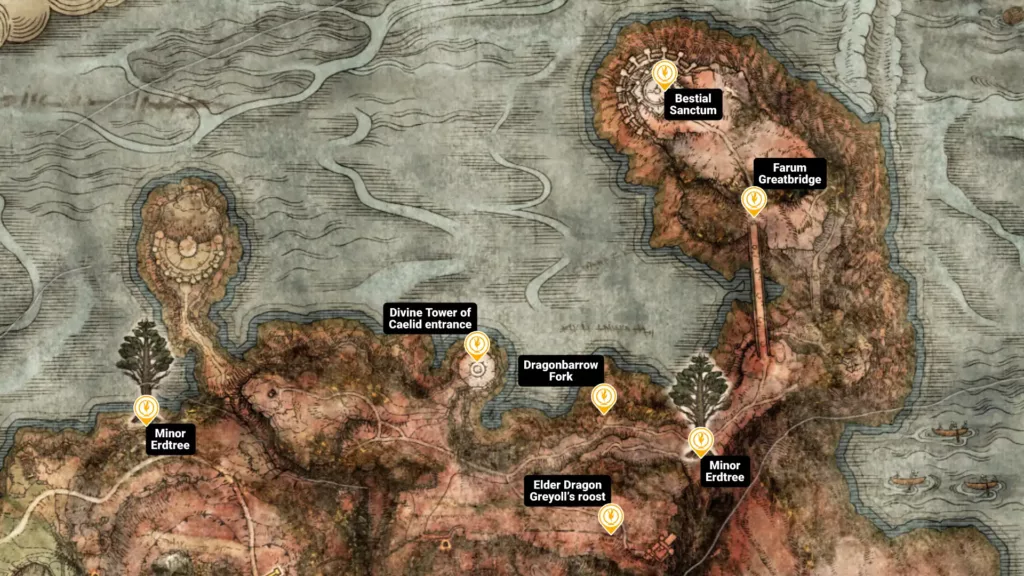
| Recommended level: | 90–110 |
| How to reach: | Travel north from Caelid via the Greatbridge, or teleport to Bestial Sanctum through the Sending Gate |
| Key NPCs and quests: | Gurranq, Beast Clergyman |
| Essential pickups: | Somber Smithing Stones, Golden Seeds, Dragon Hearts |
| Major encounter: | Elder Dragon Greyoll |
| Biggest hazards: | Extremely high-damage enemies, aggressive dragons |
Greyoll’s Dragonbarrow sits in the northeastern portion of Caelid and stands apart as one of Elden Ring’s deceptively dangerous zones. Although you can access it early on, it’s best approached later in the game. Standard enemies here hit nearly as hard as some of the endgame bosses.
Exploration here is tied to Gurranq, Beast Clergyman’s Deathroot questline, and optional dragon hunts (if you’re up for it). You should prioritize activating Sites of Grace, collecting top-tier Somber Smithing Stones, and selecting encounters deliberately instead of engaging enemies directly.
Specific locations:
- Bestial Sanctum
- Farum Greatbridge
- Dragonbarrow Fork
- Elder Dragon Greyoll’s roost
- Minor Erdtree (Dragonbarrow)
- Divine Tower of Caelid entrance
Leyndell, Royal Capital
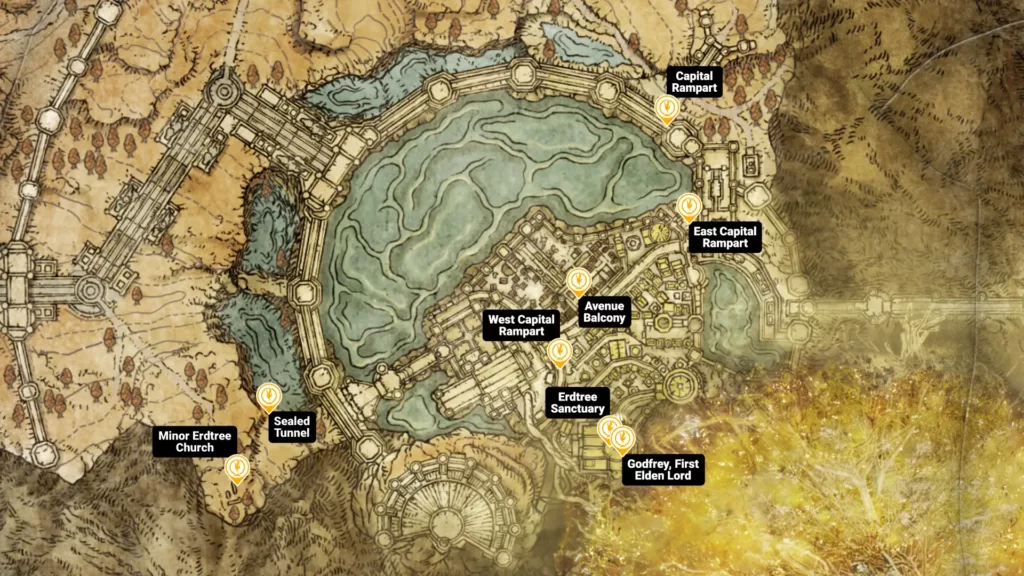
| Recommended level: | 100–110 |
| How to reach: | Move through the capital outskirts after defeating the Draconic Tree Sentinel |
| Key NPCs and quests: | Goldmask, Brother Corhyn, Melina |
| Essential pickups: | Smithing Stones, Golden Seeds, Leyndell Map Fragment |
| Major encounter: | Godfrey, First Elden Lord |
| Biggest hazards: | Heavy enemy patrols, lightning-based damage, and confusing city layout |
Leyndell, Royal Capital, is located at the base of the Erdtree and features one of the most intricate level designs in Elden Ring. The Draconic Tree Sentinel guards its access, marking a clear transition into endgame content.
Clearing Leyndell is essential for story progression and leads toward the Erdtree interior and the Mountaintops of the Giants. Before pushing forward, you should take time to explore the capital thoroughly. Its layout, rewards, and access points change permanently as the story advances, so, expect frequent ambushes and limited opportunity for free-flowing combat.
Specific locations:
- Capital Rampart
- Sealed Tunnel
- Minor Erdtree Church
- Avenue Balcony
- Erdtree Sanctuary
- West Capital Rampart
Forbidden Lands
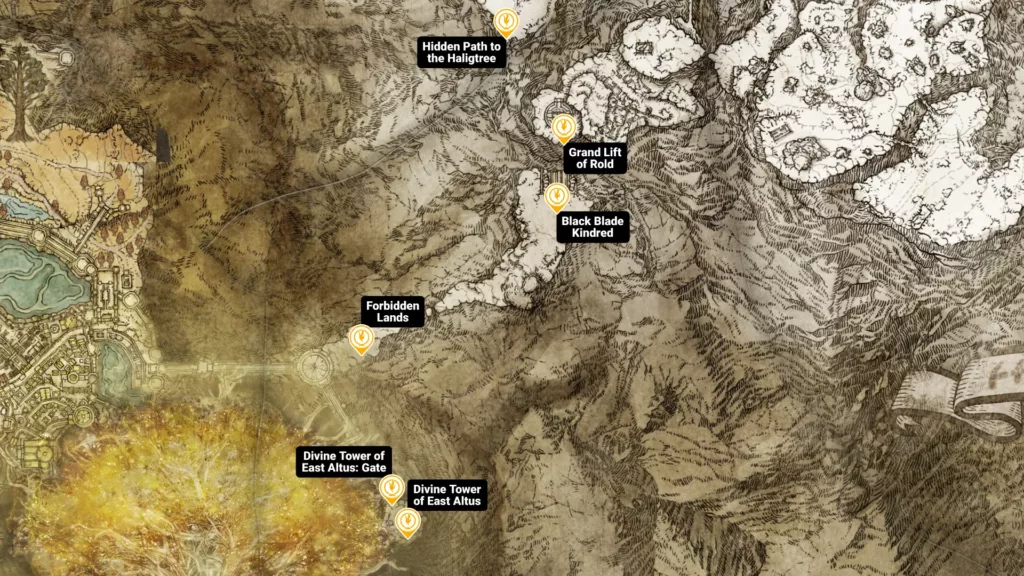
| Recommended level: | 110–120 |
| How to reach: | Exit Leyndell through the eastern gate after defeating Morgott |
| Key NPCs and quests: | Melina, Shabriri |
| Essential pickups: | Rold Medallion, Golden Seeds, Smithing Stones |
| Major encounter: | Black Blade Kindred |
| Biggest hazards: | Heavy fog reducing visibility, powerful enemies, narrow paths |
The Forbidden Lands form a bleak passage between Leyndell, Royal Capital, and the frozen north. Once you defeat Morgott, the Omen King, this region strips away the capital’s scale and awe, pushing you through fog, isolation, and sustained danger.
This area leads directly to the Grand Lift of Rold, the gateway to the Mountaintops of the Giants. Before advancing, remember to activate nearby Sites of Grace, gather upgrade materials, and ensure your character is adequately prepared through farming resources to be prepared for what lies ahead.
Specific locations:
- Forbidden Lands Site of Grace
- Hidden Path to the Haligtree entrance
- Grand Lift of Rold
- Divine Tower of East Altus: Gate
- Divine Tower of East Altus
Mountaintops of Giants
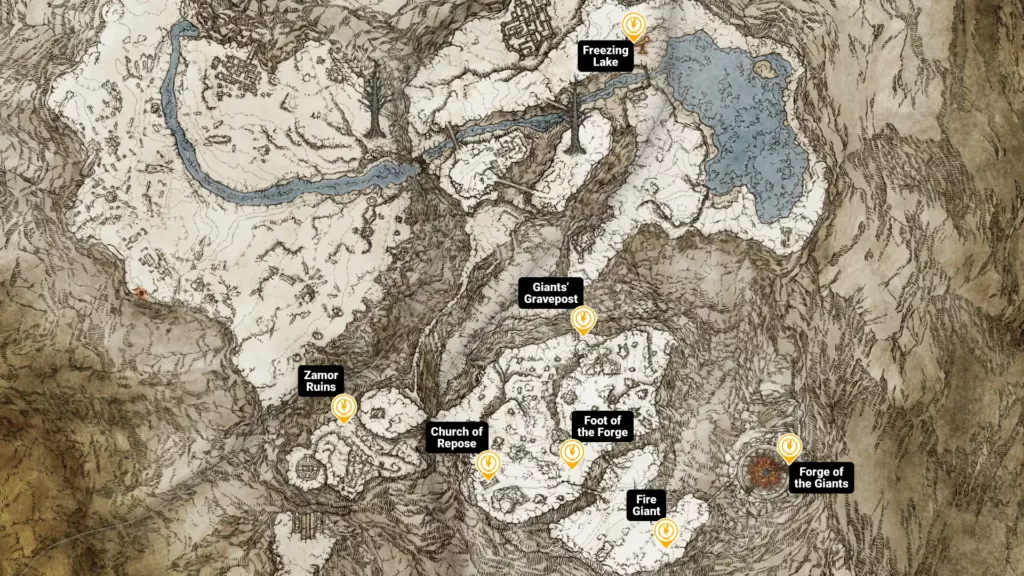
| Recommended level: | 110–120 |
| How to reach: | Use the Grand Lift of Rold after obtaining the Rold Medallion from Melina |
| Key NPCs and quests: | Melina, Shabriri |
| Essential pickups: | Mountaintops Map Fragment, Golden Seeds, Sacred Tears |
| Major encounter: | Fire Giant |
| Biggest hazards: | Extreme enemy damage, frequent ambushes in snowstorms |
The Mountaintops of the Giants lie across the frozen north beyond the Forbidden Lands, introducing extremely powerful enemies and environmental horrors. This region features sprawling enemy patrols, many of which can easily defeat you in a few hits.
Progression through this area leads directly to the Forge of the Giants and the Fire Giant boss encounter. Before you head into this monstrous encounter, secure both regional map fragments,thoroughly upgrade your flasks, and activate those Sites of Grace.
Specific locations:
- Zamor Ruins
- Giants’ Gravepost
- Freezing Lake
- Church of Repose
- Foot of the Forge
- Fire Giant (boss arena)
- Forge of the Giants
Flame Peak
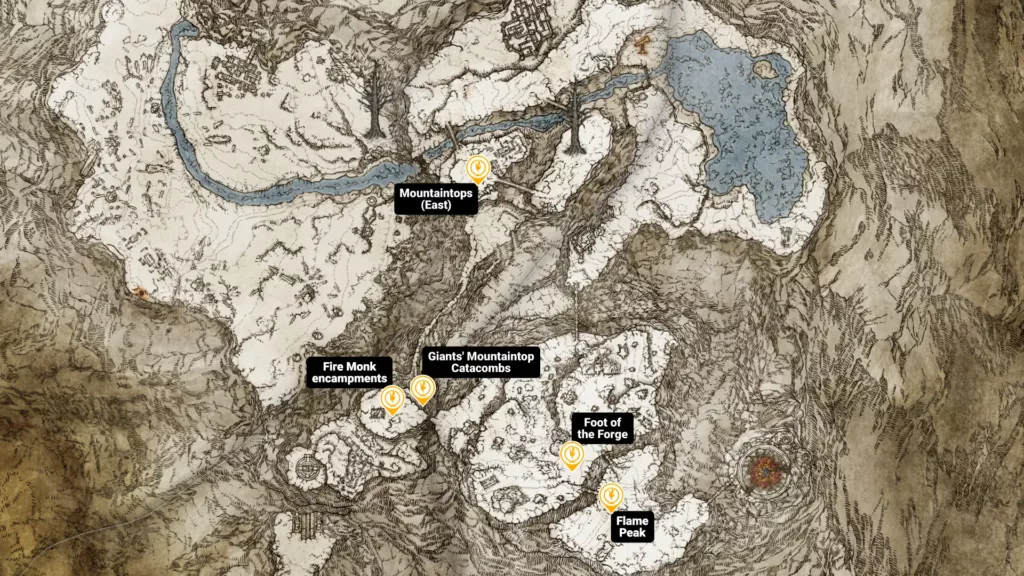
| Recommended level: | 110–120 |
| How to reach: | Travel east through the Mountaintops of the Giants beyond Zamor Ruins |
| Key NPCs and quests: | N/A |
| Essential pickups: | Golden Seeds, Fire-based incantations, Smithing Stones |
| Major encounter: | Flame Guardian elites |
| Biggest hazards: | Fire-based enemies, aggressive mobs, wide combat spaces with limited cover |
The Flame Peak is a subregion of the Mountaintops of the Giants, marked by scorched terrain and dangerous enemies. It marks an escalation in enemy aggression and damage output, reinforcing the game’s endgame expectations. Combat here favors careful positioning over reckless attacks.
As you move through Flame Peak, the path forward tightens, and any margin for error becomes minimal. Enemy pressure ramps up near the Forge of Giants, with Flame Guardians and Fire Monks forcing prolonged battles where positioning and stamina management become more important than dealing raw damage.
Specific locations:
- Flame Peak Site of Grace
- Fire Monk encampments
- Eastern Mountaintops traversal routes
- Foot of the Forge
- Giants’ Mountaintop Catacombs
Subterranean Shunning-Grounds
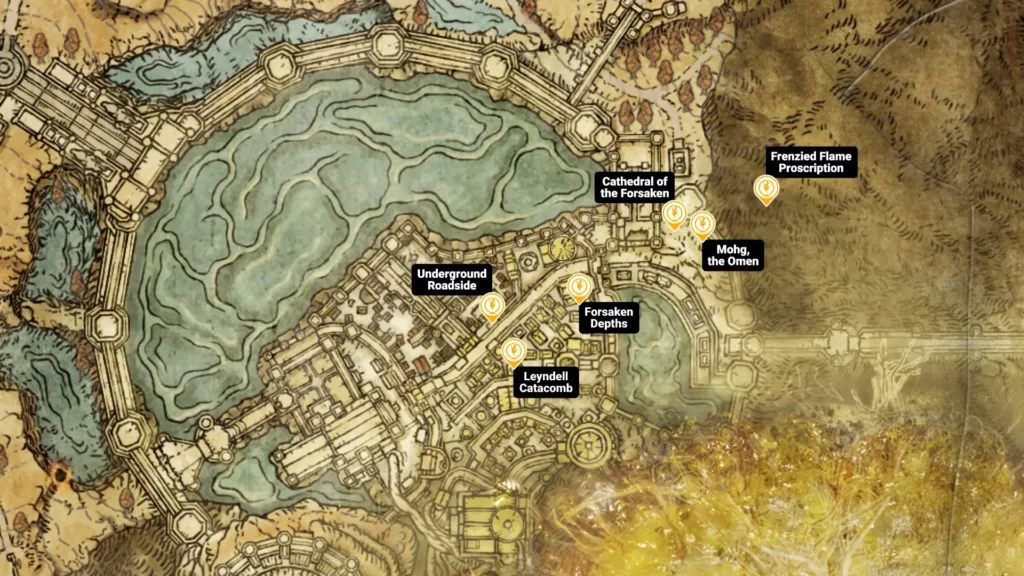
| Recommended level: | 110–120 |
| How to reach: | Descend into the sewers beneath Leyndell, Royal Capital, via hidden wells and tunnels |
| Key NPCs and quests: | Dung Eater, Hyetta |
| Essential pickups: | Seedbed Curses, Golden Seeds, high-tier Smithing Stones |
| Major encounter: | Mohg, the Omen |
| Biggest hazards: | Confusing layout, dangerous ambushes, Frenzy and bleed buildup |
This eerie and labyrinthine place lies beneath Leyndell, Royal Capital. It’s accessed through hidden paths in the capital, where sewer networks replace grand vistas with a network of claustrophobic tunnels packed with elite enemies and traps.
Progressing through this place is essential if you’re doing Dung Eater’s questline, and it unlocks the path to the Frenzied Flame Proscription. You should focus on carefully mapping routes, collecting Seedbed Curses, and preparing for status effects common in tight spaces.
Specific locations:
- Underground Roadside
- Forsaken Depths
- Leyndell Catacombs
- Frenzied Flame Proscription
- Cathedral of the Forsaken
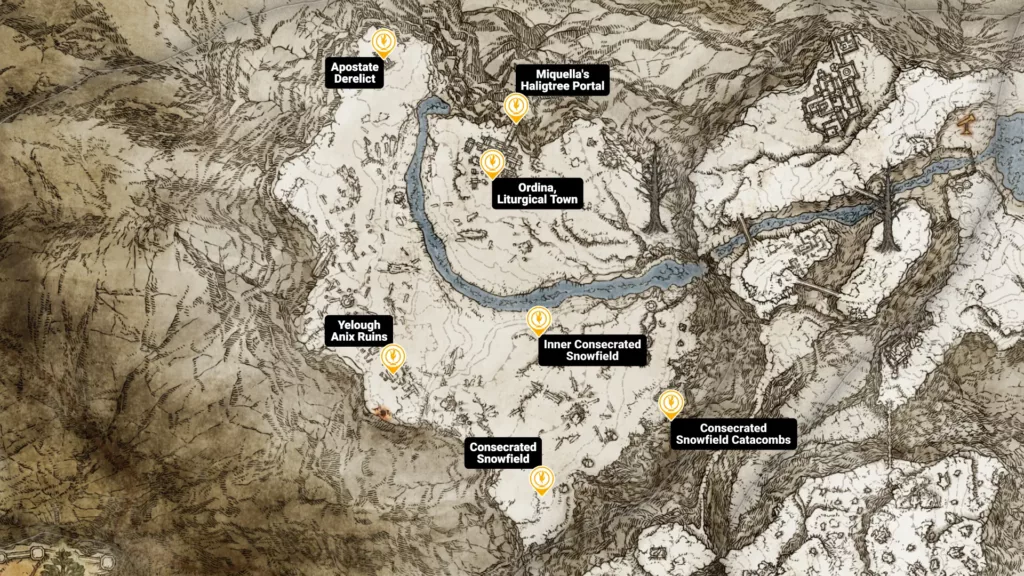
Consecrated Snowfield
| Recommended level: | 120–140 |
| How to reach: | Use the Grand Lift of Rold with the Secret Haligtree Medallion |
| Key NPCs and quests: | Latenna the Albinauric, Millicent |
| Essential pickups: | Consecrated Snowfield Map Fragment, Golden Seeds, Ancient Dragon Smithing Stones |
| Major encounter: | Death Rite Bird |
| Biggest hazards: | Near-zero visibility blizzards, high-damage foes, surprise ambushes |
The Consecrated Snowfield is a hidden, late-game region branching from the Grand Lift of Rold. You must obtain both halves of the Secret Haligtree Medallion to unlock it, which is a significant milestone on its own. The challenges here are extreme, and enemies scale well beyond the Mountaintops of the Giants.
This region serves as the gateway to Miquella’s Haligtree, one of the most difficult areas in the game. Before moving on, you should secure the map fragment to navigate blizzard zones, activate multiple Sites of Grace, and prepare for constant ambushes.
Specific locations:
- Consecrated Snowfield
- Inner Consecrated Snowfield
- Ordina, Liturgical Town
- Apostate Derelict
- Consecrated Snowfield Catacombs
- Yelough Anix Ruins
- Portal to Miquella’s Haligtree
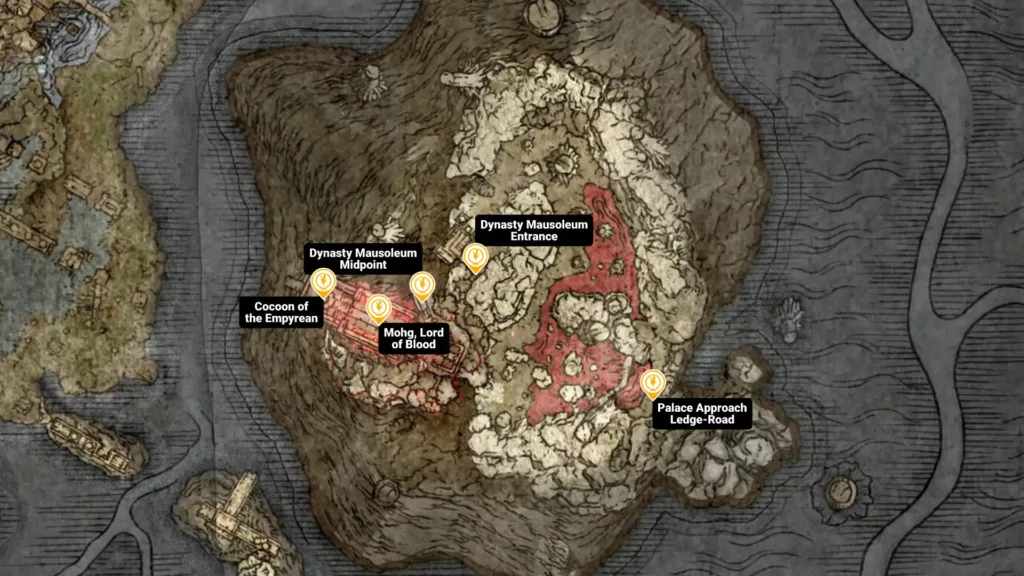
Mohgwyn Palace
| Recommended level: | 120–140 |
| How to reach: | Use the Pureblood Knight’s Medal from White-Faced Varre or a portal in the Consecrated Snowfield |
| Key NPCs and quests: | White-Faced Varre, Mogh |
| Essential pickups: | Ancient Dragon Smithing Stones, Somber Ancient Dragon Smithing Stones, Lord of Blood’s Exultation |
| Major encounter: | Mohg, Lord of Blood |
| Biggest hazards: | Massive rune-farming enemy groups, dangerous bleed buildup |
Mohgwyn Palace is a hidden region located deep underground, accessed through multiple ways. Although it’s optional, it’s a rewarding farming spot and combat practice zone. The enemies here have scaled well beyond most of the game, making the difficulty notably high.
Progression through Mohgwyn Palace culminates in a mandatory boss fight with Mohg, Lord of Blood. Fully upgrade weapons and flasks, and prepare bleed resistance tools. A Purifying Crystal Tear mixed into a Flask of Wondrous Physick nullifies the devastating Bloodboon Ritual.
Specific locations:
- Palace Approach Ledge-Road
- Dynasty Mausoleum Entrance
- Dynasty Mausoleum Midpoint
- Cocoon of the Empyrean
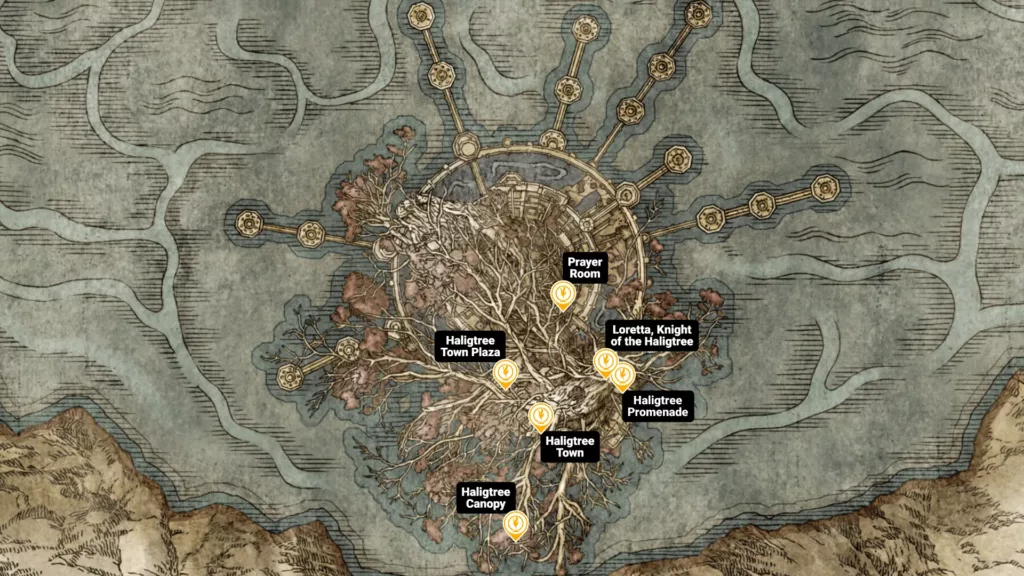
Miquella’s Haligtree
| Recommended level: | 130–150 |
| How to reach: | Solve Ordina, Liturgical Town puzzle and use the portal in the Consecrated Snowfield |
| Key NPCs and quests: | Millicent, Latenna |
| Essential pickups: | Ancient Dragon Smithing Stones, high-tier Somber Smithing Stones, Golden Seeds |
| Major encounter: | Loretta, Knight of the Haligtree |
| Biggest hazards: | Extreme enemy density, lethal branch traversal |
Miquella’s Haligtree is a meticulously designed endgame region that’s accessible once you complete the hidden Ordina puzzle in the Consecrated Snowfield. It’s built vertically along massive tree branches, with an emphasis on precise movement and endurance.
Progression through this region leads you to Elphael, Brace of the Haligtree, where the game’s most famous encounter awaits. But, before you head there, prepare yourself for multi-enemy engagements and expect heavy ranged attacks. One misstep, and you’re back to the last Site of Grace.
Specific locations:
- Haligtree Canopy
- Haligtree Town
- Haligtree Town Plaza
- Haligtree Promenade
Elphael, Brace of Haligtree
| Recommended level: | 130–150+ |
| How to reach: | Move down from Miquella’s Haligtree after defeating Loretta, Knight of the Haligtree |
| Key NPCs and quests: | Millicent, Gowry |
| Essential pickups: | Ancient Dragon Smithing Stones, Somber Ancient Dragon Smithing Stones, Golden Seeds |
| Major encounter: | Malenia, Blade of Miquella |
| Biggest hazards: | Extremely aggressive enemies, Scarlet Rot zones, little to no room for error |
This place serves as the base of Miquella’s Haligtree and stands as one of Elden Ring’s most demanding Legacy Dungeons. Here is where you fight against Malenia, Blade of Miquella, widely considered to be among one of the hardest and lore-heavy boss encounters in the game.
Before you even think of meeting Malenia, consider completing Millicent’s quest for unique rewards. Also, fully upgrade weapons and flasks, and carefully map the route through rot-infested areas. Expect relentless pressure from elite enemies, ambushes from multiple elevations, and a boss encounter that demands near-perfect combat skills.
Specific locations:
- Prayer Room
- Elphael Inner Wall
- Drainage Channel
- Haligtree Roots
- Malenia, Goddess of Rot
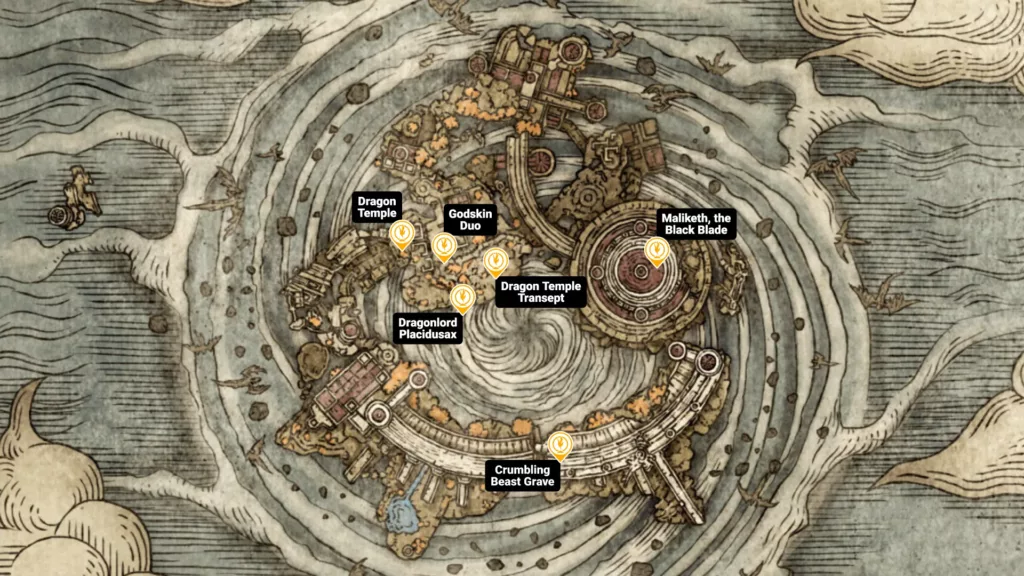
Crumbling Farum Azula
| Recommended level: | 130–150 |
| How to reach: | Triggers automatically after completing the Forge of the Giants sequence |
| Key NPCs and quests: | Alexander, Iron Fist, Bernahl |
| Essential pickups: | Ancient Dragon Smithing Stones, Somber Ancient Dragon Smithing Stones, high-quality talismans |
| Major encounter: | Maliketh, the Black Blade |
| Biggest hazards: | Extremely vertical pathways, constant ambushes, lightning and wind-based enemies |
Crumbling Farum Azula is a beautiful place lost in time, floating around as a ruin that unlocks after you complete events at the Forge of the Giants. It serves as one of the final Legacy Dungeons in the game, trading traditional gameplay for fragmented platforms, violent storms, and relentless enemy pressure.
Clearing Farum Azula is mandatory for story progression and culminates in a confrontation with Maliketh, the Black Blade. Before you fight this boss, explore side paths for top-tier loot and complete Alexander’s quest objectives. Also, prepare yourself to fight the Godskin Duo. It’s a difficult encounter, but worth it.
Specific locations:
- Crumbling Beast Grave
- Dragon Temple
- Dragon Temple Transept
- Godskin Duo (boss arena)
- Dragonlord Placidusax (boss arena) (hidden)
- Maliketh, the Black Blade boss arena
Leyndell, Ashen Capital
| Recommended level: | 140–150 |
| How to reach: | Unlocks once you complete Crumbling Farum Azula |
| Key NPCs and quests: | Sir Gideon Ofnir, Melina |
| Essential pickups: | Legendary loot, high-tier Smithing Stones, final talismans |
| Major encounter: | Godfrey, First Elden Lord (Hoarah Loux) |
| Biggest hazards: | Elite enemies, limited safe zones |
Leyndell, Ashen Capital, is a transformed version of the royal city, buried beneath ash after the events that take place at Crumbling Farum Azula. This place marks the game’s final stage, right before you earn the ending you’ve been working toward.
This region leads directly into the final sequence of bosses within the Erdtree. You need to prepare for consecutive high-stakes encounters by fully upgrading your flasks, weapons, and respeccing if necessary. Also, complete any side quests you need to before you fight the final boss.
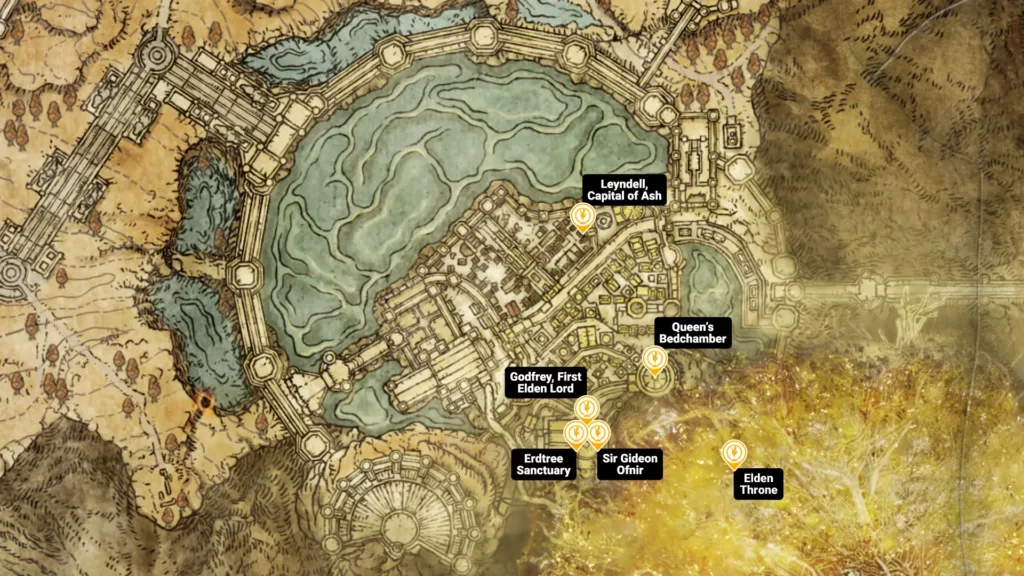
Specific locations:
- Leyndell, Capital of Ash
- Erdtree Sanctuary
- Queen’s Bedchamber
- Elden Throne
What Are Sites Of Grace?
In Elden Ring, Sites of Grace act as the game’s primary checkpoints and progression hubs as the Tarnished navigates the Lands Between. Here are some of the primary functions they serve:
- Replenish stats and flasks: Restoring at a Site of Grace fully heals HP and FP while refilling Crimson and Cerulean Flasks.
- Level up: Sites of Grace allow you to spend runes to increase attributes, shaping builds, and scaling damage and survivability.
- Fast travel: Once discovered, Sites of Grace act as fast-travel points, letting you teleport freely.
- Manage flasks: You can allocate flask charges between HP and FP, and upgrade them using Golden Seeds and Sacred Tears.
- Mix Wondrous Physick: This flask can be customized by combining Crystal Tears for powerful, temporary buffs.
- Memorize spells: Sorceries and incantations can be equipped and adjusted, allowing you to adapt magic loadouts.
- Ashes of War: You can manage your Ashes of War and modify a weapon’s abilities and scaling to suit your build.
- Great Runes: After defeating shardbearers, Great Runes can be equipped and activated at Sites of Grace.
- Chest storage: You can organize and store excess items, so your inventory doesn’t feel all over the place.
- Alter garments: Certain armor pieces can be modified here.
- Pass time: You can advance time from day to night (or vice versa), enabling access to time-of-day-specific bosses and events.
- Talk to NPCs: Some NPC interactions and story moments trigger specifically at Sites of Grace.
- Respawn enemies: Resting resets most enemies in the world, letting you rune-farm but also making things challenging again.
Explore New RPG Worlds
When you’ve accomplished your goals as the Elden Lord and unlocked all the Sites of Grace in Elden Ring, there is a world of games out there waiting to be explored. Some of the top RPGs on Steam may help fill the void left by Elden Ring once you’re done with the game.
Alternatively, you can check out a unique collection of RPGs that cater to players who enjoy strategy, tactics, creativity, and powerful worldbuilding.
Elden Ring Sites of Grace FAQ
Below are some quick answers to the most common questions regarding Sites of Grace in Elden Ring.
Which Sites of Grace Are Required To Reach Key Bosses?
Sites of Grace that appear along the main story path are usually the ones that lead you to mandatory bosses. Some of these include Margit, Morgott, the Fire Giant, and so on. However, most optional areas can be reached without activating Sites of Grace.
How Many Sites of Grace Are There in Elden Ring?
Elden Ring’s base game includes over 314 Sites of Grace spread all across the map. The high number reflects an open-ended approach to adventuring and the hours of promising content.
How Many Sites of Grace Are in Elden Ring DLC?
The Shadow of the Erdtree DLC adds around 105 Sites of Grace across its new regions, in support of the expanded map and different landscapes.